User Manual v1.0 2023.
This document is copyrighted by DJI with all rights reserved. Unless otherwise authorized by DJI, you are not eligible to use or allow others to use the document or any part of the document by reproducing, transferring or selling the document. Users should only refer to this document and the content thereof as instructions to operate DJI UAV. The document should not be used for other purposes. Searching for Keywords Search for keywords such as “battery” and “install” to find a topic.
DJI Mavic 3 Pro User Manual Using this Manual Legend Important Hints and Tips Reference Read Before the First Flight DJITM provides users with tutorial videos and the following documents: 1. Safety Guidelines 2. Quick Start Guide 3. User Manual It is recommended to watch all tutorial videos and read the safety guidelines before using for the first time. Prepare for your first flight by reviewing the Quick Start Guide and refer to this User Manual for more information.
DJI Mavic 3 Pro User Manual Download DJI Assistant 2 Download DJI ASSISTANTTM 2 (Consumer Drones Series) https://www.dji.com/mavic-3-pro/downloads • The operating temperature of this product is -10° to 40° C. It does not meet the standard operating temperature for military-grade application (-55° to 125° C), which is required to endure greater environmental variability. Operate the product appropriately and only for applications that meet the operating temperature range requirements of that grade.
Contents Using this Manual 3 Legend 3 Read Before the First Flight 3 Video Tutorials 3 Download the DJI Fly App 3 Download DJI Assistant 2 4 Product Profile 9 Introduction 9 Feature Highlights Using for the First Time 9 10 Preparing the Aircraft 10 Preparing the Remote Controller 11 Activating the DJI Mavic 3 Pro Aircraft 12 Binding the Aircraft and Remote Controller 12 Updating Firmware Overview 12 13 Aircraft 13 DJI RC Pro 14 DJI RC Remote Controller 17 Flight Safety 20
DJI Mavic 3 Pro User Manual QuickShots 32 Hyperlapse 34 Waypoint Flight 36 Cruise Control 40 Aircraft 42 Flight Modes 42 Aircraft Status Indicators 43 Return to Home 44 Smart RTH 44 Low Battery RTH 47 Failsafe RTH 48 Landing Protection 49 Precision Landing Vision Systems and Infrared Sensing System Detection Range 50 Using the Vision System 51 Advanced Pilot Assistance Systems (APAS 5.
DJI Mavic 3 Pro User Manual Remote Controller Alert 71 Optimal Transmission Zone 71 Linking the Remote Controller 72 Operating the Touchscreen 73 Advanced Features DJI RC 75 76 Operation 76 Remote Controller LEDs 80 Remote Controller Alert 81 Optimal Transmission Zone 81 Linking the Remote Controller 82 Operating the Touchscreen 83 Advanced Features 85 DJI Fly App 87 Home 87 Camera View 88 Buttons Description Screen Shortcuts Settings 88 91 92 Safety 92 Control 93 Camera
Product Profile This chapter introduces the major features of the product. 8 © 2023 DJI All Rights Reserved.
DJI Mavic 3 Pro User Manual Product Profile Introduction DJI Mavic 3 Pro features both an infrared sensing system and omnidirectional vision systems, allowing for hovering and flying indoors, outdoors, and for automatic Return to Home while avoiding obstacles in all directions. The aircraft has a maximum flight speed of 47 mph (75.6 kph) and a maximum flight time of 43 minutes. The DJI RC Pro and DJI RC remote controllers have a built-in 5.5-in screen with a resolution of 1920×1080 pixels.
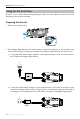
DJI Mavic 3 Pro User Manual Using for the First Time DJI Mavic 3 Pro is folded before being packaged. Follow the steps below to unfold the aircraft and prepare the remote controller. Preparing the Aircraft 1. Remove the storage cover. 2 1 2. All Intelligent Flight Batteries are in hibernation mode before shipment to ensure safety. Use the provided charger to charge and activate the Intelligent Flight Batteries for the first time. a.
DJI Mavic 3 Pro User Manual 3. Unfold the front arms, followed by the rear arms, and then the propeller blades. • Charger is not included with Mavic 3 Pro (Drone Only). It is recommended to use a PD 65W (or above) charger to charge the Intelligent Flight Battery. • Use a power cable with compatible specifications for charging, and use a power adapter if necessary. • Make sure to unfold the front arms before unfolding the rear arms.
DJI Mavic 3 Pro User Manual 4. The remote controller needs to be activated before first use and an internet connection is required for activation. Press, and then press again and hold the power button to power on the remote controller. Follow the on-screen prompts to activate the remote controller. Follow the steps below to prepare the DJI RC remote controller. 1. Remove the control sticks from the storage slots on the remote controller and screw them into place. 2 1 2.
DJI Mavic 3 Pro User Manual Overview Aircraft 2 7 8 6 B A 1 2 C 3 10 4 9 5 16 11 17 13 14 12 1. 15 Gimbal and Camera A. Tele Camera 8. Propellers 9. Aircraft Status Indicators B. Medium Tele Camera 10. Landing Gear (Built-in antennas) C. Hasselblad Camera 11. Upward Vision System 2. Horizontal Omnidirectional Vision System 12. Intelligent Flight Battery 3. Auxiliary Light 4. Downward Vision System 5. Infrared Sensing System 6. Front LEDs 7. Motors 13.
DJI Mavic 3 Pro User Manual DJI RC Pro 1 2 3 4 5 8 6 9 7 10 16 17 11 12 13 1. Antennas Transmit control and video wireless signals between the remote controller and the aircraft. 2. Back/Function Button Press once to return to the previous screen. Press twice to return to the home screen. Use the back button in combinations with other buttons for additional functions. Refer to the Remote Controller Button Combinations section for more information. 3.
DJI Mavic 3 Pro User Manual 10. Touchscreen Touch the screen to operate the remote controller. Note that the touchscreen is not waterproof. Operate with caution. 11. microSD Card Slot For inserting a microSD card. 12. USB-C Port For charging and connecting the remote controller to the computer. 13. Mini HDMI Port For outputting HDMI signal to an external monitor. 14. Gimbal Dial Controls the tilt of the camera. 15. Record Button Press once to start or stop recording. 16.
DJI Mavic 3 Pro User Manual 20 21 24 23 22 25 20. Air Vent For heat dissipation. Do not block the air vent during usage. 21. Control Sticks Storage Slot For storing the control sticks. 22. Customizable C1 Button Switch between recentering the gimbal and pointing the gimbal downward. Set the function in DJI Fly by entering Camera View > Settings > Control > Button Customization. 23. Speaker Outputs sound. 24. Customizable C2 Button Press once to turn the auxiliary light on or off.
DJI Mavic 3 Pro User Manual DJI RC Remote Controller 1 2 4 7 3 11 5 6 13 15 12 10 1. 9 14 8 Control Sticks Use the control sticks to control the aircraft movements. Set the stick mode in DJI Fly. The control sticks are removable and easy to store. 2. Status LED Indicates the status of the remote controller. 3. Battery Level LEDs Display the battery level of the remote controller. 4.
DJI Mavic 3 Pro User Manual 12. Record Button Press once to start or stop recording. 13. Camera Control Dial Control zoom in/out by default. Set the function in DJI Fly by entering Camera View > Settings > Control > Button Customization. 14. Focus/Shutter Button Press halfway down on the button to autofocus and press all the way down to take a photo. Press once to switch to photo mode when in record mode. 15. Speaker Outputs sound. 16 17 18 16. Control Sticks Storage Slot For storing the control sticks.
Flight Safety This section describes safe flight practices and flight restrictions. © 2023 DJI All Rights Reserved.
DJI Mavic 3 Pro User Manual Flight Safety Once pre-flight preparation is complete, it is recommended to hone your flight skills and practice flying safely. Pick a suitable area to fly in according to the following flight requirements and restrictions. Make sure you understand and comply with the local laws and regulations before flying. Read the Safety Guidelines before flight to ensure the safe use of the product. Flight Environment Requirements 1.
DJI Mavic 3 Pro User Manual 4. DO NOT use an aircraft that has been crashed or accidentally damaged or an aircraft that is not in good condition. 5. Make sure to train sufficiently and have contingency plans for emergencies or when an incident occurs. 6. Make sure to have a flight plan. DO NOT fly the aircraft recklessly. 7. Respect the privacy of others when using the camera. Make sure to comply with local privacy laws, regulations, and moral standards. 8.
DJI Mavic 3 Pro User Manual Max Altitude Home Point Max Distance Height of aircraft when taking off Home Point not manually updated during flight Strong GNSS Signal Flight Restrictions Prompt in DJI Fly App Max Altitude Altitude of the aircraft cannot exceed the value Max flight altitude reached. set in the DJI Fly app. Max Distance The straight-line distance from the aircraft to the Home Point cannot exceed the max flight Max flight distance reached. distance set in the DJI Fly app.
DJI Mavic 3 Pro User Manual GEO Zones DJI’s GEO system designates safe flight locations, provides risk levels and safety notices for individual flights and offers information on restricted airspace. All restricted flight areas are referred to as GEO Zones, which are further divided into Restricted Zones, Authorization Zones, Warning Zones, Enhanced Warning Zones, and Altitude Zones. Users can view such information in real-time in the DJI Fly app.
DJI Mavic 3 Pro User Manual Auto Landing Use the Auto Landing function: 1. Tap . If conditions are safe for landing, press and hold the button to confirm. 2. Auto landing can be cancelled by tapping . 3. If the Downward Vision System is working normally, Landing Protection will be enabled. 4. Motors will stop automatically after landing. • Choose the proper place for landing.
DJI Mavic 3 Pro User Manual Controlling the Aircraft The control sticks of the remote controller can be used to control the aircraft movements. The control sticks can be operated in Mode 1, Mode 2, or Mode 3, as shown below. The default control mode of the remote controller is Mode 2. Refer to the Remote Controller section for more details.
DJI Mavic 3 Pro User Manual Takeoff/Landing Procedures 1. Place the aircraft in an open, flat area with the aircraft rear facing towards the user. 2. Power on the remote controller and the aircraft. 3. Launch DJI Fly and enter the camera view. 4. Tap Settings > Safety, and then set the Obstacle Avoidance Action to Bypass or Brake. Make sure to set an appropriate Max Altitude and RTH Altitude. 5. Wait for the aircraft self-diagnostics to complete.
DJI Mavic 3 Pro User Manual Intelligent Flight Modes FocusTrack FocusTrack includes Spotlight 2.0, Point of Interest 3.0, and ActiveTrack 5.0. • Refer to the Remote Controller and Controlling the Aircraft sections for more information about the roll, pitch, throttle, and yaw control sticks. Spotlight 2.0 Description Control the aircraft manually while the camera remains locked on the subject. Supported Subjects Control Obstacle Avoidance Point of Interest 3.0 (POI 3.
DJI Mavic 3 Pro User Manual ActiveTrack 5.0 Trace Parallel After setting the tracking direction (the default direction is Back), the aircraft tracks the subject as its moving direction, and the orientation towards the subject keeps constant as the tracking direction. The aircraft tracks the subject at a constant angle and distance from the side as the tracking starts. • In Trace mode, the direction setting is only available when the subject is moving in a stable direction.
DJI Mavic 3 Pro User Manual Using FocusTrack 1. Takeoff. 2. Drag-select the subject in the camera view, or enable Subject Scanning under Control settings in DJI Fly and tap the recognized subject to enable FocusTrack. • FocusTrack must be used within the supported zoom ratio as follows, otherwise it will affect subject recognition: a. Spotlight/Point of Interest: supports moving subjects such as vehicles, boats, people, and stationary subjects up to 7x zoom.
DJI Mavic 3 Pro User Manual c. Tap on the bottom of the screen to switch to ActiveTrack. In Trace mode, the tracking direction can be changed using the direction wheel (Front, Back, Left, Right, Front Diagonal Left, Front Diagonal Right, Back Diagonal Left, and Back Diagonal Right). The direction wheel will be minimized if there is no operation for an extended period or any other area of the screen is tapped.
DJI Mavic 3 Pro User Manual • In supported moving subjects, vehicles and boats refer to cars and small to mediumsized yachts. DO NOT track a remotely controlled model car or boat. • The tracking subject may inadvertently swap to another subject if they pass by each other. • FocusTrack is disabled in Explore mode, or when recording in 5.1K and 120fps and above, and Apple ProRes 422HQ/422/422LT.
DJI Mavic 3 Pro User Manual Exiting MasterShots Press the flight pause button once or tap and hover. in DJI Fly to exit MasterShots. The aircraft will brake • Use MasterShots at locations that are clear of buildings and other obstacles. Make sure there are no humans, animals, or other obstacles in the flight path. When the lighting is sufficient and the environment is suitable for vision systems, the aircraft will brake and hover in place if there is an obstacle detected.
DJI Mavic 3 Pro User Manual Using QuickShots 1. Launch the aircraft and make it hover at least 2 m (6.6 ft) above ground. 2m 2. In DJI Fly, tap the shooting mode icon to select QuickShots and follow the prompts. Make sure you understand how to use the shooting mode and there are no obstacles in the surrounding area. 3. Choose a shooting mode, drag-select your target subject in the camera view, and tap Start to begin recording. The aircraft will fly back to its original position once shooting is finished.
DJI Mavic 3 Pro User Manual c. When the subject is similar in color or pattern with the surroundings. d. When the subject is in the air. e. When the subject is moving fast. f. When the lighting is extremely low (<300 lux) or high (>10,000 lux). • DO NOT use QuickShots in places close to buildings or where the GNSS signal is weak, otherwise the flight path will become unstable. • Make sure to follow local privacy laws and regulations when using QuickShots.
DJI Mavic 3 Pro User Manual 2. Drag-select a subject on the screen. Use the yaw stick and gimbal dial to adjust the frame. 3. Tap the shutter/record button to begin. Course Lock Course Lock allows the user to fix the flight direction. When using Course Lock, the user may either select an object so that the camera will always face the subject or not select an object so that the user can control the aircraft orientation and gimbal. Follow the steps below to operate Course Lock: 1.
DJI Mavic 3 Pro User Manual Waypoint Flight Waypoint Flight enables the aircraft to capture images during a flight according to the waypoint flight route generated by the preset waypoints. Points of Interest (POI) can be linked to the waypoints. The heading will point toward the POI during flight. A waypoint flight route can be saved and repeated. Using Waypoint Flight 1. Enable Waypoint Flight Tap on the left of the camera view in DJI Fly to enable Waypoint Flight. 2.
DJI Mavic 3 Pro User Manual Settings Tap the waypoint number for settings, the waypoint parameters are described as follows: Camera Action The camera action at the waypoint. Choose between None, Take Photo, and Start or Stop Recording. Altitude The altitude at the waypoint from the take-off point. Ensure to take off at the same take-off altitude to obtain better performance when a Waypoint Flight is repeated. Speed The flight speed at the waypoint.
DJI Mavic 3 Pro User Manual Hovering Time The duration of the aircraft hovering time at the current waypoint. * Before selecting POI for heading or gimbal tilt, make sure there are POIs in the flight route. If a POI is linked to a waypoint, the heading and gimbal tilt of the waypoint will be reset to toward the POI. All the settings except camera action can be applied to all waypoints after selecting Apply to All. Tap to delete the current selected waypoint. 3.
DJI Mavic 3 Pro User Manual a. Tap GO to upload the waypoint flight task. Tap return to the waypoint flight parameter settings. to cancel the uploading process and b. The waypoint flight task will be performed after being uploaded, the flight duration, waypoints, and distance and will be displayed on the camera view. The control stick input will change the flight speed during a Waypoint Flight. c. Tap to pause the Waypoint Flight after the task begins. Tap to continue the Waypoint Flight.
DJI Mavic 3 Pro User Manual Cruise Control The cruise control function enables the aircraft to lock the current control stick input of the remote controller when conditions permit. Fly at the speed corresponding to the current control stick input without continually using control stick movements. The cruise control feature also supports aircraft movements such as spiraling up by increasing the control stick input. Using Cruise Control 1.
Aircraft DJ I Ma vic 3 Pro c ontains a flight controller, video downlink system, vision systems, infrared sensing system, propulsion system, and an Intelligent Flight Battery. © 2023 DJI All Rights Reserved.
DJI Mavic 3 Pro User Manual Aircraft DJI Mavic 3 Pro contains a flight controller, video downlink system, vision systems, infrared sensing system, propulsion system, and an Intelligent Flight Battery. Flight Modes DJI Mavic 3 Pro supports the following flight modes. The flight modes can be switched via the Flight Mode switch on the remote controller. Normal Mode The aircraft utilizes GNSS, the Horizontal, Upward, and Downward Vision Systems, and the Infrared Sensing System to locate and stabilize itself.
DJI Mavic 3 Pro User Manual • A minimum braking distance of 10 m is required in windless conditions while the aircraft is ascending and descending in Sport mode or Normal mode. • The responsiveness of the aircraft significantly increases in Sport mode, which means a small control stick movement on the remote controller translates into the aircraft moving a large distance. Make sure to maintain adequate maneuvering space during flight.
DJI Mavic 3 Pro User Manual After the motors start, the front LEDs blink red and green alternately, and the aircraft status indicators blink green. The green lights indicate the aircraft is a UAV and the red lights indicate the heading and position of the aircraft. • To obtain better footage, the front LEDs turn off automatically when shooting if the front LEDs are set to auto in DJI Fly. Lighting requirements vary depending on the region. Observe local laws and regulations.
DJI Mavic 3 Pro User Manual and transmission signals. The optimal RTH path means the aircraft will travel the shortest distance possible, reducing the amount of battery power used and increasing flight time. 2. Preset: if the aircraft is further than 50 m from the Home Point when RTH begins, the aircraft will plan the RTH path, fly to an open area while avoiding obstacles, ascend to the RTH Altitude, and return to home using the best path.
DJI Mavic 3 Pro User Manual Straight Line RTH The aircraft will enter Straight Line RTH when the lighting is not sufficient and the environment is not suitable for Advanced RTH. Straight Line RTH Procedure: 1. The Home Point is recorded. 2. Straight Line RTH is triggered. 3. The aircraft brakes and hover in place. a.
DJI Mavic 3 Pro User Manual • When the remote controller signal is normal during Advanced RTH, the pitch stick can be used to control the flight speed, but the orientation and altitude cannot be controlled and the aircraft cannot be flown left or right. Acceleration uses more power. The aircraft cannot sense obstacles if the flight speed exceeds the effective sensing speed. The aircraft will brake and hover in place and exit from RTH if the pitch stick is pulled all the way down.
DJI Mavic 3 Pro User Manual Failsafe RTH The action of the aircraft when the remote controller signal is lost can be set to RTH, land,or hover in Setting > Safety > Advanced Safety Settings in DJI Fly. If the Home Point was successfully recorded and the compass is functioning normally, Failsafe RTH automatically activates after the remote controller signal is lost for more than six seconds.
DJI Mavic 3 Pro User Manual Landing Protection If the user triggers RTH or auto landing using the remote controller or the app, Landing Protection will activate during Smart RTH. Landing Protection is enabled once the aircraft begins to land. 1. During Landing Protection, the aircraft will automatically detect and carefully land on suitable ground. 2. If the ground is determined unsuitable for landing, the aircraft will hover and wait for pilot confirmation. 3.
DJI Mavic 3 Pro User Manual Vision Systems and Infrared Sensing System DJI Mavic 3 Pro is equipped with both an infrared sensing system and horizontal, upward, and downward vision systems. The upward and downward vision systems consist of two cameras each, and the forward, backward, and lateral vision systems consist of four cameras in total. The infrared sensing system consists of two 3D infrared modules.
DJI Mavic 3 Pro User Manual 0.5-20 m 90° 0.2-10 m 90° 90° 90° 100° 0.5-25 m 0.5-25 m 90° 90° 103° 103° 90° 85° 85° 90° 90° 90° 0.5-16 m 130° 130° 160° 0.5-30 m Using the Vision System The positioning function of the downward vision system is applicable when GNSS signals are unavailable or weak. It is automatically enabled in Normal or Cine mode.
DJI Mavic 3 Pro User Manual e. Flying in an area with frequent and drastic lighting changes. f. Flying near extremely dark (< 10 lux) or bright (> 40,000 lux) surfaces. g. Flying near surfaces that strongly reflect or absorb infrared waves (e.g., mirrors). h. Flying near surfaces without clear patterns or textures. i. Flying near surfaces with repeating identical patterns or textures (e.g., tiles with the same design). j. Flying near obstacles with small surface areas (e.g., tree branches).
DJI Mavic 3 Pro User Manual Advanced Pilot Assistance Systems (APAS 5.0) The Advanced Pilot Assistance Systems 5.0 (APAS 5.0) feature is available in Normal mode and Cine mode. When APAS is enabled, the aircraft will continue to respond to user commands and plan its path according to both control stick inputs and the flight environment. APAS makes it easier to avoid obstacles, obtain smoother footage, and provide a better flying experience. Keep moving the control sticks in any direction.
DJI Mavic 3 Pro User Manual Flight Recorder Flight data, including flight telemetry, aircraft status information, and other parameters, are automatically saved to the internal data recorder of the aircraft. The data can be accessed using DJI Assistant 2 (Consumer Drones Series). Propellers There are two types of DJI Mavic 3 Pro Quick-Release Propellers designed to spin in different directions. Marks are used to indicate which propellers should be attached to which motors.
DJI Mavic 3 Pro User Manual • To avoid damaging the propellers, place the aircraft in the direction shown in the carrying case during transportation or storage. DO NOT squeeze or bend the propellers. If propellers are damaged, the flight performance may be affected. • Make sure the motors are mounted securely and rotating smoothly. Land the aircraft immediately if a motor is stuck and unable to rotate freely. • DO NOT attempt to modify the structure of the motors.
DJI Mavic 3 Pro User Manual battery cell is detected. 10. Hibernation Mode: the battery switches off after 20 minutes of inactivity to save power. If the battery level is less than 5%, the battery will enter Hibernation mode after six hours to prevent over-discharge. In Hibernation mode, the battery level indicators do not illuminate. Charge the battery to wake it from hibernation. 11. Communication: information about the voltage, capacity, and current of the battery is transmitted to the aircraft.
DJI Mavic 3 Pro User Manual Low-Temperature Notice 1. Battery capacity is significantly reduced when flying at low temperatures from -10° to 5° C (14° to 41° F). It is recommended to hover the aircraft in place for a while to heat the battery. Make sure to fully charge the battery before takeoff. 2. Batteries cannot be used in extremely low-temperature environments of lower than -10° C (14° F). 3.
DJI Mavic 3 Pro User Manual • DO NOT charge an Intelligent Flight Battery immediately after flight as it may be too hot. Wait for the battery to cool down to the operating temperature before charging again. • The charger stops charging the battery if the battery cell temperature is not within the operating range of 5° to 40° C (41° to 104° F). The ideal charging temperature is from 22° to 28° C (71.6° to 82.4° F). • Fully charge the battery at least once every three months to maintain battery health.
DJI Mavic 3 Pro User Manual Status LED Indicator Descriptions Blinking Pattern Description Solid yellow No battery is inserted.
DJI Mavic 3 Pro User Manual Inserting/Removing the Battery Insert the Intelligent Flight Battery into the battery compartment of the aircraft. Make sure it is mounted securely and that the battery buckles are clicked into place. Click Press and hold the textured part of the battery buckles on the sides of the battery to remove it from the compartment. 1 2 • DO NOT insert or remove the battery while the aircraft is powered on. • Make sure the battery is mounted securely.
DJI Mavic 3 Pro User Manual Gimbal and Camera Gimbal Profile The 3-axis gimbal provides stabilization for the camera, allowing you to capture clear and stable images and video. The control tilt range is -90° to +35° and the control pan range is -5° to +5°. 35° 0° 5° -5° -90° Use the gimbal dial on the remote controller to control the tilt of the camera. Alternatively, do so through the camera view in DJI Fly. Press and hold the screen until the camera adjustment bar appears.
DJI Mavic 3 Pro User Manual • DO NOT apply external force to the gimbal after the gimbal is powered on. DO NOT add any extra payload other than an official accessory to the gimbal, as this may cause the gimbal to function abnormally or lead to permanent motor damage. • Remove the gimbal protector before powering on the aircraft. Attach the gimbal protector when the aircraft is not in use. • Flying in heavy fog or clouds may make the gimbal wet, leading to temporary failure.
DJI Mavic 3 Pro User Manual Storing and Exporting Photos and Videos Storing Photos and Videos DJI Mavic 3 Pro has 8GB of built-in storage and supports the use of a microSD card to store photos and videos. A SDXC, or UHS-I microSD card is required due to the fast read and write speeds necessary for high-resolution video data. Refer to the Specifications section for more information about recommended microSD cards. In addition, DJI Mavic 3 Pro Cine aircraft comes with a built-in 1TB SSD.
DJI Mavic 3 Pro User Manual • The maximum download rate can only be achieved in countries and regions where the 5.8 GHz frequency is permitted by local laws and regulations. To achieve the maximum download rate, the device must support a 5.8 GHz frequency band and Wi-Fi 6 connection, and the footage must be using the internal storage of aircraft in an environment without interference or obstruction. If 5.
Remote Controller This section describes the features of the remote controller and includes instructions for controlling the aircraft and the camera. © 2023 DJI All Rights Reserved.
DJI Mavic 3 Pro User Manual Remote Controller DJI RC Pro The DJI RC Pro remote controller features O3+, works at both 2.4 GHz and 5.8 GHz, is capable of selecting the best transmission channel automatically, and can transmit a live HD view from the camera of the aircraft at a distance of up to 15 km (compliant with FCC standards, measured in a wide open area without interference). The built-in 5.
DJI Mavic 3 Pro User Manual Controlling the Gimbal and Camera Focus/Shutter Button: press halfway down to auto-focus, and press all the way down to take a photo. Record Button: press once to start or stop recording. Camera Control Dial: use to adjust the zoom by default. The dial function can be set to adjust the focal length, EV, aperture, shutter speed, and ISO. Gimbal Dial: control the tilt of the gimbal.
DJI Mavic 3 Pro User Manual Controlling the Aircraft Three preprogrammed modes (Mode 1, Mode 2, and Mode 3) are available and custom modes can be configured in the DJI Fly app.
DJI Mavic 3 Pro User Manual Remote Controller (Mode 2) Aircraft Remarks Throttle Stick: moving the left stick up or down changes the altitude of the aircraft. Push the stick up to ascend and push down to descend. The aircraft hovers in place if the stick is in the center. Use the left stick to take off when the motors are spinning at an idle speed. The more the stick is pushed away from the center, the faster the aircraft changes elevation.
DJI Mavic 3 Pro User Manual RTH Button Press and hold the RTH button until the remote controller beeps to start RTH. The aircraft will fly to the last updated Home Point. Press the button again to cancel RTH and regain control of the aircraft. Customizable Buttons Including C1, C2, C3, and the 5D button. Go to Settings > Control in DJI Fly to customize the function of the button.
DJI Mavic 3 Pro User Manual Remote Controller LEDs Status LED Blinking Pattern — — — Descriptions Solid red Disconnected from the aircraft Blinks red The temperature of the remote controller is too high, or the battery level of the aircraft is low Solid green Connected with the aircraft Blinks blue The remote controller is linking to an aircraft Solid yellow Firmware update failed Blinks yellow The battery level of the remote controller is low Blinks cyan Control sticks not centered Batte
DJI Mavic 3 Pro User Manual • DO NOT operate other wireless devices at the same frequency as the remote controller to avoid signal interference. • A prompt will be displayed in DJI Fly if the transmission signal is weak during flight. Adjust the antennas to make sure that the aircraft is in the optimal transmission range. Linking the Remote Controller The remote controller is already linked to the aircraft when purchased together as a combo.
DJI Mavic 3 Pro User Manual Operating the Touchscreen Home 4:53 DJI Fly Gallery Files Firefox Setting Guide The top of the touchscreen displays the time, Wi-Fi signal, and battery level of the remote controller. Some apps are already installed by default such as DJI Fly, Gallery, Files, Firefox, Settings, and Tips. Settings includes network, display, voice, and Bluetooth configurations. Users can quickly learn about the features under Tips.
DJI Mavic 3 Pro User Manual Quick Settings 2 3 4 1 5 6 7 1. Notifications Tap to check system notifications. 2. Recent Tap to check recently opened apps. 3. Home Tap to return to the home screen. 4. System Settings Tap to access system settings. 5. Shortcuts : Tap to enable or disable Wi-Fi. Hold to enter settings and connect to or add a Wi-Fi network. : Tap to enable or disable Bluetooth. Hold to enter settings and connect with nearby Bluetooth devices. : Tap to enable Do Not Disturb mode.
DJI Mavic 3 Pro User Manual Advanced Features Calibrating the Compass The compass may need to be calibrated after the remote controller is used in areas with electromagnetic interference. A warning prompt will appear if the compass of the remote controller requires calibration. Tap the warning prompt to start calibrating. In other cases, follow the steps below to calibrate your remote controller. 1. Power on the remote controller and enter the home page. 2.
DJI Mavic 3 Pro User Manual DJI RC When used with DJI Mavic 3 Pro, DJI RC remote controller features O3+ video transmission, works at both 2.4 GHz and 5.8 GHz frequency bands. It is capable of selecting the best transmission channel automatically and can transmit up to 1080p 60fps HD live view from the aircraft to the remote controller at a distance of up to 15 km (compliant with FCC standards, and measured in a wide open area without interference). The DJI RC is also equipped with a 5.
DJI Mavic 3 Pro User Manual Controlling the Gimbal and Camera Focus/Shutter Button: press halfway down to auto-focus and press all the way down to take a photo. Record Button: press once to start or stop recording. Camera Control Dial: Use to adjust the zoom by default. The dial function can be set to adjust the focal length, EV, aperture, shutter speed, and ISO. Gimbal Dial: control the tilt of the gimbal.
DJI Mavic 3 Pro User Manual Controlling the Aircraft Three preprogrammed modes (Mode 1, Mode 2, and Mode 3) are available and custom modes can be configured in DJI Fly.
DJI Mavic 3 Pro User Manual Remote Controller (Mode 2) Aircraft Remarks Throttle Stick: moving the left stick up or down changes the altitude of the aircraft. Push the stick up to ascend and down to descend. The more the stick is pushed away from the center position, the faster the aircraft will change altitude. Push the stick gently to prevent sudden and unexpected changes in altitude. Yaw Stick: moving the left stick to the left or right controls the orientation of the aircraft.
DJI Mavic 3 Pro User Manual Flight Pause/RTH Button Press once to make the aircraft brake and hover in place. Press and hold the button until the remote controller beeps and starts RTH, the aircraft will return to the last recorded Home Point. Press this button again to cancel RTH and to regain control of the aircraft. Customizable Buttons Go to Settings > Control in DJI Fly to set the functions of the customizable C1 and C2 buttons.
DJI Mavic 3 Pro User Manual Battery Level LEDs Blinking Pattern Battery Level 76%-100% 51%-75% 26%-50% 0%-25% Remote Controller Alert The remote controller beeps to indicate an error or warning. Pay attention when prompts appear on the touchscreen or in DJI Fly. Slide down from the top of the screen and select Mute to disable all alerts, or slide the volume bar to 0 to disable some alerts. The remote controller sounds an alert during RTH. The alert cannot be canceled.
DJI Mavic 3 Pro User Manual Linking the Remote Controller The remote controller is already linked to the aircraft when purchased together as a combo. Otherwise, follow the steps below to link the remote controller and the aircraft after activation. 1. Power on the aircraft and the remote controller. 2. Launch DJI Fly. 3. In camera view, tap and select Control and then Connect to the Aircraft. During linking, the status LED of the remote controller blinks blue and the remote controller beeps. 4.
DJI Mavic 3 Pro User Manual Operating the Touchscreen Home Screen Gestures Slide from the left or right to the center of the screen to return to the previous screen. Slide up from the bottom of the screen to return to DJI Fly. ×2 Slide down from the top of the screen to open the status bar when in DJI Fly. Slide down twice from the top of the screen to open Quick Settings when in DJI Fly. The status bar displays the time, Wi-Fi signal, battery level of the remote controller, etc.
DJI Mavic 3 Pro User Manual Quick Settings 1 2 3 4 5 1. Notifications Tap to check system notifications. 2. System Settings Tap to access system settings and configure settings such as Bluetooth, volume, and network. You can also view the Guide to learn more about the controls and status LEDs. 3. Shortcuts : Tap to enable or disable Wi-Fi. Hold to enter settings and then connect to or add a Wi-Fi network. : Tap to enable or disable Bluetooth.
DJI Mavic 3 Pro User Manual Advanced Features Calibrating the Compass The compass may need to be calibrated after the remote controller is used in areas with electromagnetic interference. A warning prompt will appear if the compass of the remote controller requires calibration. Tap the warning prompt to start calibrating. In other cases, follow the steps below to calibrate the remote controller. 1. Power on the remote controller, and enter Quick Settings. 2.
DJI Fly App This section introduces the main functions of the DJI Fly app. 86 © 2023 DJI All Rights Reserved.
DJI Mavic 3 Pro User Manual DJI Fly App Home Launch DJI Fly and enter the home screen. Fly Spots View or share flight and shooting locations nearby, learn more about GEO Zones, and preview aerial photos of different locations taken by other users. Academy Tap the icon in the top right corner to enter Academy and view product tutorials, flight tips, flight safety notices, and manual documents. Album Allows you to view photos and videos from the aircraft album or saved on the local device.
DJI Mavic 3 Pro User Manual Camera View Buttons Description 1 2 3 4 5 6 7 19 8 9 18 10 17 11 16 1. 15 14 13 12 Flight Mode N Mode: displays the current flight mode. 2. System Status Bar In Flight: displays aircraft flight status and various warning messages. 3. Battery Information 80 31'59": displays the current battery level and remaining flight time. Tap to view more information about the battery. 4.
DJI Mavic 3 Pro User Manual 7. Settings : tap to view or set parameters for safety, control, camera, and transmission. Refer to the Settings section for more information. 8. Shooting Modes Photo: Single, Explore, AEB, Burst Shooting, and Time Shot. Video: Normal, Night, Explore, and Slow Motion. MasterShots: drag-select a subject. The aircraft will record while executing different maneuvers in sequence and keep the subject in the center of the frame. A short cinematic video will be generated afterward.
DJI Mavic 3 Pro User Manual 10. Shutter/Record Button : tap to take a photo or to start or stop recording a video. 11. Playback : tap to enter playback and preview photos and videos as soon as they are captured. 12. Camera Modes Switch : tap to switch between Auto and Pro mode. Different parameters can be set in different modes. 13. Shooting Parameters RES&FPS 4K 60 : displays the current shooting parameters. Tap to access parameter settings. 14.
DJI Mavic 3 Pro User Manual Screen Shortcuts Tap to Aim During flight double-tap the point of interest on the screen, the aircraft will automatically move the point of interest to the center of the frame. Gimbal Angle Adjustment Press and hold on the screen to bring up the gimbal adjustment bar to adjust the gimbal angle. Focus/Spot Metering Tap on the screen to enable focus or spot metering.
DJI Mavic 3 Pro User Manual Settings Safety • Flight Assistance Obstacle Avoidance Horizontal vision system is enabled after setting Obstacle Avoidance Action Action to Bypass or Brake. The aircraft cannot sense obstacles if Obstacle Avoidance is disabled. Bybassing Options Select Normal or Nifty mode when using Bypass. Display Radar Map When enabled, the real-time obstacle detection radar map will be displayed.
DJI Mavic 3 Pro User Manual Control • Aircraft Settings Units Can be set to metric or imperial. Subject Scanning When enabled, the aircraft automatically scans and displays subjects in the camera view (only available for single-shot and normal video modes).
DJI Mavic 3 Pro User Manual • General Settings Anti-Flicker When enabled, the footage flicker caused by the light source will be reduced when shooting in environments with lights. In Pro mode, anti-flicker will only take effect when shutter speed and ISO are set to auto. • Histogram When enabled, users can check the screen to view whether the exposure is appropriate. Peaking Level When enabled in MF mode, the objects in focus will be outlined in red.
DJI Mavic 3 Pro User Manual Transmission A livestreaming platform can be selected to broadcast the camera view in real time. The HDMI output, frequency band, and channel mode can also be set in the transmission settings. • Live streaming platforms and HDMI output are not supported when using DJI RC. About Displays information such as the Device Name, Wi-Fi Name, Model, App Version, Aircraft Firmware, RC Firmware, FlySafe Data, SN, etc.
Appendix 96 © 2023 DJI All Rights Reserved.
DJI Mavic 3 Pro User Manual Appendix Specifications Aircraft Takeoff Weight Mavic 3 Pro: 958 g Mavic 3 Pro Cine: 963 g Dimensions Folded (without propellers): 231.1×98×95.4 mm Unfolded (without propellers): 347.5×290.8×107.
DJI Mavic 3 Pro User Manual Tele Camera FOV: 15° Format Equivalent: 166 mm Aperture: f/3.
DJI Mavic 3 Pro User Manual Video Resolution Hasselblad Camera Apple ProRes 422 HQ Apple ProRes 422 Apple ProRes 422 LT 5.1K: 5120×2700@24/25/30/48/50fps DCI 4K: 4096×2160@24/25/30/48/50/60/120*fps 4K: 3840×2160@24/25/30/48/50/60/120*fps H.264/H.265 5.1K: 5120×2700@24/25/30/48/50fps DCI 4K: 4096×2160@24/25/30/48/50/60/120*fps 4K: 3840×2160@24/25/30/48/50/60/120*fps FHD: 1920×1080@24/25/30/48/50/60/120*/200*fps * Recording frame rates. The corresponding video plays as slow-motion video.
DJI Mavic 3 Pro User Manual Color Mode and Sampling Hasselblad Camera Method Normal: 10-bit 4:2:2 (Apple ProRes 422 HQ/422/422 LT) 8-bit 4:2:0 (H.264/H.265) D-Log: 10-bit 4:2:2 (Apple ProRes 422 HQ/422/422 LT) 10-bit 4:2:0 (H.264/H.265) HLG/D-Log M: 10-bit 4:2:2 (Apple ProRes 422 HQ/422/422 LT) 10-bit 4:2:0 (H.265) Medium Tele Camera Normal: 10-bit 4:2:2 (Apple ProRes 422 HQ/422/422 LT) 8-bit 4:2:0 (H.264/H.265) HLG/D-Log M: 10-bit 4:2:2 (Apple ProRes 422 HQ/422/422 LT) 10-bit 4:2:0 (H.
DJI Mavic 3 Pro User Manual Backward Measurement Range: 0.5-16 m Effective Sensing Speed: Flight Speed ≤ 12 m/s FOV: Horizontal 90°, Vertical 103° Lateral Measurement Range: 0.5-25 m Effective Sensing Speed: Flight Speed ≤ 15 m/s FOV: Horizontal 90°, Vertical 85° Upward Measurement Range: 0.2-10 m Effective Sensing Speed: Flight Speed ≤ 6 m/s FOV: Front and Back 100°, Left and Right 90° Downward Measurement Range: 0.
DJI Mavic 3 Pro User Manual Lowest Latency[7] 130 ms (with DJI RC-N1 Remote Controller) 120 ms (with DJI RC Pro) 130 ms (with DJI RC) Antenna 4 antennas, 2T4R Storage Recommended microSD Cards Lexar 1066x 64GB V30 A2 microSDXC Lexar 1066x 128GB V30 A2 microSDXC Lexar 1066x 256GB V30 A2 microSDXC Lexar 1066x 512GB V30 A2 microSDXC SanDisk High Endurance 64GB V30 microSDXC SanDisk High Endurance 128GB V30 microSDXC SanDisk High Endurance 256GB V30 microSDXC Kingston Canvas Go! Plus 64GB V30 A2 microSDXC
DJI Mavic 3 Pro User Manual DJI 100W USB-C Power Adapter: Max 100 W (total) When both ports are used, the max output power of one port is 82 W, and the charger will dynamically allocate the output power of the two ports according to the power load. Rated Power DJI 65W Portable Charger: 65 W DJI 100W USB-C Power Adapter: 100 W DJI RC Pro Operating Temperature -10° to 40° C (14° to 104° F) GNSS GPS + Galileo + GLONASS Battery Li-ion (5000 mAh @ 7.
DJI Mavic 3 Pro User Manual Operating Time Approx. 4 hours Storage Capacity Support microSD card to expand capacity Video Transmission Video Transmission System When used with different aircraft hardware configurations, the DJI RC Remote Controller will automatically select the corresponding firmware version for updating. It supports the O3+ transmission technology when linked with DJI Mavic 3 Pro. Operating Frequency[3] 2.400-2.4835 GHz, 5.725-5.850 GHz Transmitter Power (EIRP) 2.
DJI Mavic 3 Pro User Manual Camera Function Matrix Photo Video Hasselblad Camera Medium Tele Camera Tele Camera Single Shot √ √ √ Burst Shooting √ √ √ AEB √ √ √ Timed √ √ √ DNG √ √ √ Pano √ × × Hyperlapse √ √ × Slow Motion 4K 120fps C4K 120fps 1080p 200fps × × Color Mode Hasselblad HNCS D-Log D-Log M HLG Normal D-Log M HLG Normal Night Mode √ × × QuickShots √ × × MasterShots √ × × √ Only supports Spotlight and POI, ActiveTrack is not supported FocusTr
DJI Mavic 3 Pro User Manual Firmware Update Use DJI Fly or DJI Assistant 2 (Consumer Drones Series) to update the aircraft firmware. Using DJI Fly When connecting the aircraft or remote controller to DJI Fly, you will be notified if a new firmware update is available. To start updating, connect your remote controller or mobile device to the internet and follow the on-screen instructions. Note that you cannot update the firmware if the remote controller is not linked to the aircraft.
DJI Mavic 3 Pro User Manual Post-Flight Checklist • Make sure to perform a visual inspection so that the aircraft, remote controller, gimbal camera, Intelligent Flight Batteries, and propellers are in good condition. Contact DJI support if any damage is noticed. • Make sure that the camera lens and vision system sensors are clean. • Make sure to store aircraft correctly before transporting it. Maintenance Instructions To avoid serious injury to children and animals, observe the following rule: 1.
DJI Mavic 3 Pro User Manual contains alcohol. Liquids can penetrate the aircraft housing, which can cause a short circuit and destroy the electronics. 13. Make sure to turn off the battery to replace or to check the propellers. Troubleshooting Procedures 1. Why can the battery not be used before the first flight? The battery must be activated by charging before using it for the first time. 2. How to solve the gimbal drift issue during flight? Calibrate IMU and compass in DJI Fly.
DJI Mavic 3 Pro User Manual Disposal Observe the local regulations related to electronic devices when disposing of the aircraft and remote controller. Battery Disposal Dispose of the batteries in specific recycling containers only after a complete discharge. DO NOT dispose of the batteries in regular trash containers. Strictly follow the local regulations regarding the disposal and recycling of batteries. Dispose of a battery immediately if it cannot be powered on after over-discharging.
DJI Mavic 3 Pro User Manual • The maximum flight speed of RTH is 16 m/s, and the maximum flight speed of Waypoint Flight is 15 m/s. Direct Remote ID 1. Transport Method: Wi-Fi Beacon 2. Method of uploading the UAS Operator Registration Number to the aircraft: Enter DJI Fly > Safety > UAS Remote Identification, and then upload UAS Operator Registration Number. List of Items, including qualified accessories 1. DJI Mavic 3 Low-Noise Propellers (Model: 9453F, 8.5g) 2.
DJI Mavic 3 Pro User Manual aircraft is near or in a restricted area, the horizontal distance is less than 160 m, or the vertical distance is less than 40 m from the zone to remind the user to fly with caution. AGL (Above Ground Level) Statement The vertical part of ‘‘Geo-awareness’’ may use the AMSL altitude or the AGL height. The choice between these two references is specified individually for each UGZ. Neither AMSL altitude nor the AGL height is supported by DJI Mavic 3 Pro.
DJI Mavic 3 Pro User Manual Authorization Zones Appear blue in the DJI app. Users will be prompted with a warning, and flight is limited by default. UA cannot fly or takeoff in these zones unless authorized. Authorization Zones may be unlocked by authorized users using a DJI verified account. 20 m Receiving a warning 100 m Authorization Zones Limit maximum speed When approaching: 1. Receiving a warning 2. Can not fly in 3.
DJI Mavic 3 Pro User Manual Warning Zones A warning message will prompt users when the drone reaches the edge of the zone. Warning Zones 1. UA can take off and fly into these zones with a warning message Ground • When the aircraft and DJI Fly app cannot obtain a GPS signal, the GEO awareness function will be inoperative. Interference of the aircraft antenna or disabling the GPS authorization in DJI Fly will cause the GPS signal fails to be obtained.
DJI Mavic 3 Pro User Manual FAR Remote ID Compliance Information The aircraft complies with the requirements of 14 CFR Part 89: • The aircraft automatically broadcasts Remote ID messages from takeoff to shut down.
WE ARE HERE FOR YOU Contact DJI SUPPORT Trademark Recognition The Adopted Trademarks HDMI, HDMI High-Definition Multimedia Interface, and the HDMI Logo are trademarks or registered trademarks of HDMI Licensing Administrator, Inc. in the United States and other countries This content is subject to change. https://www.dji.com/mavic-3-pro/downloads If you have any questions about this document, please contact DJI by sending a message to DocSupport@dji.com. and MAVIC are trademarks of DJI.