DJS-LED631 Qwash LED Plus 36*10w(ZOOM) User Manual KEEP THIS MANUAL FOR FUTURE NEEDS Version 20 http://www.djslighting.
1. Dispacking Thank you for choosing our moving head. For your own safety, please read this manual before installing the device. This manual covers the important information on installation and applications. Please install and operate the fixture with following instructions. Meanwhile, please keep this manual well for future needs. This moving wash is made of a new type of high temperature strength of engineering plastics and cast aluminum casing with nice outlook.
2. Safety Instructions This device has left the factory in perfect condition. In order to maintain this condition and to ensure a safe operation, it is absolutely necessary for the user to follow the safety instructions and warning notes written in this user manual. If the device has been exposed to temperature changes due to environmental changes, do not switch it on immediately. The arising condensation could damage the device. Leave the device switched off until it has reached room temperature.
3. Operation Instructions -The moving head is an LED wash light for onsite decoration purpose. -Don’t turn on the fixture if it’s been through severe temperature difference like after transportation because it might damage the light due to the environment changes. So make sure to operate the fixture until it is in normal temperature. -This light should be keep away from strong shaking during any transportation or movement.
4. Installation via clamp Please refer to the picture below: Screw one clamp each via a M12 screw and nut onto the Omega holders. Insert the quick-lock fasteners of the first Omega holder into the respective holes on the bottom of the device. Tighten the quick-lock fasteners fully clockwise. Install the second Omega holder. Pull the safety-rope through the holes on the bottom of the base and over the trussing system or a safe fixation spot. Insert the end in the carabine and tighten the safety screw.
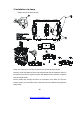
5. DMX-512 control connections Connect the provided XLR cable to the female 3-pin XLR output of your controller and the other side to the male 3-pin XLR input of the moving head. You can chain multiple Moving head together through serial linking. The cable needed should be two core, screened cable with XLR input and output connectors. Please refer to the diagram below.
6. LCD Display Operations The display will close after 30 seconds without operations. -6- http://www.djslighting.
Channel Function Value Description 1 PAN 0-255 0---540/630 2 PAN 16bit 0-255 1.8 degree 3 Tilt 0-255 0---280 Tilt 16bit 0-255 1.
8. Technical Specifications 36PCS 10W high power LEDs 50,000 hours lifespan and low power consumption 16 bit smooth and precise resolution for PAN/TILT movement 540°/630° pan and 280° tilt movement Scan position memory, auto reposition after unexpected movement RGBW color mixing system 8.
9. Wave Beam -9http://www.djslighting.
10. Maintenance and Cleaning The following points have to be considered during the inspection: 1) All screws for installing the devices or parts of the device have to be tightly connected and must not be corroded. 2) There must not be any deformations on the housing, color lenses, fixations and installation spots (ceiling, suspension, trussing). 3)Mechanically moved parts must not show any traces of wearing and must not rotate with unbalances.