
Installation Instructions


Installing DMX AG™
DMX AG™ Foundation Guide: Version 4.3
Updated: September 9, 2014 (clarifications only denoted by ᵠ)
16
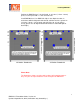
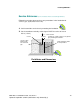
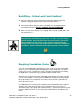
Backfilling – Follow Local Code Practices*
1.
Cover the drainage system required by Code* with approved granular
material using good engineering and construction practices.*
2.
Carefully backfill the balance of the excavated area, by following good
construction practices (DO NOT DAMAGE DMX AG MEMBRANE)*
3.
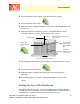
Make sure the finished grade is just slightly above the top of DMX AG™, but
not greater than 1".*
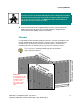
During backfill, avoid placing large rocks (> 6” dia.)* or frozen clumps
against the wall. Ensure that the base of the excavation is not frozen
when backfilling as this may be a sign of frozen earth beneath the
footings which can lead to structural issues not related to a membrane
installation. Excess settlement under slabs on grade is also possible.*
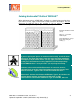
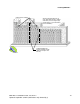
Repairing Foundation Cracks *
You can use the DMX AG™ membrane to cover small cracks in the foundation
(up to ¼ inch (7 mm) wide) without wrapping the entire foundation. For larger
cracks up to ½ inch (12.5 mm) the cracks should be repaired prior to installing
the DMX AG as a protective layer and ground water control sheet.*
Excavate the soil around the crack right down to the footing. Clean the exposed
area of soil and debris.* Install a piece of DMX AG™ membrane from the grade
line to the footing. The membrane must extend 12 to 16 inches (30 to 40 cm)
each side of the crack.
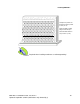
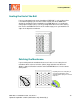
Use DMX Washers™ to fasten the membrane to the foundation at the required
spacing* and seal the top and sides of the membrane in the same way as
described earlier in this guide and around openings.* (Sealant and nails in the flat
tab area, DMX FlexTrim™ on each side with sealant between membrane and
trim.)*