User Guide USING YOUR DMX PROFUSION® iO FOR ProFusion® iO Pandora User Guide
Table of Contents Introduction................................................................................................................................................................................... 4 ProFusion iO Player......................................................................................................................................................................... 4 Front Panel..................................................................................................
How to connect the USB Wi-Fi adaptor.............................................................................................................................. 27 Wi-Fi Setup.......................................................................................................................................................................... 27 How to configure Wireless automatically with Wi-Fi Quick Setup......................................................................................
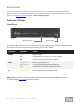
Introduction This Feature Guide provides detailed instructions on how to use the various features of the ProFusion iO Pandora and the use of the Online Control Panel to control your stations. For instructions for the setup of your player, see the Quick Start Guide and FAQs at dmx.com/pandora/get-support. ProFusion iO Player Front Panel Remote Sensor Status Lights The ProFusion iO Pandora front panel has three status indicator lights and a sensor for infrared remote control.
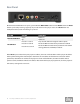
Rear Panel On the ProFusion iO Pandora rear panel, you will find the Main Power button and the Reset button. The Reset button is pressed by inserting a paperclip or pin into the hole in the player chassis. The Reset button has multiple functions, based on how long it is pressed.
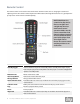
Remote Control The remote control can be used to execute the most common actions such as changing the station and adjusting volume. The remote control requires two AAA batteries. Rechargeable batteries are a good option if you expect to use the remote control frequently. NOTE: Weak batteries, scratched or dirty lenses, fluorescent lights and sunlight may interfere with remote control operation. Make sure the remote control has fresh batteries that are properly inserted.
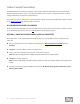
Online Control Panel Setup The Online Control Panel provides complete control of your ProFusion iO Pandora from your favorite web browser. The web interface can be accessed anywhere from within your local computer network including laptops, workstations and wireless network devices. First, verify your player is powered on, connected to the network, and to your amplifier with volume on. Refer to the Quick Start Guide for detailed, setup instructions.
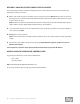
OPTION B: HOW TO DISCOVER YOUR PLAYER VIA PLAYER This method plays back the IP address through the player’s audio outputs. You may want to perform this method of discovery after hours. 1 Obtain and record the player’s IP address. Using a paperclip, press the Reset button on the rear panel of the player for one second. Your ProFusion iO Pandora will playback its IP address. Write this down. To hear it again, repeat this step. NOTE: You may hear a second IP address identified as the Wireless IP address.
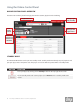
Using the Online Control Panel ONLINE CONTROL PANEL OVERVIEW The Zone view is where you will manage your Pandora stations, playback and scheduling. Playback Control Settings, Login, Help, Standby Status/error messages will appear here Now Playing Controls Create and manage your stations and schedules STANDBY MODE Your ProFusion iO Pandora can be put into Standby mode. Standby mode immediately stops all playback and puts your player into a low-power state.
HOW TO CONTROL PLAYBACK The Zone listed shows the service currently being controlled. The buttons next to Zone control playback. NOTE: Pandora will be your only Zone if you do not have any other music services through DMX/Mood. BUTTON FUNCTION Pause – Click to stop music playback Play – Click to resume music playback Skip Forward – Click to end current track and play the next scheduled track. Skipped track will not play on any stations for 4 hours. Mute (Not Muted) – Click to mute. Playback is not halted.
NOW PLAYING SECTION Now Playing displays the Track Title, Artist, Album and album art for the track currently playing. “Now Playing” changes to “Paused” if playback has been paused. You also can change stations, provide track feedback and quickly access other features in this section. HOW TO CHANGE THE STATION Select a different station from the dropdown. The current track will fade to silence followed by the first track of the new station selected.
Stations Stations is where you can manage your Pandora stations, create new stations and browse genre stations from the Online Control Panel. You may prefer to manage your stations through Pandora.com (be sure to log into the Pandora account associated with your player). Any changes made using the Online Control Panel or Pandora will synchronize automatically. HOW TO MANAGE STATIONS The stations associated with your Pandora account are listed under Mange Stations.
HOW TO CREATE A STATION Search the Pandora music database by artist, track or genre to create a new station. 1 Type any full or partial track title, artist name or genre into the Search box and click the Search button 2 Pandora will return a list of artists, tracks and genres. Click to expand a list. To create your new Pandora station, click to the right of result row. It will be added to your stations and will begin playing immediately on your player.
HOW TO BROWSE GENRE STATIONS Pandora has many genre stations for you to explore. Browse Genre Stations lists all the Pandora genre stations by category. 1 Click > to expand a category to see the genres within. Create a new station from the Pandora genre by clicking next to the genre station name. It will be added to your stations and will begin playing immediately on your player. 14 Need Help? Call 800.929.5407 or visit dmx.
Track History Track History displays the tracks that recently played on a station from top to bottom. Title, Artist, and Album information is displayed. Because Track History shows the last tracks played in a station, it may not reflect the tracks recently heard if there was station change.
Schedule Control Schedule Control gives you the ability to play specific stations at designated times of the day (dayparts) with a Custom Schedule. This feature enables you to set the mood for your customers based on the time of day. If you elect ‘No Schedule,’ the station selected in the dropdown will play until another station is manually selected. HOW TO CREATE YOUR CUSTOM SCHEDULE 1 Click Edit. 2 Add your first daypart to your Custom Schedule.
NOTE: Make sure you have a daypart scheduled for when you want music to resume again. 4 When your Custom Schedule is complete, click Save. 17 Need Help? Call 800.929.5407 or visit dmx.
HOW TO MODIFY YOUR CUSTOM SCHEDULE 1 Click Edit. 2 To remove a daypart from your Custom Schedule, click 18 Need Help? Call 800.929.5407 or visit dmx.com/pandora beside the daypart you wish to remove.
3 Add any new dayparts to your Custom Schedule. Set the start time and select the station from the dropdown, and click . Repeat this for each daypart. 4 When your Custom Schedule is complete, click Save. 19 Need Help? Call 800.929.5407 or visit dmx.
HOW TO TURN ON YOUR CUSTOM SCHEDULE 1 In the Schedule Type dropdown, select ‘Custom Schedule.’ 2 Click Change Schedule. Your Custom Schedule will begin to play within a few moments. 20 Need Help? Call 800.929.5407 or visit dmx.
HOW TO TURN OFF YOUR CUSTOM SCHEDULE 1 In the Schedule Type dropdown, select ‘No Schedule.’ 2 Click Change Schedule. Playback will stop. 21 Need Help? Call 800.929.5407 or visit dmx.
3 ‘Zone Stopped’ will show under Now Playing. Select a station from the Station dropdown at the top of the page. The selected station will begin to play and continue until a new station is selected, or the Schedule Type is changed to ‘Custom Schedule.’ Administration The Administration section houses the player, network, user and Pandora settings for your ProFusion iO Pandora. HOW TO ACCESS THE ADMINISTRATION PAGE Click Administration in the top right of the screen. 22 Need Help? Call 800.929.
HOW TO RETURN TO THE ONLINE CONTROL PANEL HOME PAGE When in Administration, click Zone in the top right to manage your stations and playback. Device Information Device Information provides some key information about your specific player. Device Information contains the following: Device ID, software version, configuration version, device description, MAC Address and, Wireless MAC Address (if enabled). ID: The Device ID is a unique number specific to your ProFusion iO Pandora.
Info: Usually references your company name and location. This information is optional and may not be present. Ethernet MAC: A Media Access Control address (MAC address) is a unique identifier assigned to network interfaces for communications on the physical network segment. You may need to provide the MAC address to your network administrator for network access. Wireless MAC: If Wi-Fi is enabled and active on your player, your Wireless MAC address will display.
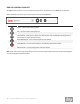
2 Select the IP Type: DHCP or STATIC. a. DHCP is the default. If this is correct for your system, please skip to step 3. b. For Static IP: Enter the IP address, Subnet mask, Default gateway, DNS primary and DNS secondary for the player. NOTE: These fields require three digit entry for each octet. See image below for proper format (ex. 198.162.010.001=correct; 198.162.10.1=incorrect). If required, Static IP information can be obtained from your network administrator or ISP.
3 With the USB Wi-Fi adaptor oriented correctly, fully insert it into the USB port on the rear panel of the player. The antenna can bend and rotate to accommodate most installations. For best performance, make sure the antenna is clear of obstacles and three feet from any large metal objects. Do not disconnect the Ethernet cable until your player has obtained a wireless IP address. 4 Press the Main Power Button to the ‘on’ position.
HOW TO CONFIGURE WIRELESS MANUALLY 1 Click Edit. a. If the Wireless panel shows ‘Disabled’, check the box next to ‘Enabled’. b. If Wireless has been enabled previously’, proceed to the next step. 2 Select the IP type, either DHCP or STATIC. If you need help determining your IP type and information, contact your ISP or network administrator. a. DHCP is the default. If this is correct for your system, please skip to step 3. b.
6 Enter the password for your wireless network and click Save. If required, Static IP information can be obtained from your network administrator or ISP. 7 Click Refresh to update the wireless network information. It may take several minutes for the player to obtain a wireless IP address. If it does not immediately update, wait a few minutes and click Refresh again. 8 Make a note of the wireless IP address.
9 Click Standby. Logout of the Online Control Panel. RECYCLE THE POWER TO YOUR PLAYER 1 Press the Main Power button on the back of the player to the ‘off’ position. 2 Disconnect Ethernet cable from the rear panel of your player. 3 Wait 5 seconds, and then press the Main Power button to the ‘on’ position. LOGIN TO THE ONLINE CONTROL PANEL AND TEST WI-FI CONNECTIVITY If you were unable to obtain the new Wireless IP address upon configuration, use either discovery method to obtain the Wireless IP address.
Update Update displays the FTP protocol, IP server address and any connectivity errors of your ProFusion iO Pandora. The player supports FTP and SFTP transfer protocols. NOTE: Modifying the update settings incorrectly will likely render your player unable to connect for updates. Proceed only at the direction of your network administrator or DMX. FTP SERVER HOW TO CHANGE THE PROTOCOL AND/OR UPDATE SERVER IP ADDRESS 1 Click Edit. 2 Select either ‘FTP’ or ‘SFTP’ from the Protocol dropdown.
Update Status Below the FTP server panel, you will see the Update Status. “Update stopped” indicates normal operation. If any errors have occurred, an error message will be displayed. BUTTON FUNCTION Initiates a connection to check for configuration changes and software updates. Used for different application of the ProFusion iO. ProFusion iO Pandora streams music, so there are no music updates to download. Clicking will simply initiate an Update Configuration. Terminates an active update.
Settings Settings controls the date and time on your player, as well as audio output type. Timezone is set by DMX and cannot be changed from the Online Control Panel. The default audio output is stereo, but can be changed to mono if desired. HOW TO CHANGE THE DATE OR TIME 1 Click Edit. 2 Input the correct date and/or time, then click Save to commit your changes. HOW TO CHANGE THE AUDIO OUTPUT 1 Click Edit.
Users Users controls the four users/logins that can have access to modify playback and/or player controls. Users is only accessible when logged in as the Admin. By default, only the Admin and Remote Control are enabled. User Types admin: This is the master login that can control all of the player functions. You cannot disable this login or any of its permissions. It is advised that you keep this login information private and set up the operator and user accounts for general use.
HOW TO ENABLE/DISABLE A LOGIN 1 Click Edit Settings. 2 Check or uncheck the box next to ‘Enabled.’ If enabling the operator or user logins, create a password and confirm it in second box. 3 Click Save to commit your changes. The Remote Control does not have a password. NOTE: User names and passwords are case sensitive. HOW TO EDIT PERMISSIONS FOR A LOGIN 1 Click Edit Permissions. 2 Check the controls you want accessible with the login. 3 Uncheck the controls you do not want accessible with the login.
4 Click Save to commit your changes. 35 Need Help? Call 800.929.5407 or visit dmx.
Permissions Described DEVICE CONTROL Change Volume Messages Force Network Update Device Standby Change Video Settings Change Network Settings Change Date/Time Audio Control Allow the user to change the volume output of the device zone. Does not apply to ProFusion iO Pandora. Allow the user to start a network update to download new configuration and/or content. Allow the user to put device into Standby mode. Does not apply to ProFusion iO Pandora.
Pandora Settings DEACTIVATE Deactivating will disassociate the current Pandora account from the player. This will allow a different Pandora account to then be associated with this player. This may be useful, for example, it there has been a change in management at your business and you want to transfer accounts. HOW TO DEACTIVATE THE PLAYER 1 Click Deactivate. 2 A deactivate confirmation message box will be displayed. Click Deactivate to confirm.
Explicit Content Filter Your player is automatically set with the Explicit Content Filter enabled. In the event you hear a track with strong profanity, you may report the artist name, track title and album title to Pandora at Pandora-info@ pandora.com. Giving the track a ‘Thumbs Down’ will prevent the track from playing on the station. While the filter is designed to block explicit lyrics, the filter does not remove tracks with suggestive content;only you can select appropriate music for your clientele.
Forgot Online Control Panel password Press the Reset button on the rear of the player for 5 seconds to reset the admin password to the default value, 23646. Online Control Panel displays Machine Expired Contact DMX Customer Service. Buttons on the Online Control Panel are disabled The feature is disabled by the master admin login.
Appendix B: Player Specifications Connections Audio: (2) RCA female jacks Network: (1) RJ-45 Ethernet port HDMI Video: (1) Composite Video (CVBS): (1) RCA female jack USB: (1) USB 2.0 port For detailed output specifications, please contact DMX. Power Specifications Power Supply: external AC to DC power transfer device Input Voltage (AC~): 100 - 240Vac Nominal (90 - 265Vac Maximum) Input Frequency: 47 - 63Hz Input Current: 0.
Conditions Working Temperature: 32°F to 105°F (0°C to 40°C) Working Humidity: 5%-90% (Non-condensing) Storage Temperature: -4°F to113°F; (-20°C to 45°C) Storage Humidity: 0-98% (Non-condensing) Appendix C: Contact DMX DMX Customer Support Center 800.929.5407 or Pandora@dmx.coM UPDATED 01/17/13 Copyright © 2013 Mood Media Corporation/DMX, Inc. All rights reserved. As a business owner...