
User's Manual
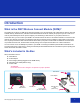


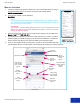

Table Of Contents
- License Agreements
- Contents
- Introduction
- Getting Started
- Setting up the WCM Hardware
- 1. Before setting up your WCM, set up your DNP photo printer(s) as shown in the printer's user guide by loading media (ribbon and paper), connecting the power cable and USB printer cable (included with the WCM) and turning the printers on.
- 2. Plug the USB printer cable into one of the two USB ports on the back of the WCM.
- 3. Plug the WCM power adapter into the micro-USB port on the back of the WCM.
- Setting up the WCM Portal
- QR Code Activation
- WCM Hotspot Connection
- WCM Portal
- Connect to the WCM hot spot network DNPWirelessConnect
- 2. To log in to the network, use the password: dnp12345
- 3. Once connected to the network, open your web browser and type into the address bar dnpwc.local OR 192.168.4.1
- 4. The WCM portal will load into your browser. The first time that you connect, you will be asked to register your WCM by typing in your name and email address. You MUST do this the first time, but after that you will not be asked for this informatio...
- 5. Once you have registered with your information, you will see the main WCM portal page. Use the diagram below to access all parts of the portal page and make any necessary changes.
- Tap for About info
- Configuring Your Printer in WCM
- About Printer Instances
- You must create at least one printer instance to be able to print. Give each printer instance a custom name like “QW410 4x6 Matte” or “DS620 6x8 Glossy”
- Adding a Printer
- 1. Click the Add button. The WCM detects your printers (you can connect two printers to the WCM if you like) and shows you the printer names.
- 2. Click the printer that you want to use and select Continue.
- 3. When asked if you want to customize the name, tap YES. DNP recommends renaming your printer.
- 4. Click Continue.
- Editing a Printer Instance
- Changing the Print Finish
- Adding a Printer
- Connecting Your WCM to a Local Wi-Fi Network
- Setting up the WCM Hardware
- Using the WCM
- Printing from your iPhone or iPad (iOS printing)
- 1. Use the Settings app to connect your device to the network where WCM is available (either the WCM Hotspot "DNPWirelessConnect" or the local Wi-Fi network.)
- 2. Open the Photos app.
- 3. Select the photo(s) that you wish to print.
- 4. Tap the Share icon (bottom left on iPhone, top left on iPad).
- 5. Scroll down and tap the Print button.
- 6. In the Printer Options, tap Select Printer (or the printer name if shown).
- 7. Tap the printer name you want.
- 8. Tap the Print button (shown in image).
- 9. Your photo should start printing in approximately 30 seconds.
- Printing from Android phones and tablets
- Printing from a Windows PC
- 1. Download the DNP Windows printer driver from www.dnpphoto.com
- 2. Install the DNP printer driver.
- 3. Connect your PC to the network where the WCM is available (either the WCM Hotspot "DNPWirelessConnect" or the local Wi-Fi network) by clicking on the Network icon in the task bar.
- 4. Open a photo on your PC and click on the Print icon.
- 5. Click on the printer name and click the + (Add) icon to add a printer.
- 6. Click on Add a Printer or Scanner - Windows will find printers on your network. Select the printer instance that you want. You can now choose the printer settings that you wish to use for printing.
- 7. Print size is established when a printer instance is set up in the WCM Portal and will override paper size in print settings.
- 8. If the picture aspect ratio does not match the print size (ex. 6x8 print size and the aspect is 16:9 aspect), the fit of the print may not match the print size and a white border may appear on the print. If Fit is set to Fill Page, the WCM will ce...
- 9. Popular print size aspect ratios:
- 10. Click Print.
- Printing from a Mac
- 1. Download the DNP Mac printer driver from www.dnpphoto.com
- 2. Install the DNP Mac printer driver.
- 3. Connect your Mac to the network where WCM is available (either DNPWirelessConnect or your network if you have connected the WCM to that network) by clicking on the Network icon in the menu bar.
- 4. Pull down the Apple Menu and choose System Preferences.
- 5. Click on Printers & Scanners.
- 6. Click on the + (Add) icon to add a printer.
- 7. Select the printer instance that you want to install and click the Add button.
- Printing from Custom Photo Booth Applications
- Administrator Password Protection
- Printing from your iPhone or iPad (iOS printing)
- Advanced Settings
- Changing the Built-In HotSpot Name and Password
- 1. From the main screen, click the Edit button next to the Built-In HotSpot section.
- 2. When prompted, enter your new network name (ex. Bobs Photo Fun).
- 3. In the password field, enter a password. The new password must be at least 8 characters.
- 4. If you are having issues with poor connections you can change the channel to one of the higher settings (5-10). However, DNP IAM does not recommend changing the channel setting.
- Language Settings
- Measurement Settings (Metric vs. Imperial)
- Changing the Built-In HotSpot Name and Password
- Troubleshooting
- Resetting Your WCM
- 1. Sometimes power cycling the printer may clear a problem. To do so, simply turn OFF the printer for several seconds and turn it back on. If that doesn't clear the issue continue to the next option.
- 2. Restart the printing subsystem (in the Subsystem Controls section of the WCM portal). Use this to clear minor issues such as printers not immediately broadcasting over the network or clearing problem job(s). This is a non-destructive option and wi...
- 3. Power reset - shut down the WCM (in the WCM portal), unplug the WCM, then plug the WCM in again. If you cannot connect with the WCM portal, simply unplug the unit, wait 10 seconds and plug the WCM in again.
- 4. Reset the printing subsystem (in the Subsystem Controls section of the WCM portal). This will remove configured printers and queues from your settings. Use with caution - you will lose all current print jobs and you will have to reconfigure all pr...
- Contact Us
- Resetting Your WCM
