
User manual


- 15 -
English
Getting started
Install the software
First, install the driver before you connect the microscope to the USB port.
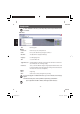
Insert the supplied CD-ROM into the CD-ROM drive of your computer. The CD starts automatically and
displays the startup screen, alternatively, you can start the installation with microcapture or microcapture.
exe. on the CD. Click on the install screen on USB Microscope Driver
After a successful driver installation, start the installation of micro-capture software
The Installation installs itself completely independent.
For Windows Vista, Windows 7 the user rights for the directory Micro Capture might have to be changed,
otherwise the menu setting can not be stored.
For MAC OS a folder on the CD is available.
The microscope is installed as a UVC device, and is therefore suitable for all modern opera-
ting systems. The Micro capture software works only with Windows from Windows2000 SP4
and MAC. Directx9c must be installed in Windows.
Start the software
Start the program microcapture.exe from your desktop
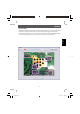
If all drivers are installed correctly, you will clearly see a preview.
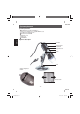
Operation
Mount the camera on the included stand and remove the protection cap.
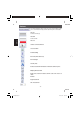
The program interface is multilingual. Should it be necessary to switch the language, select the options>
Language> English
Point the camera at the imaged object and set the sharpness with the thumbwheel. Observe the monitor.
At very short distance to the object, there are 2 points with different magnifi cation at which
the camera can be focused. For help, refer to page 9 .
To save individual images, you press the button for single images, click in the upper window frame on the
camera icon or press the F11 key. Photos are stored in the folder photos.
The captured image is displayed on the right side as a miniature representation.
If the mouse is moved on a miniature representation, the image is displayed in the preview window. Use
the right mouse button and get a submenu with which you can do the following action: With Öffnet, you get
a preview, click Save to save the image, to copy the image is saved in the memory for further processing
and with delete the Image is deleted. To Save, a dialog box opens that allows you to select the fi le name
and location.
A video will be added as soon as the video camera icon in the upper window is clicked or the system is
started with capturing> video. The recording will be stopped once the icon is clicked again. Videos are
saved in the folder video.
Software installation
dm4lg.indd 15dm4lg.indd 15 27.01.2010 15:55:5027.01.2010 15:55:50