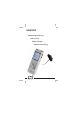
HSQ2010 Bedienungsanleitung user manual Mode d’emploi Gebruiksaanwijzing
Inhaltsverzeichnis Deutsch Sicherheitshinweise ......................................3 Funktionsumfang ..........................................4 Lieferumfang .................................................6 Geräteansicht ...............................................7 Inbetriebnahme ............................................8 Batterien einlegen ........................................8 Ein- und ausschalten ....................................8 Hold-Funktion. ........................................
Sicherheitshinweise Allgemeine Hinweise Stellen Sie das Gerät niemals auf einen instabilen Untergrund. Durch ein Herabfallen könnten Personen verletzt werden. Das Gerät gehört nicht in Kinderhände. Es ist kein Spielzeug. Beachten Sie auch die Sicherheitshinweise und die Bedienungsanleitungen der übrigen Geräte, an die das Gerät angeschlossen wird.
Sicherheitshinweise Störungen Deutsch Sollte ein Gegenstand oder Flüssigkeit in das Gerät gelangen, entfernen Sie die Batterien und lassen Sie das Gerät von einer autorisierten Fachkraft überprüfen, bevor Sie es weiter verwenden. Wir empfehlen Ihnen, sich an unser Service-Center zu wenden. Die meisten elektronischen Geräte, wie Lampen, Rechner, Computer, Telefone etc. erzeugen ein elektromagnetisches Feld.
-5- Deutsch Funktionsumfang • Dank einstellbarer Aufnahmeempfindlichkeit können Hintergrundgeräusche vermieden werden und erfolgt eine Anpassung an die Aufnahmeumgebung. • Der interne Speicher bietet eine große Aufnahmekapazität und ermöglicht es, auch lange Aufnahmen zu speichern. • Der sprachaktivierte Aufnahmemodus ermöglicht Freisprechaufnahmen, sodass Sie sich keine Sorgen machen müssen, an das Drücken der Aufnahmetaste zu denken.
Lieferumfang Deutsch • Schnelle Übertragung von Aufnahmen, Musik und Daten über USB2.0-Verbindung. • Die Funktionen für Indexmarkierer und temporäre Markierer ermöglichen es Ihnen, die gewünschten Stellen in einer Aufnahme schnell zu finden. • Unterstützt bis zu 400 Aufnahmen in jedem der vier verfügbaren Ordner und einem versteckten Ordner, damit Sie die Dateien schnell und leicht organisieren können.
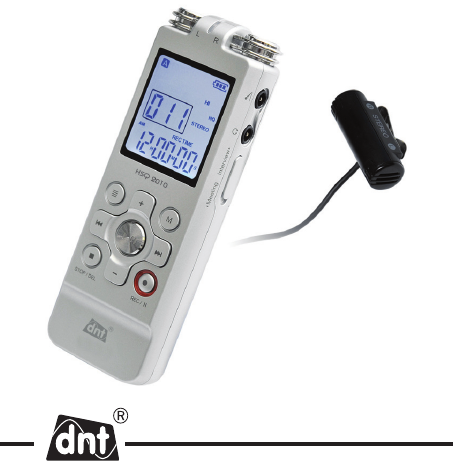
Geräteansicht Deutsch Geräteansicht Ohrhörerbuchse Mikrofonbuchse, Line-In-Buchse Integriertes Mikrofon (LINKS/RECHTS/MITTE) Aufnahme/Pause/Ein Stopp/Display/Löschen Lautsprecher Menü/UKW-Radio Inhalt/Ordner/Wiederholen Display Aufnahme-/Wiedergabeanzeige Lautstärke+ Ein- und ausschalten, Wiedergabe/ Pause, Wiedergabegeschwindigkeit Schneller Vorlauf/Dateiauswahl/Menüauswahl Lautstärke Schneller Rücklauf/Dateiauswah^Menüauswahl Hold-Schalter 17 Batteriefach USB-Buchse Halteschlaufenloch Mikrofonauswahl (
Inbetriebnahme Batterien einlegen Deutsch 1 Schieben Sie die Batteriefachabdeckung auf. 2 Legen Sie die Batterien gemäß der Darstellung ein, und schließen Sie die Abdeckung. • Entfernen Sie die Batterien, wenn Sie den Recorder für längere Zeit nicht benutzen. Der Recorder kann durch auslaufende Batterien beschädigt werden. • Wenn am Recorder Fehlfunktionen auftreten, entfernen Sie die Batterien, und legen Sie sie wieder ein. • Stoppen Sie den Recorder, bevor Sie die Batterien austauschen.
Inbetriebnahme Befindet sich der HOLD-Schalter in der Hold-Position, sind alle Tasten des Geräts deaktiviert. Auf dem Display wird kurz On Hold angezeigt, und dann wird das Display ausgeschaltet. Heben Sie die Sperre des Recorders auf, indem Sie den Schalter in die OffPosition bewegen. Datum und Uhrzeit einstellen Wenn Sie die Batterien zum ersten Mal einlegen, werden Sie zum Einstellen von Datum und Uhrzeit aufgefordert. • Auf dem Display wird CLOCK angezeigt. Drücken Sie die -Taste.
Aufnahme Den Recorder mit einem Computer verwenden Deutsch Da es sich beim Recorder um einen USB-Massenspeicher handelt, können Sie Dateien bequem speichern, sichern und verschieben. Der Recorder wird mit einem USB-Kabel an einen Computer angeschlossen. Es ist nicht erforderlich, eine spezielle Software zu installieren. Der Recorder wird automatisch als Wechsellaufwerk angezeigt, und Sie können Dateien einfach per Drag & Drop vom Computer auf das Gerät kopieren oder umgekehrt.
Mit einem externen Mikrofon aufnehmen Die Aufnahme mit einem externen Mikrofon erfolgt wie mit dem integrierten Mikrofon, Sie brauchen lediglich ein Mikrofon an die Mikrofonbuchse anzuschließen. - 11 - Deutsch Aufnahme fest (weitere Informationen finden Sie unter Einstellungen anpassen auf Seite 25). • Machen Sie eine Probeaufnahme, um sicherzugehen, dass Sie mit den Einstellungen des Recorders zufrieden sind.
Aufnahme Deutsch Überlappende Aufnahme Führen Sie die folgenden Schritte aus, um zu einer gespeicherten Aufnahme etwas hinzuzufügen und einen Teil der Aufnahme zu überlappen. • Drücken Sie bei gestopptem Recorder die -Taste, um den gewünschten Ordner auszuwählen. • Drücken Sie die oder -Taste, um die Datei auszuwählen, der Sie etwas hinzufügen möchten.
Die aufgenommene Datei wird im Verzeichnis VOICE im Ordner H gespeichert und wird automatisch als schreibgeschützt festgelegt, d. h. die aktuelle Sprachdatei wird gesperrt, um ein versehentliches Löschen der Datei zu verhindern. Wenn Sie alle Dateien in einem Ordner löschen möchten, müssen Sie Off wählen, um die Sperre der Datei aufzuheben, sodass auch diese Datei gelöscht werden kann.
Aufnahme Versteckte Aufnahmen wiedergeben Deutsch • Drücken Sie bei gestopptem Recorder gleichzeitig die -Taste und die Taste -Taste, um den gewünschten Ordner auszuwählen. • Im Modus „Versteckte Wiedergabe“ durchsucht der Recorder automatisch den Ordner H im Verzeichnis VOICE. • Drücken Sie die -Taste, um die Wiedergabe anzuhalten. Die Aufnahme-/Wiedergabeanzeige blinkt orange. Drücken Sie -Taste, um die Wiedergabe fortzusetzen. erneut die • Drücken Sie die STOP/DEL-Taste, um die Wiedergabe zu beenden.
Funktionen Weitere Funktionen Mit Mikrofon und Ohrhörer, ohne jedoch aufzunehmen, können Sie das Gerät auch als Hörgerät verwenden. • Halten Sie bei gestopptem Recorder die -Taste gedrückt,um den gewünschten Ordner auszuwählen. • Drücken Sie die STOP/DEL-Taste, um die Hörgerätefunktion zu beenden. Das Windows Media Player-Plug-in im SLP-Modus verwenden Für die Wiedergabe von Windows-Medien im SLP-Modus muss das Windows Media Player-Browser-Plug-in installiert sein.
Funktionen Deutsch Es kann mehrere Sekunden dauern, bis der Computer die Programmliste kompiliert hat. • Suchen Sie in der Liste nach CNM Codec. Wenn der Name in der Liste angezeigt wird, ist das Plug-in installiert, andernfalls müssen Sie das Windows Media-Plug-in für den SLP-Modus von der dnt-Kundendienstseite herunterladen und im Recorder-Stammverzeichnis installieren. Die einfachste Weise, um das CNM-Plug-in zu deinstallieren, bietet die Option Software in der Systemsteuerung.
Sprachdatei sperren und entsperren Sie können Dateien sperren, um ein versehentliches Löschen der darin enthaltenen wichtigen Daten zu verhindern. Gesperrte Dateien werden nicht gelöscht, wenn Sie alle in einem Ordner enthaltenen Dateien löschen. • Halten Sie bei gestopptem Recorder die STOP/DEL-Taste gedrückt, um den gewünschten Ordner auszuwählen. • Drücken Sie die oder -Taste. um im Menü Geschützt auszuwählen (auf dem Display wird ProTec angezeigt).
Wiedergabe Wiedergabe Deutsch • Drücken Sie bei gestopptem Recorder die -Taste, um den gewünschten Ordner auszuwählen. • Drücken Sie die oder -Taste, um eine Datei für die Wiedergabe auszuwählen. -Taste. Auf dem Display wird die Wieder• Drücken Sie die gabedauer angezeigt, und die grüne LED leuchtet. • Passen Sie die Lautstärke mit den Tasten + und - an. • Drücken Sie die STOP/DEL-Taste, um die Wiedergabe zu beenden. Auf dem Display wird die Gesamtwiedergabedauer der aktuellen Datei angezeigt.
Wiedergabe > Jazz > Rock > Pop > Normal). Das Symbol markierer enthält. zeigt an, dass die Aufnahme Index- Pro Datei können bis zu 32 Indexmarkierer festgelegt werden. Wiedergabefunktionen Langsame, schnelle und normale Wiedergabe -Taste mindestens 1 Sekunde lang gedrückt, Halten Sie die um zwischen normaler, langsamer und schneller Wiedergabe zu wechseln. Suchen oder -Taste Halten Sie während der Wiedergabe die gedrückt, um die aktuelle Datei schnell vorwärts oder rückwärts wiederzugeben.
Löschen wiederholte Wiedergabe der Sequenz beginnt. Deutsch • Drücken Sie auf die STOP/DEL-Taste, um die Wiedergabe zu beenden oder drücken Sie die -Taste, um zur normalen Wiedergabe zurückzukehren. Eine Datei oder einen Ordner wiederholen/Zufallsmodus Halten Sie während der Wiedergabe die -Taste mindestens 1 Sekunde lang gedrückt, um zwischen den Wiedergabemodi zu wechseln (Datei wiederholen, Ordner wiederholen, Zufallsmodus für Ordner oder normale Wiedergabe).
Löschen oder -Taste, um eine Löschoption ausDeutsch • Drücken Sie die zuwählen. Symbol Bedeutung FILE Löscht eine Datei. FOLD Löscht alle Dateien in einem Ordner. Löscht alle Indexmarkierer in einer Datei. • Drücken Sie die -Taste. oder -Taste, um die zu löschende Datei, • Drücken Sie die den zu löschenden Ordner oder die Datei mit den zu löschenden Indexmarkierern auszuwählen. • Drücken Sie erneut die • Drücken Sie die oder -Taste, N (Nein) wird angezeigt. -Taste, um Y (Ja) auszuwählen.
Löschen Undele (rückgängig machen) angezeigt wird. Deutsch • Drücken Sie die -Taste, um das Menü Undele aufzurufen. NO (Nein) wird angezeigt. • Drücken Sie die len. oder -Taste, um YES (Ja) auszuwäh- • Drücken Sie zur Bestätigung die -Taste. Diese Option ist nur unmittelbar nach der Löschung verfügbar. Wenn Sie nach dem Löschen der Datei über den Computer eine Datei auf dem Voice Recorder aktualisiert haben oder eine Aufnahme gemacht wurde, können die gelöschten Daten nicht wiederhergestellt werden.
Radio • Schließen Sie die Ohrhörer an. Die mitgelieferten Ohrhörer dienen auch als Antenne. • Halten Sie die Taste MENU mindestens 1 Sekunde lang gedrückt, um den Radiomodus aufzurufen. Radiosender automatisch einstellen • Drücken Sie die Taste MENU, während sich der Recorder im Radiomodus befindet, um das Menü zu öffnen. • Drücken Sie die oder -Taste, bis AUTO angezeigt wird. -Taste. N (Nein) wird angezeigt. • Drücken Sie erneut die • Drücken Sie die oder -Taste, um Y (Ja) auszuwählen.
Radio Deutsch Drücken Sie die STOP/DEL-Taste, während sich der Recorder im Radiomodus befindet, um zwischen Stereo- und Monoempfang umzuschalten. Voreingestellten Sender wiedergeben • Drücken Sie die -Taste, während sich der Recorder im Radiomodus befindet, um zwischen manueller Senderwahl und Voreinstellungsmodus umzuschalten. oder -Taste, • Drücken Sie im Voreinstellungsmodus die um zu einem anderen voreingestellten Sender zu wechseln. • Passen Sie die Lautstärke mit den Tasten „+“ und „-“ an.
Deutsch Radio Einstellungen anpassen Dieses Menü ist verfügbar, wenn der Recorder gestoppt wurde und bei Radioempfang. Welche Menüoptionen verfügbar sind, hängt davon ab, ob Sie sich in einem Sprachordner, einem Musikordner oder im Radiomodus befinden. • Drücken Sie bei gestopptem Recorder oder im Radiomodus die Taste MENU , um das Menü zu öffnen. • Drücken Sie die oder -Taste , um eine Menüoption auszuwählen . -Taste , um ein Untermenü aufzurufen.
Menüfunktionen PCM SHQ HQ SP LP SLP Mehrere Aufnahmemodi stehen zur Auswahl: nicht komprimierte PCM-Stereoaufnahme für Aufnahmen in CD-Qualität, zwei Stereomodi (SHQ und HQ) sowie drei Monomodi (SP, LP und SLP für erweiterte Aufnahmedauer). Weitere Informationen zu verfügbaren Aufnahmemodi und Aufnahmedauer finden Sie unter .Technische Angaben auf Seite 30. DIVIDE* Off 30Min. 60Min. Wenn diese Funktion aktiviert ist, wird bei einer Aufnahme automatisch alle 30 oder 60 Minuten eine neue Datei angelegt.
On Off Der sprachaktivierte Aufnahmemodus ist eine bequeme Funktion, die Freisprechaufnahmen ermöglicht. Wenn dieser Modus aktiviert ist, startet die Aufnahme, wenn Sie zu sprechen beginnen. Tritt eine Stille von mindestens drei Sekunden auf, wird die Aufnahme automatisch angehalten und nur fortgesetzt, wenn Sie wieder zu sprechen anfangen CLOCK DD:MM: YY 12/24H HH:MM: SS Jeder Datei werden Angaben zum 12/24 H Aufnahmezeitpunkt hinzugefügt, nachdem Datum und Uhrzeit eingestellt wurden.
Funktionen VER Zeigt die Version und das Veröffentlichungsdatum der Firmware an Deutsch NTRO Yes No Zum aktuellen Ordner werden 10 Sekunden lang Musik oder Sprache wiedergegeben. AUTO** Yes No Es können bis zu 20 automatisch voreingestellte Radiosender gespeichert werden. OUTPUT ** EP SP Im Radiomodus können Sie zwischen Wiedergabe über Ohrhörer (EP) oder Lautsprecher (SP) wählen. REG ON KOR ** USA Diese Option ermöglicht es, einen UKWBereich auszuwählen (Korea/USA/China/ Europa/Japan/Andere).
• Drücken Sie die oder -Taste , um UPDATE zu wählen. • Drücken Sie die -Taste . N (Nein) wird angezeigt. • Drücken Sie die oder -Taste , um Y (Ja) zu wählen. -Taste , um die neue Firmware zu • Drücken Sie erneut die installieren. Problembehandlung Mein Recorder lässt sich nicht einschalten. • Die Batterien sind möglicherweise leer oder nicht richtig eingelegt. Tauschen Sie die Batterien gegen neue aus, und achten Sie darauf, dass sie richtig eingelegt sind. Mein Recorder nimmt nichts auf.
Technische Daten Deutsch Mein Recorder kann nicht stoppen, anhalten, wiedergeben oder aufnehmen. • Der Recorder befindet sich möglicherweise im HOLD-Modus. Schieben Sie den HOLD-Schalter in die Off-Position. Ich höre nichts über die Ohrhörer. • Die Ohrhörer sind möglicherweise nicht richtig angeschlossen. Schließen Sie die Ohrhörer richtig an. Die Lautstärke ist auf leisester Stufe. Passen Sie die Lautstärke an. Technische Daten Anschlüsse • USB • Mikro Mitte schneller Mini-USB 2.
Deutsch Technische Daten Kompressionsrate/Abtastfrequenz PCM-Modus 1411 kBit/s, 44,1 kHz SHQ-Modus 320 kBit/s, 44,1 kHz HQ-Modus 192 kBit/s, 44,1 kHz SP-Modus 128 kBit/s, 44,1 kHz LP-Modus 64 kBit/s, 22.05 kHz SLP-Modus 4 kBit/s, 8 kHz Musikwiedergabe Kompressionsformat .mp3, .
Serviceabwicklung/Entsorgung Serviceabwicklung Deutsch Sollten Sie Grund zur Beanstandung haben oder Ihr Gerät einen Defekt aufweist, wenden Sie sich an Ihren Händler oder setzen Sie sich bitte mit der Serviceabteilung der Fa. dnt in Verbindung, um eine Serviceabwicklung zu vereinbaren. Servicezeit: Montag bis Donnerstag von 8.00-17.00 Uhr Freitag von 8.00-16.00 Uhr Hotline/Service: 06074 3714 31 E-Mail: support@dnt.
Garantiebedingungen 1.Es gelten grundsätzlich die gesetzlichen Garantiebestimungen. Die Garantiezeit beginnt mit der Übergabe des Gerätes. Im Garantiefall ist das Gerät mit dem Kaufbeleg (Kassenzettel, Rechnung o.ä.), dem korrekt ausgefüllten Gerätepass und einer genauen Fehlerbeschreibung einzureichen. Ohne diese Belege sind wir nicht zur Garantieleistung verpflichtet. 2.Während der Garantiezeit beheben wir kostenlos alle Mängel, soweit sie auf Material oder Fabrikationsfehler zurückzuführen sind.
Inhaltsverzeichnis English Safety Instructions ......................................35 Product highlights .......................................36 What‘s in the box ........................................38 Voice Recorder ...........................................39 Getting started ............................................40 Insert the batteries......................................40 Power on/off ................................................40 Hold function......................................
Safety instructions Please read this information carefully before you use the product Don’t place the unit on unstable location, if it falls down, people may be injured. The unit is not a toy, please beware of small children. If you connect the unit to other electronic devices, please study also the security instruction of this device. If you have any question regarding the unit, how it works, the safety or the correct connection please contact our technical support or ask any specialist.
Safety instructions Batteries must be disposed of correctly. Battery retailers have containers for used batteries. There are also special local authority collection points for used batteries. Technical problems English In case any foreign material or liquid gets into the product, please immediately remove the power cord. Before you use it again, ask your authorised dealer to check the product carefully. Please do not hesitate to contact our service center.
- 37 - English Features • The voice-activat ed recording mode provides hands-free recording without having to worry about remembering to push the record button. • The auto divide feature automatically divides long recordings into separate files. This makes it much easier to find, edit and archive long recordings such as meetings or lectures. • Record while p owered through USB without draining the battery.* • Records from external audio sources via line-in.
Delivery content Delivery content English batteries USB cable stereo earphones user manual audio cable lapel stereo microphone voice recorder ear microphone - 38 - stand holder
English View of the appliance Headphone socket Microphone socket, line-in socket Built-in microphone (LEFT/RIGHT/CENTER) Record / Pause / Power on Stop / Display / Delete Speaker Menu / FM radio Index / Folder Display Record / Play indicator Volume up Power on/off, Play/Pause, Play speed Fast forward / File selection / Menu selection Volume down Fast rewind / File selection / Menu selection Hold switch Battery compartment USB socket Strap hole Select Mic.
Getting started Insert the batteries • Slide open the battery cover. • Place the batteries in the correct polarity as indicated and close you may have to reset the time,the cover. English • Remove the batteries if you will not be using the HSQ2010 Recorder for an extended period. Leaking batteries may damage the HSQ2010 Recorder • If the HSQ2010 Recorder malfunctions, remove the batteries and reinsert them. • Stop the recorder before replacing the batteries.
Getting started Hold function When the HOLD switch is in the Hold position, all buttons on the device are inactive.On Hold will be shown briefly on the display, and the display will turn off. Unlock the HSQ2010 Recorder by moving the HOLD switch to the Off position. When the batteries are installed for the first time, you will be prompted to set the date and time. button. The • CLOCK will be shown on the display. Press the year indicator flashes. • Press the or button to set the year.
Record Use the HSQ2010 Recorder with a computer As a USB mass storage device, the HSQ2010 Recorder offers a convenient way to save, back up and move files. The HSQ2010 Recorder connects to a computer using a USB connection and does not require special software to be installed. The HSQ2010 Recorder is automatically displayed as a removable drive, allowing you to simply drag and drop files to and from the unit. English Do not disconnect the HSQ2010 Recorder while files are transferred from or to the device.
- 43 - English Record Make a test r ecording to make sure that the HSQ2010 Recorder settings are correct. during recording to display the remaiPress and hold ning recording time. Press during recording to create a new file. The maximum number of files in each folder is 400, for a total capacity of 2,000 files (400 files x 4 folders, 400 files x 1 hidden folder). If the recording time e xceeds the available capacity or the number of files reaches 2,000, recording stops and FULL will be displayed.
Record English Overlap recording Follow these steps to make additions to a recording and overlap parts of a recording. • Press the button while the recorder is stopped to select the desired folder. or button to select the file to which the addi• Press the tion should be made. • Play or forward to the position where the addition should be made button to pause playback. and press the • Press the button to start overlap recording.
Hidden Recording button while the recorder is stopped to select the • Press the desired folder. • When it is in Hidden Recording mode, the red record/play indicator light will not be activated while recording. Point the Built-in microphone toward the sound source. • To pause recording, press the button . The record/play indicator will not blink and PAUSE will flash on the display. • Press the , button again to resume recording. • To stop recording, press the STOP/DEL button.
Record Playback of Hidden Recorded File English • Press the button and button simultaneously while the recorder is stopped to select the desired folder • When it is in the Hidden Playback mode, the recorder browses the voice recording file of H folder of VOICE directory automatically. • To pause playback, press the button. The record/play indibutton again to resume cator will blink in orange, Press the playback. • To stop playback, press the STOP/DEL button.
Additional Features Additional Features Hearing Aid Feature You can listen to voices using the microphone with earphones without using the recording function. English • Press and hold the button on while the recorder is stopped to select the desired folder. • To stop Hearing Aid Feature, press the STOP/DEL button Using the Windows Media Player plugin with SLP mode To play Windows media in SLP mode, SLP needs the Windows Media Player browser plugin installed.
Additional Features The simplest way to uninstal CNM plugin is to use Add or Remove Programs. Uninstall CNM plugin Click Start, and then click Run. • In the Open box, type appwiz.cpl, and then click OK. It may take several seconds for your computer to compile a list of programs. English • Scroll down through the list and click CNM Codec, and then click Remove.
Additional Features Sequential file numbers are reassigned automatically. A file attribute of created date is set to current time and date based on HSQ2010 Recorder. Lock and Unlock Voice File • Press and hold STOP/DEL button while the recorder is stopped to select the desired folder. or • Press the displayed ProTec. • Press the played.
Playback Playback English • Press the button while the recorder is stopped to select the desired folder. • Press the or button to select the file to play back. button. The playback time will be shown on the • Press the display, and the green LED will light. • Adjust the volume using the and + / - buttons. • To stop playback, press the STOP/DEL button. The total playback time of the current file will be shown on the display. button again to continue playback from the previ• Press the ous position.
Playback noise cancel mode (Normal > LCF (Low Cut Filter) > VOC (Voice Filter) > Normal). The icon indicates, that the voice file contains index marks. Up to 32 index marks can be set per file. Slow and fast, normal playback Press and hold the button for 1 second or longer to switch between normal, slow and fast playback. Search Press and hold the or button during playback to scan backward or forward in the current file at a fast speed. Release the button to resume playback at the selected speed.
Delete Repeat a file or folder / shuffle mode Press and hold the button for 1 second or longer during playback to switch between play modes (repeat file, repeat folder, shuffle folder or normal playback). Icon Meaning Play one file repeatedly English Play all files within folder repeatedly. Play all music files within folder randomly Shuffle mode is available only in the M (music) folder. Delete • Press the button while the recorder is stopped to select the desired folder.
Delete • Press the button. • Press the or button to select the file, the folder or the file containing the index marks to be deleted • Press the button again.N (No) is displayed. • Press the or • Press the button to confirm. English button to select Y(Yes) Sequential file numbers are reassigned automatically Undelete functions To recover a file that was accidentally erased. If files were recorded after deleting a recorded file, recovery is not available.
Delete English Error ER will be displayed, if it could not recover the erased voice file. Radio mode • Connect the headphones. The supplied headphones serve as a radio antenna • Press and hold the MENU button for 1 second or longer to enter radio mode. Auto tune radio stations • Press the MENU button while the recorder is in radio mode to open the menu. or button to select AUTO. • Press the button again.N (No) is displayed. • Press the • Press the or button to select Y(Yes). button to confirm.
Radio Press the STOP/DEL button while the recorder is in radio mode to switch between stereo and mono reception. Play a preset radio station • Press the button while the recorder is in radio mode to switch between frequency and preset mode. or • In preset mode, press the ther preset radio station. button to change to ano- • Adjust the volume using the + and - buttons. • To exit radio mode, press and hold the MENU button for 1 second or longer.
Radio Record from FM radio • Manually tune to a radio station or play a preset radio station. English • Press the button to start recording. • To stop recording, press the STOP/DEL button. Customize settings The menu is available while the recorder is stopped and during radio reception. The available menu items differ depending on whether you are in a voice folder, a music folder or in radio mode. • Press the MENU button while the recoder is stopped or during radio reception to open the menu.
Menu SPLIT* Setting Description Yes Split a large file into two separate files so No that they can be easily archived or transferred via e-mail, or so that part of a file can be deleted. To split a file, play and stop at the position where the splitting should be made, then open the SPLIT menu.
Settings On Off Voice-activated recording is a convenient feature for hands-free recording. When voice-activated recording is enabled, recording will start when you begin speaking. When you stop speaking, the recorder will automatically pause recording after three seconds of silence, and resume only when you begin speaking again CLOCK DD:MM: YY 12/24H HH:MM: SS If the date and time are set, information about when the file is recorded is automatically stored with each file.
AUTO** Yes No Auto-tune a radio station and store up to 20 stations as presets. OUTPUT ** EP SP Switch between earphone (EP) and speaker (SP) output in radio mode. REG ON KOR ** USA The FM Region mode enables you to select between Korea/USA/China/Europe/Japan/ Others DEFAULT Yes No You can reset all the items on the VOICE and FM menu to their default setting. UNDELETE*** YES No Recovers files accidentally erased.
Firmware Update the firmware English Your HSQ2010 Recorder is controlled by an internal program called firmware. R egularly check www.dnt.de for new firmware updates. • Download the firmware update for your HSQ2010 model from www.dnt.de > Service > Download-Center > Voice-Recorder herunterand save the file in the root directory of the HSQ2010 Recorders. • Press the MENU button while the recorder is stopped to open the menu. • Press the or button to select UPDATE . • Press the -button .
Troubleshooting Troubleshooting My recorder does not record anything • The recorder may be in HOLD mode. Slide the HOLD switch to the Off position. • The maximum number of recordings may be reached or the recording capacity is full. • Delete some recordings or move recordings to an external device. I cannot hear anything from the speaker • The headphones may be plugged in. Remove the headphones.. • The volume is at the lowest setting. Adjust the volume.
Technical data Technical data Connectivity • USB • Center mic High-speed 2.0 mini-USB 6,0 mm, impedance 2,0 kΩ 5,8 mm, impedance 1,6 kΩ 3. 5 mm, impedance 16 Ω or more • left/right mic English • Headphone Display • Typ • Diagonal screen size Recording format LCD, Segment 37,58 mm/1,4 Zoll .mp3 (Mpeg I/Audio Layer 3) .wav (PCM) () .cnm (Compressed Voice Format) Built-in flash memory Built-in: Stereo External Stereo Recording media Microphone Recording time 4GB PCM mode (.
Technical data Music playback Kompressionsformat MP3-Bitraten: WMA-Bitraten • No DRM support Tuner/reception • Tuner bands: • Frequency range FM stereo 87,5 - 108 MHz (Korea, USA, Europa, China, Andere) • Frequency range 76 - 90 MHz (Japan) • Number of preset channels 20 • Auto digital tuning Speaker Built-in 30 mm round dynamic speaker • Output power 300 mW Operating conditions • Temperature 5 - 45 °C/41 - 113 °F • Humidity 10 % - 90 % Power • Battery type 2 AAA Alkali-ManganBatteries (LR03 oder R03) • Ba
Servicea information/Disposal Service information In case of complaints your device shows a defect, please consult your dealer or contact the service department of dnt to agree a servicing. Service time: English Hotline/service: E-mail: Monday until Thursday from 8.00-17.00h Friday from 8.00-16.00h +49 6074 3714 31 support@dnt.de Please do not send your device to our address without request by our service team. The expense and the risk of loss are for debits of the sender.
1.In general the European warranty regulations are valid. Warranty starts with receipt of unit. In a warranty case, please submit the unit together with invoice, unit pass and error description. Without these documentary evidence we are not obliged to a warranty performance. 2.During warranty period we repair all constructional or material defects which are caused by a manufacturing fault. It is in the decision of the manufacturer to change or replace defective parts/units. Further claims are excluded.
Contenu Français Directives de sécurité .................................67 Les points forts du produit ..........................68 Contenu de l’emballage ..............................70 Vue de l’appareil .........................................71 Première mise en service ...........................72 Insertion des piles ......................................72 Marche/arrêt ...............................................72 Bouton HOLD..............................................
Précautions de sécurité Avant la première mise en service, veuillez lire attentivement les instructions suivantes. Ne jamais poser l’appareil sur un support instable. La chute de l’appareil pourrait blesser des personnes. Ne pas laisser l’appareil à la portée des enfants en bas âge. L’appareil n’est pas un jouet. Veuillez également respecter les prescriptions de sécurité et les modes d’emploi des autres appareils auxquels sera connecté l’appareil.
Précautions de sécurité Les éléments du boîtier ou des accessoires peuvent contenir ce que l’on appelle des plastifiants pouvant attaquer des surfaces synthétiques et des surfaces de meubles sensibles Evitez pour cette raison un contact direct avec ces surfaces Perturbations En cas de pénétration d’un objet ou d’humidité dans l’appareil, faites le contrôler par un expert agrée. Nous vous recommandons de vous adresser à notre service clientèle.
- 69 - Français Les points forts du produit autres bruits de fond et permet d’adapter l’enregistrement au milieu ambiant. • L’importante mémoire interne offre une capacité d’enregistrement considérable et permet de stocker de longs enregistrements. • Le mode d’enregistrement activé par voix permet un enregistrement « mains libres », lequel vous évite d’avoir à vous rappeler d’appuyer sur le bouton d’enregistrement.
Contenu de l’emballage • Prend en charge un maximum de 400 enregistrements dans chacun des quatre dossiers disponibles et un dossier masqué pour organiser vos fichiers rapidement et facilement. • Faisant également office de périphérique de stockage USB, le HSQ2010 offre un moyen pratique d’enregistrer, de sauvegarder et de déplacer des fichiers sans avoir à installer de logiciel ou de pilote. * Disponible uniquement pour certaines versions du produit.
Vue de l’appareil Français Vue de l’appareil Prise du casque d’écoute Prise du microphone, prise d’entrée de ligne Microphone intégré (GAUCHE/DROITE/CENTRE) Enregistrer / Suspendre / Allumer Arrêter / Afficher / Supprimer Haut-parleurs Menu / Radio FM Index / Dossier / Répétition Écran Indicateur Enregistrement / Lecture Volume - Haut Marche/arrêt, Lecture/Pause, Vitesse de lecture Avance rapide / Sélection de fichier / Sélection de menu Volume - Bas Retour rapide / Sélection de fichier / Sélection de me
Prise en main Insertion des piles • Faites glisser le couvercle du compartiment à piles. • Installez correctement les piles tel qu’indiqué par les polarités et remettez le couvercle en place. Français • Retirez les piles si vous envisagez de ne pas utiliser l’enregistreur HSQ2010 pendant une période de temps prolongée. L’enregistreur HSQ2010 risque d’être endommagé si une fuite existe au niveau des piles.
Prise en main Bouton HOLD Lorsque le bouton HOLD est positionné sur Hold, tous les boutons de l’appareil deviennent inactifs. L’écran indiquera brièvement On Hold puis s’éteindra. Déverrouillez l’enregistreur HSQ2010 en positionnant le bouton sur Off. Lorsque vous installez les piles pour la première fois, vous êtes invité à régler la date et l’heure. . L’indicateur • L’écran indiquera CLOCK. Appuyez sur le bouton d’année clignote. ou pour régler l’année.
Enregistrement Utilisation de l’enregistreur HSQ2010 avec un ordinateur Faisant office de périphérique de stockage USB, l’enregistreur HSQ2010 offre un moyen pratique d’enregistrer, de sauvegarder et de déplacer des fichiers. L’enregistreur HSQ2010 se connecte à un ordinateur à l’aide d’un câble USB et ne nécessite pas l’installation de logiciel en particulier. Etant automatiquement reconnu en tant que lecteur amovible par votre ordinateur, il vous suffit de déplacer des fichiers depuis/vers l’unité.
Enregistrement à l’aide d’un microphone externe Pour réaliser un enregistrement à l’aide d’un microphone externe, connectez le microphone à la prise correspondante et suivez la même procédure que pour le microphone intégré. - 75 - Français Enregistrement page 89. • Testez l’enregistrement pour vous assurer que les réglages de l’enregistreur HSQ2010 sont corrects. enfoncé durant l’enregistrement • Maintenez le bouton pour afficher la durée d’enregistrement restante.
Enregistrement Français Ecrasement de l’enregistrement Suivez les étapes ci-dessous pour apportez des ajouts à un enregistrement et en écraser des parties. pendant que l’enregistreur est arrêté • Appuyez sur le bouton pour sélectionner le dossier souhaité. • Appuyez sur le bouton ou pour sélectionner le fichier auquel vous souhaitez apporter l’ajout. • Lisez le fichier ou avancez jusqu’à la position où l’ajout doit être pour suspendre la lecapporté, puis appuyez sur le bouton ture.
Enregistrement Français Enregistrement discret pendant que l’enregistreur est arrêté • Appuyez sur le bouton pour sélectionner le dossier souhaité. • En mode Hidden Recording (enregistrement discret), le voyant rouge d’enregistrement/lecture reste éteint durant l’enregistrement. Avancez le microphone intégré vers la source audio. pour suspendre l’enregistrement. Le • Appuyez sur le bouton voyant d’enregistrement/lecture se met à clignoter. Le mot PAUSE s’affiche par intermittence à l’écran.
Enregistrement Lecture d’un fichier enregistré en mode d’enregistrement discret Français • Appuyez simultanément sur les boutons et pendant que l’enregistreur est arrêté pour sélectionner le dossier souhaité. • En mode Hidden Playback (lecture discrète), l’enregistreur parcourt automatiquement le fichier d’enregistrement vocal contenu dans le dossier H du répertoire VOICE. • Appuyez sur le bouton pour suspendre la lecture.
Fonctions supplémentaires Fonctions supplémentaires Aide auditive Utilisation du plug-in Windows Media Player en mode SLP Pour exécuter Windows Media Player en mode SLP, le plug-in du lecteur Windows Media Player doit être installé dans SLP. Pour installer le plug-in CNM Codec, procédez comme suit : • Visitez le site Web de dnt à l’adresse: http://www.dnt.de • Téléchargez le plug-in CNM Codec.
Fonctions supplémentaires • Recherchez le plug-in CNM Codec en faisant défiler la liste. • S’il figure dans la liste, le plug-in est installé. Sinon, vous devez l’installer pour le mode SLP depuis la page de support d’dnt ou depuis le répertoire racine de HSQ2010. • Pour désinstaller le plug-in CNM Codec, le plus simple consiste à accéder à Ajout/suppression de programmes. Désinstallez le plug-in. Français Cliquez sur Démarrer, puis sur Exécuter. • Dans la zone Ouvrir, tapez appwiz.
Fonctions supplémentaires Les numéros de fichier consécutifs sont réattribués automatiquement. La date de création d’un fichier est définie sur la date et l’heure actuelles, réglées dans l’enregistreur HSQ2010. Le verrouillage de fichiers empêche que d’importantes données ne soient accidentellement supprimées. Les fichiers verrouillés ne sont pas supprimés lorsque vous décidez de supprimer tous les fichiers d’un dossier.
Lecture Lecture Français • Appuyez sur le bouton pendant que l’enregistreur est arrêté pour sélectionner le dossier souhaité. • Appuyez sur le bouton ou pour sélectionner le fichier que vous souhaitez lire. . La durée de lecture s’affiche sur • Appuyez sur le bouton l’écran, et le voyant vert s’allume. • Réglez le volume à l’aide des boutons + / -. • Appuyez sur le bouton STOP/DEL pour arrêter la lecture. La durée totale de lecture pour le fichier en cours s’affiche sur l’écran.
Lecture niveau supérieur. Appuyez sur le bouton durant la lecture audio pour modifier le mode de l’égaliseur (Normal > Classic > Jazz > Rock > Pop > Normal). Remarques sur l’utilisation de l’enregistreur HSQ2010 en tant qu’enregistreur simple indique que le fichier vocal comporte des L’icône repères d’index. Vous pouvez définir un maximum de 32 repères d’index dans un seul fichier.
Supprimer clignote sur l’écran. au point de fin choisi. La séquence de • Appuyez sur le bouton répétition commence. • Appuyez sur le bouton STOP/DEL pour arrêter la lecture ou sur pour revenir en mode de lecture normale.
Supprimer • Appuyez sur le bouton de suppression pour sélectionner une option Signification FILE Permet de supprimer un seul fichier FOLD Permet de supprimer tous les fichiers d’un dossier. Permet de supprimer tous les repères d’index d’un fichier. • Appuyez sur le bouton -Taste. • Appuyez sur le bouton ou pour sélectionner le fichier, le dossier ou le fichier contenant les repères d’index à supprimer. • Appuyez de nouveau sur le bouton s’affiche à l’écran.
Supprimer dant au moins une seconde. Le mot DELETE s’affiche à l’écran. • Appuyez sur le bouton oder pour sélectionner le menu jusqu’à ce qu’il affiche Undelete (annuler la suppression). • Appuyez sur le bouton mot NO s’affiche. pour accéder au menu Undelete. Le • Appuyez sur le bouton ou pour sélectionner YES et confirmer l’annulation de la suppression. • Appuyez sur le bouton pour confirmer l’opération.
Radio Mode Radio • Branchez le casque d’écoute. Celui fourni avec l’appareil fait également office d’antenne radio. • Appuyez sur le bouton MENU pendant au moins une seconde pour passer en mode Radio. • Appuyez sur le bouton MENU pendant que l’enregistreur est en mode Radio. • Appuyez sur le bouton ou pour sélectionner AUTO. . La lettre N (pour non) s’affiche. • Appuyez sur le bouton • Appuyez sur le bouton oder pour sélectionner Y (oui). pour confirmer l’opération.
Radio Appuyez sur le bouton pendant que l’enregistreur est en mode Radio, pour basculer entre les modes de réception stéréo et mono. Lecture d’une station radio mémorisée Français • Appuyez sur le bouton pendant que l’enregistreur est en mode Radio pour basculer entre les modes Frequency (fréquence) et Preset (stations mémorisées). ou pour • En mode Preset, appuyez sur le bouton passer à une autre station radio mémorisée. • Réglez le volume à l’aide des boutons + / -.
Radio • Appuyez sur le bouton de MENU , pendant que l’enregistreur est arrêté ou durant une réception radio, pour ouvrir le menu. • Appuyez sur le bouton ou , pour sélectionner un élément de menu. • Appuyez sur le bouton , pour accéder à un sous-menu. • Appuyez sur le bouton oder , pour confirmer votre sélection. • Appuyez sur le bouton • Appuyez sur le bouton MENU , pour quitter l’écran de réglages actif.
PCM SHQ HQ SP LP SLP DIVIDE* Off 30Min. 60Min. Français REC* Choisissez parmi différents modes d’enregistrement : enregistrement stéréo PCM non compressé pour une qualité semblable à celle d’un CD audio, deux modes stéréo (SHQ et HQ) ou trois modes mono dont SP, LP et SLP pour des périodes d’enregistrement prolongées. Reportezvous aux données techniques de la page 94 pour en savoir plus sur les modes d’enregistrement disponibles et les durées d’enregistrement.
On Off L’écran reste allumé pendant quelques secondes lorsque vous appuyez sur un bouton VA* On Off L’enregistrement activé par la voix est un moyen pratique d’enregistrer de la voix en mode mains libres. Lorsque l’enregistrement activé par la voix est activé, l’enregistrement commence dès que vous vous mettez à parler. Quand vous cessez de parler, l’appareil suspend automatiquement l’enregistrement après trois secondes de silence et le reprend uniquement lorsque vous vous remettez à parler.
VER Indique la version du microprogramme et sa date de parution. Français NTRO Yes No Lit les 10 premières secondes du contenu audio (musique ou voix) du dossier actif. AUTO** Yes No Permet de rechercher automatiquement une station radio et de mémoriser un maximum de 20 stations. OUTPUT ** EP SP Permet de passer de la sortie écouteurs (EP) à la sortie (haut-parleurs) en mode Radio.
ou , pour sélectionner . La lettre N (pour non) s’affiche à ou ,pour sélectionner Y , pour installer le nouveau micro- Français •Appuyez sur le bouton UPDATE . • Appuyez sur le bouton l’écran • Appuyez sur le bouton (oui). • Appuyez sur le bouton programme.. Résolution de problèmes L’enregistreur ne s’allume pas. • Les piles sont peut-être déchargées ou mal installées. Remplacez les piles usagées par des neuves et vérifiez qu’elles sont correctement installées. L’enregistreur n’enregistre rien.
Caractéristiques techniques L’enregistreur ne s’arrête pas, ne se met pas sur pause ou n’enregistre pas • Il se peut qu’il soit en mode HOLD (mise en attente). Faites glisser le bouton HOLD en position Off. Le casque d’écoute n’émet aucun son. • Le casque d’écoute n’est peut-être pas branché correctement. Branchez-le convenablement. Le volume est à son niveau le plus bas. Réglez le volume.
Caractéristiques techniques 192 Kb/s / 44.1 KHz 128 Kb/s / 44.1 KHz 64 Kb/s / 22.05 KHz 4 Kb/s / 8 KHz .mp3, .
Service clientèle Pour toute réclamation ou si votre appareil devait présenter un défaut, nous vous prions de vous adresser à votre détaillant ou au service clientèle de la société dnt afin de convenir des mesures à prendre. Horaires de service : Lundi à jeudi de 8h00 à 17h00 Vendredi de 8h00 à 16h00 Assistance téléphonique/Service : 06074 37 14 31 Courriel : support@dnt.
1.L‘application de la garantie est soumise aux dispositions légales. La période de garantie débute à la remise de l‘appareil. En cas d‘application de la garantie, nous demandons que soit restitué l‘appareil accompagné de son justificatif d‘achat (ticket de caisse, facture ou autres), la carte de l‘appareil dûment renseignée et une description précise du défaut. Sans ces éléments, nous ne sommes pas tenus d‘assurer les prestations de garantie. 2.
Inhoud Nederlands Veiligheidsinstructies ..................................99 Productkenmerken ...................................100 Inhoud van de doos ..................................102 Toestelaanzicht .........................................103 Inbedrijfstelling .........................................104 De batterijen plaatsen ..............................104 In-/uitschakelen ........................................104 Functie Hold..............................................
Veiligheidaanwijzingen Lees deze aanwijzingen a.u.b. voor het eerste gebruik zorgvuldig door. Plaats het toestel nooit op een onstabiele ondergrond. Door het neervallen kan het toestel beschadigd worden. Het toestel mag niet in kinderhanden geraken. Het is geen speelgoed. Let ook op de veiligheidsaanwijzingen en de gebruiksaanwijzingen van de overige toestellen, waarop het toestel aangesloten wordt.
Veiligheidaanwijzingen lakken kunnen aantasten. Vermijd daarom een direct contact met gevoelige vlakken. Storingen Mocht een voorwerp of vloeistof in het toestel geraken, moet u het door een geautoriseerde geschoolde arbeidskracht laten controleren voordat u het verder gebruikt. Wij raden u aan zich tot ons servicecentrum te wenden. Verpakkingsmateriaal Bewaar het verpakkingsmateriaal buiten bereik van kinderen.
Productkenmerken • • • • • • Afspelen • Aanpasbare afspeelsnelheid zodat u opnamen snel en langzaam kunt afspelen. • Een heel audiobestand of een deel ervan instellen voor herhaald afspelen met de optie voor herhaald afspelen. • Genieten van muziek in MP3- en WMA-indeling plus een FMtuner*. • Alarmklok met afspelen van spraak en timeropname. • Gesproken hulpberichten voor meldingen over de gebruiksomstandigheden van de recorder. Gemak • Groot scherm met achtergrondverlichting voor comfortabel kijken.
Inhoud van de doos • Als USB-massaopslagapparaat biedt de HSQ2010 een gemakkelijke manier om bestanden op te slaan, er back-ups van te maken en bestanden te verplaatsen, zonder dat u daarvoor speciale software of stuurprogramma‘s hoeft te installeren. * Niet in alle productversies beschikbaar.
Toestelaanzicht Aansluiting voor koptelefoon Aansluiting voor microfoon, aansluiting voor line-in Ingebouwde microfoon (links/rechts/midden) Opnemen / Pauzeren / Aan/uit Stoppen / Weergeven / Verwijderen Luidspreker Menu / FM tuner Index / Map / Herhalen Beeldscherm Indicator opname/afspelen Volume omhoog Aan/uit, Afspelen/Pauzeren, Afspeelsnelheid Vooruitspoelen / Bestand selecteren / Menu selecteren Volume omlaag Terugspoelen / Bestand selecteren / Menu selecteren Hold-schakelaar Batterijcompartiment USB
Inbedrijfstelling De batterijen plaatsen 1 Schuif de batterijklep open. 2 Plaats de batterijen met de plus- en minpool in de aangegeven richting en sluit de klep. Nederlands • Verwijder de batterijen als u de HSQ2010 Recorder langdurig niet gebruikt. Lekkende batterijen kunnen de HSQ2010 Recorder beschadigen. • Als de HSQ2010 Recorder niet goed werkt, verwijdert u de batterijen en plaatst u deze opnieuw. • Stop de recorder voordat u de batterijen vervangt.
Inbedrijfstelling Functie Hold Wanneer de HOLD-schakelaar zich in de Hold-positie bevindt, zijn alle knoppen op het apparaat inactief. Op het display wordt kort On Hold weergegeven, waarna het display wordt uitgeschakeld. U kunt de HSQ2010 Recorder weer ontgrendelen door de schakelaar in de positie Off te zetten. Datum en tijd instellen Nederlands Wanneer de batterijen voor de eerste keer worden geplaatst, wordt u gevraagd de datum en tijd in te stellen. • CLOCK wordt weergegeven op het scherm.
Opnemen De HSQ2010 Recorder gebruiken met een computer Als USB-massaopslagapparaat biedt de HSQ2010 Recorder een gemakkelijke manier om bestanden op te slaan, er back-ups van te maken en bestanden te verplaatsen. U kunt de HSQ2010 Recorder aansluiten op een computer via een USB-verbinding. U hoeft hiervoor geen speciale software te installeren. De HSQ2010 Recorder wordt automatisch weergegeven als verwijderbaar station, zodat u eenvoudig bestanden van en naar het apparaat kunt slepen en neerzetten.
Opnemen met een externe microfoon Als u wilt opnemen met een externe microfoon, sluit u deze aan op de microfoonaansluiting en volgt u verder dezelfde procedure als voor de ingebouwde microfoon. - 107 - Nederlands Opnemen lingen aanpassen op pagina 121 voor details). • Maak een proefopname om te controleren of de instellingen van de HSQ2010 Recorder juist zijn. • Druk op en houdt deze ingedrukt tijdens het opnemen om de resterende opnametijd weer te geven.
Opnemen Overlappende opname Voer de volgende stappen uit om een opname aan te vullen en delen van een opname te overlappen. • Druk op de knop terwijl de recorder is gestopt om de gewenste map te selecteren. of - om het bestand te selecteren dat • Druk op de knop u wilt aanvullen. • Ga door af te spelen of vooruit te spoelen naar de positie waar u de aanvulling wilt maken en druk op de knop om het afspelen te pauzeren. om de overlappende opname te starten.
Opnemen Het opgenomen bestand wordt opgeslagen in de map H in de directory VOICE en wordt automatisch ingesteld als alleen-lezen, zodat het huidige spraakbestand wordt vergrendeld en niet kan worden gewist. Wanneer u een bestand vergrendelt, voorkomt u dat belangrijke gegevens per ongeluk worden gewist wanneer u alle bestanden in een map wist. Selecteer Off om het bestand te ontgrendelen zodat het kan worden gewist.
Opnemen Een verborgen opgenomen bestand afspelen • Druk gelijktijdig op de knop en - terwijl de recorder is gestopt om de gewenste map te selecteren. • In de modus Verborgen afspelen bladert de recorder automatisch naar het opgenomen spraakbestand in de map H van de directory VOICE. om het afspelen te pauzeren. De indicator • Druk op de knop voor opnemen/afspelen knippert nu oranje. Druk nogmaals op de knop om het afspelen te hervatten. • Druk op de knop STOP/DEL om het afspelen te stoppen.
Extra functies Extra functies Hoortoestelfunctie U kunt naar stemmen luisteren via de microfoon en oortelefoon, zonder de opnamefunctie te gebruiken. • Druk op de knop en houd deze ingedrukt terwijl de recorder is gestopt om de gewenste map te selecteren. • Druk op de knop STOP/DEL om de hoortoestelfunctie te stoppen. Als u Windows Media-bestanden wilt afspelen in de SLP-modus, moet de browserinvoegtoepassing voor Windows Media Player worden geïnstalleerd.
functies Het kan enkele seconden duren voordat de lijst met programma‘s is samengesteld. • Blader door de lijst en kijk of u CNM Codec ziet staan. Als dat het geval is, is de invoegtoepassing geïnstalleerd. Als dat niet het geval is, moet u de Windows Media-invoegtoepassing voor de SLP-modus downloaden vanaf de ondersteuningspagina van dnt en installeren in de hoofddirectory van HSQ2010. De eenvoudigste manier om de CNM-invoegtoepassing te verwijderen is via Software in het Configuratiescherm.
functies Er worden automatisch opeenvolgende bestandsnummers toegewezen. Het bestandskenmerk voor aanmaakdatum wordt ingesteld op de huidige datum van de HSQ2010 Recorder. Spraakbestanden vergrendelen en ontgrendelen Wanneer u een bestand vergrendelt, kunnen belangrijke gegevens niet per ongeluk worden gewist. Vergrendelde bestanden worden niet gewist wanneer u alle bestanden in een map wist. 1 Druk op de knop STOP/DEL en houd deze ingedrukt terwijl de recorder is gestopt om de gewenste map te selecteren.
Afspelen Afspelen • Druk op de knop terwijl de recorder is gestopt om de gewenste map te selecteren. of om het bestand te selecteren dat u • Druk op de knop wilt afspelen. • Druk op de knop . De afspeeltijd wordt weergegeven op het display en het groene LED-lampje gaat branden. • Pas het volume aan met de knoppen + / -. • Druk op de knop STOP/DEL om het afspelen te stoppen. De totale afspeeltijd van het huidige bestand wordt weergegeven op het display.
Afspelen dus te veranderen (Normal > Classic > Jazz > Rock > Pop > Normal). Opmerkingen bij het gebruik van de HSQ2010 Recorder als HSQ2010 Recorder Druk tijdens het afspelen van spraak op de knop om de ruisonderdrukkingsmodus te veranderen mode (Normal > LCF (Low Cut Filter) > VOC (Voice Filter) > Normal). geeft aan dat het spraakbestand Het pictogram indexmarkeringen bevat. U kunt per bestand maximaal 32 indexmarkeringen instellen.
Verwijderen herhaalde gedeelte begint. • Druk op de knop STOP/DEL om het afspelen te stoppen, of druk op de knop om terug te keren naar normaal afspelen. Een bestand of map herhalen / shuffle-modus Druk tijdens het afspelen op de knop en houd deze minimaal 1 seconde ingedrukt om over te schakelen tussen de verschillende afspeelmodi (bestand herhalen, map herhalen, shuffle map of normaal afspelen).
Verwijderen Pictogram Betekenis FILE Hiermee verwijdert u één bestand FOLD Hiermee verwijdert u alle bestanden in een map Hiermee verwijdert u alle indexmarkeringen in een bestand • Druk op de knop . • Druk nogmaals op de knop . N (Nee) wordt weergegeven. • Druk op de knop of om Y (Ja) te selecteren. • Druk op de knop -om te bevestigen.
Verwijderen • Druk op de knop om het menu voor het ongedaan maken van verwijderen te openen en NO weer te geven. • Druk op de knop of om YES te selecteren voor het ongedaan maken van verwijderen. • Druk op de knop om te bevestigen Deze functie is alleen beschikbaar direct nadat het bestand van de recorder is verwijderd.
Radiomodus Radiomodus • Sluit de koptelefoon aan. De meegeleverde koptelefoon functioneert als antenne voor de radio. • Druk op de knop MENU en houd deze minimaal 1 seconde ingedrukt om de radiomodus in te stellen. Automatisch afstemmen op radiostations Nederlands • Druk op de knop MENU terwijl de recorder in de radiomodus is om het menu te openen. • Druk op de knop of om AUTO te selecteren. N (Nee) wordt weergegeven. • Druk nogmaals op de knop • Druk op de knop of om Y (Ja) te selecteren..
Radio Druk terwijl de recorder in de radiomodus is op de knop STOP/DEL om over te schakelen tussen stereo- en monoontvangst. Een vooraf ingesteld radiostation beluisteren • Druk terwijl de recorder in de radiomodus is op de knop om over te schakelen tussen frequentie en vooraf ingestelde modus. • Druk in de vooraf ingestelde modus op de knop of -om naar een ander vooraf ingesteld radiostation te gaan. • Pas het volume aan met de knoppen + en -.
Radio Dit menu is beschikbaar wanneer de recorder is gestopt en tijdens radio-ontvangst. De beschikbare menuopties variëren, afhankelijk van of u zich in een spraakmap bevindt, een muziekmap of in de radiomodus. terwijl de • Druk op de knop MENU recorder is gestopt of tijdens radio-ontvangst om het menu te openen. • Druk op de knop oder , om een menuoptie te selecteren. . om een submenu te openen. • Druk op de knop • Druk op de knop of , om een instelling te wijzigen.
Instellingen aanpassen Nederlands REC* PCM SHQ HQ SP LP SLP Hier kunt u kiezen tussen verschillende opnamemodi, van ongecomprimeerd PCM stereo-opnamen* voor een geluidskwaliteit als een audio-cd, twee stereomodi waaronder SHQ en HQ of drie monomodi waaronder SP, LP en SLP voor een langere opnametijd. Zie de technische gegevens op pagina 34 voor details over beschikbare opnamemodi en opnametijden.. DIVIDE* Off 30Min. 60Min.
Spraakgeactiveerd opnemen is een handige functie voor hands-free opnemen. Wanneer spraakgeactiveerd opnemen is ingeschakeld, begint de opname wanneer u begint te spreken. Wanneer u stopt met spreken, pauzeert de recorder de opname automatisch na drie seconden stilte. De opname wordt pas weer hervat wanneer u weer begint te spreken CLOCK DD:MM: YY 12/24H HH:MM: SS Als de datum en tijd zijn ingesteld, wordt bij elk bestand automatisch informatie opgeslagen over wanneer het bestand is opgenomen..
Instellingen aanpassen VER Hiermee geeft u de firmwareversie en de releasedatum weer. Nederlands NTRO Yes No Hiermee speelt u 10 seconden muziek of spraak af bij het begin van de huidige map AUTO** Yes No Hiermee stemt u automatisch af op een radiostation en kunt u tot 20 stations opslaan als vooraf ingestelde kanalen. OUTPUT ** EP SP Hiermee schakelt u over tussen uitvoer via de oortelefoon (EP) en de luidspreker (SP) in de radiomodus.
Problemen oplossen • • • • Druk op de knop of om UPDATE te selecteren. Druk op de knop . N (Nee) wordt weergegeven. Druk op de knop of , om Y (Ja) te selecteren. Druk nogmaals op de knop , om de nieuwe firmware te installeren. Mijn recorder gaat niet aan • Mogelijk zijn de batterijen leeg of niet goed geplaatst. Vervang de batterijen door nieuwe en controleer of deze goed zijn geplaatst. Mijn recorder neemt niets op • Mogelijk is de recorder in de modus HOLD. Schuif de HOLDschakelaar naar de positie Off.
Technische gegevens Ik hoor niets via de koptelefoon • Mogelijk is de koptelefoon niet goed aangesloten. Sluit de koptelefoon goed aan. • Mogelijk is het volume ingesteld op de laagste stand. Pas het volume aan. Technische gegevens Verbindingsmogelijkheden • USB: • Microfoon midden: • Microfoon links/rechts: • Koptelefoon: High-speed 2.0 mini-USB 6,0 mm, impedantie 2.
Technische gegevens 64 kBit/S, 22.05 kHz 4 kBit/s, 8 kHz .mp3, .
Serviceafwikkeling Hebt u klachten of is uw toestel defect? Wend u dan a.u.b. tot uw dealer of neem contact op met de serviceafdeling van de firma dnt GmbH om een serviceafwikkeling overeen te komen. Servicetijd: 's maandags tot 's donderdags van 8.00-17.00 uur 's vrijdags van 8.00-16.00 uur Hotline/service: 06074 3714 31 E-mail: support@dnt.de Stuur uw toestel a.u.b. niet naar ons adres als ons serviceteam u niet daarom verzoekt. De kosten en het gevaar van het verlies zijn ten laste van de afzender.
- 129 - Nederlands Garantievoorwaarden 1.Principieel gelden de wettelijke garantiebepalingen. De garantietijd begint met de overhandiging van het toestel. In geval van garantie moet het toestel met het koopbewijs (kassabon, rekening of iets dergelijks), het correct ingevulde toestelpasje en een nauwkeurige foutbeschrijving ingediend worden. Zonder deze bewijsstukken zijn wij niet tot garantievergoeding verplicht. 2.
HSQ2010 Garantiekarte Warranty card Carte de garantie Garantiekaart Drahtlose Nachrichtentechnik Entwicklungs- und Vertriebs GmbH Voltastraße 4 D-63128 Dietzenbach Tel. +49 (0)6074 3714-0 Fax +49 (0)6074 3714-37 Service-Hotline +49 (0)6074 3714-31 Internet http://www.dnt.de Email dnt@dnt.de Serien Nr. Serial no. N° de série Serienr.