
Manual
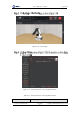
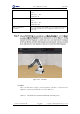
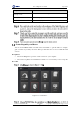
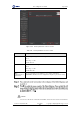
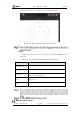
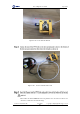
Table Of Contents
- 1. Security Precautions
- 2. Quick Start
- 3. Introduction
- 4. Interface Description
- 5. Operation
- 5.1 Introduction to the DobotStudio
- 5.2 Performing Teaching & Playback Tasks
- 5.3 Working in Offline Mode
- 5.4 Writing and Drawing
- 5.5 Performing Laser Engraving Tasks
- 5.6 Engraving a Grayscale Image
- 5.7 Controlling with your Hand Gesture
- 5.8 Controlling with your Mouse
- 5.9 Operating 3D Printing
- 5.10 Calibration
- 5.11 Connecting with WIFI Kit
- 5.12 Connecting with Bluetooth Kit
- 5.13 Operating Blockly
- 5.14 Scripting
- 5.15 Operating Stick Controller Kit
- 5.16 Operating Sliding Rail
- 5.17 Multiplexed I/O Demo
- Appendix A Dobot Magician Homing Operation

Dobot Magician User Guide 5 Operation
Issue V1.7.0 (2019-01-09) User Guide Copyright © Yuejiang Technology Co., Ltd.
101
limited position. In this case, drag the mouse to into the annular area.
Figure 5.117 Move the robotic arm in the red annular area
NOTE
For details on how to use the mouse to control the robotic arm on the Mouse page, see
Table 5.15.
Table 5.15 The robotic arm’s movement created with your mouse
Mouse action
Robotic arm’s movement
Move your mouse front,
back, right, or left
The robotic arm moves accordingly
Scroll the mouse wheel
up or down
The robotic arm moves accordingly
Press and hold the left
mouse button
Suction cup: the air pump sucks air in
Gripper: increase holding force
Release the left mouse
button
Suction cup: the air pump is powered off
Gripper: open
Right-click the mouse
button
Gripper: close
Operating 3D Printing