
Manual

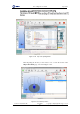

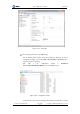
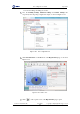
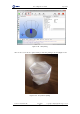
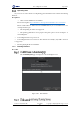


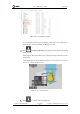
Table Of Contents
- 1. Security Precautions
- 2. Quick Start
- 3. Introduction
- 4. Interface Description
- 5. Operation
- 5.1 Introduction to the DobotStudio
- 5.2 Performing Teaching & Playback Tasks
- 5.3 Working in Offline Mode
- 5.4 Writing and Drawing
- 5.5 Performing Laser Engraving Tasks
- 5.6 Engraving a Grayscale Image
- 5.7 Controlling with your Hand Gesture
- 5.8 Controlling with your Mouse
- 5.9 Operating 3D Printing
- 5.10 Calibration
- 5.11 Connecting with WIFI Kit
- 5.12 Connecting with Bluetooth Kit
- 5.13 Operating Blockly
- 5.14 Scripting
- 5.15 Operating Stick Controller Kit
- 5.16 Operating Sliding Rail
- 5.17 Multiplexed I/O Demo
- Appendix A Dobot Magician Homing Operation

Dobot Magician User Guide 5 Operation
Issue V1.7.0 (2019-01-09) User Guide Copyright © Yuejiang Technology Co., Ltd.
125
Figure 5.150 Configuration sample
Dobot-2.0-Vase-Cura.ini is used for printing a thin-walled vase, while Dobot-
2.0-Cura.ini is used for the filling, the filling rate is 20%.
Click , the Open 3D model page is displayed, and select the 3D printing
model prepared.
The format of 3D model is STL. You can design 3D model and transform it into
STL format.
After importing the model, click the model itself, you can center, zoom or rotate,
and so on, as shown in Figure 5.151.
Figure 5.151 Zoom and rotate
Click to connect with Dobot Magician.