
Manual

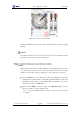
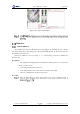


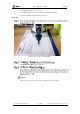
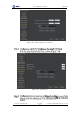

Table Of Contents
- 1. Security Precautions
- 2. Quick Start
- 3. Introduction
- 4. Interface Description
- 5. Operation
- 5.1 Introduction to the DobotStudio
- 5.2 Performing Teaching & Playback Tasks
- 5.3 Working in Offline Mode
- 5.4 Writing and Drawing
- 5.5 Performing Laser Engraving Tasks
- 5.6 Engraving a Grayscale Image
- 5.7 Controlling with your Hand Gesture
- 5.8 Controlling with your Mouse
- 5.9 Operating 3D Printing
- 5.10 Calibration
- 5.11 Connecting with WIFI Kit
- 5.12 Connecting with Bluetooth Kit
- 5.13 Operating Blockly
- 5.14 Scripting
- 5.15 Operating Stick Controller Kit
- 5.16 Operating Sliding Rail
- 5.17 Multiplexed I/O Demo
- Appendix A Dobot Magician Homing Operation

Dobot Magician User Guide 5 Operation
Issue V1.7.0 (2019-01-09) User Guide Copyright © Yuejiang Technology Co., Ltd.
135
Install the writing and drawing kit. For details, please see 5.4.1 Installing a
Writing and drawing kit.
Press the Unlock key on the Forearm and drag Dobot Magician to make the nib
near the A3 point on the calibration board, then release the Unlock key.
Click coordinate buttons on the Manual Levelling page (as shown in Figure
5.163) to make the nib align to the center of A3 point on the calibration board, as
shown in Figure 5.164.
If the speed is too fast when clicking coordinate buttons, you can drag Speed
slider to adjust speed.
Figure 5.163 Fine-tune page