
Manual
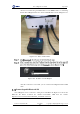
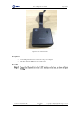


Table Of Contents
- 1. Security Precautions
- 2. Quick Start
- 3. Introduction
- 4. Interface Description
- 5. Operation
- 5.1 Introduction to the DobotStudio
- 5.2 Performing Teaching & Playback Tasks
- 5.3 Working in Offline Mode
- 5.4 Writing and Drawing
- 5.5 Performing Laser Engraving Tasks
- 5.6 Engraving a Grayscale Image
- 5.7 Controlling with your Hand Gesture
- 5.8 Controlling with your Mouse
- 5.9 Operating 3D Printing
- 5.10 Calibration
- 5.11 Connecting with WIFI Kit
- 5.12 Connecting with Bluetooth Kit
- 5.13 Operating Blockly
- 5.14 Scripting
- 5.15 Operating Stick Controller Kit
- 5.16 Operating Sliding Rail
- 5.17 Multiplexed I/O Demo
- Appendix A Dobot Magician Homing Operation

Dobot Magician User Guide 5 Operation
Issue V1.7.0 (2019-01-09) User Guide Copyright © Yuejiang Technology Co., Ltd.
146
About 5 seconds later, the green LED indicator on the WIFI module is on, indicating
that the Dobot Magician has been connected with WLAN, as shown in Figure 5.179.
Figure 5.179 Status of LED indicator
Figure 5.180 IP address of Dobot Magician
After the connection is successful, you can control Dobot Magician without USB
cable.
Connecting with Bluetooth Kit
Dobot Magician can be connected to smart phone with Bluetooth. Figure 5.181 shows the
Bluetooth kit. Please download the matched DobotStudio APP from the website
https://cn.dobot.cc/downloadcenter.html?sub_cat=69#sub-download.