
Manual
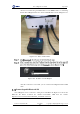
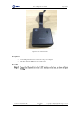


Table Of Contents
- 1. Security Precautions
- 2. Quick Start
- 3. Introduction
- 4. Interface Description
- 5. Operation
- 5.1 Introduction to the DobotStudio
- 5.2 Performing Teaching & Playback Tasks
- 5.3 Working in Offline Mode
- 5.4 Writing and Drawing
- 5.5 Performing Laser Engraving Tasks
- 5.6 Engraving a Grayscale Image
- 5.7 Controlling with your Hand Gesture
- 5.8 Controlling with your Mouse
- 5.9 Operating 3D Printing
- 5.10 Calibration
- 5.11 Connecting with WIFI Kit
- 5.12 Connecting with Bluetooth Kit
- 5.13 Operating Blockly
- 5.14 Scripting
- 5.15 Operating Stick Controller Kit
- 5.16 Operating Sliding Rail
- 5.17 Multiplexed I/O Demo
- Appendix A Dobot Magician Homing Operation

Dobot Magician User Guide 5 Operation
Issue V1.7.0 (2019-01-09) User Guide Copyright © Yuejiang Technology Co., Ltd.
154
Button
Function
positive/negative direction
Joint coordinate system mode: Dobot Magician
rotates along J2-axis in the
positive/negative direction
Right stick: Front/back
Cartesian coordinate system mode: Dobot
Magician moves along Z-axis in the
positive/negative direction
Joint coordinate system mode: Dobot Magician
rotates along J3-axis in the
positive/negative direction
Right stick: Left/right
Cartesian coordinate system mode: Dobot
Magician rotates along R-axis in the
positive/negative direction
Joint coordinate system mode: Dobot Magician
rotates along J4-axis in the
positive/negative direction
Operating Sliding Rail
When the workspace of Dobot Magician is not enough, you can extend it with the sliding kit
to do large-scale tasks, such as long-distance picking and placing, a large range of writing and so
on. Figure 5.188 shows the sliding rail kit and Table 5.20 lists its description.