
Manual
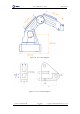

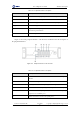


Table Of Contents
- 1. Security Precautions
- 2. Quick Start
- 3. Introduction
- 4. Interface Description
- 5. Operation
- 5.1 Introduction to the DobotStudio
- 5.2 Performing Teaching & Playback Tasks
- 5.3 Working in Offline Mode
- 5.4 Writing and Drawing
- 5.5 Performing Laser Engraving Tasks
- 5.6 Engraving a Grayscale Image
- 5.7 Controlling with your Hand Gesture
- 5.8 Controlling with your Mouse
- 5.9 Operating 3D Printing
- 5.10 Calibration
- 5.11 Connecting with WIFI Kit
- 5.12 Connecting with Bluetooth Kit
- 5.13 Operating Blockly
- 5.14 Scripting
- 5.15 Operating Stick Controller Kit
- 5.16 Operating Sliding Rail
- 5.17 Multiplexed I/O Demo
- Appendix A Dobot Magician Homing Operation

Dobot Magician User Guide 4 Interface Description
Issue V1.7.0 (2019-01-09) User Guide Copyright © Yuejiang Technology Co., Ltd.
27
Interface Description
Interface Board
The interfaces of Dobot Magician are located on the back of the base and the Forearm
respectively. Figure 4.1 shows the interfaces on the back of the base, and Table 4.1 lists the
description.
Figure 4.1 Interfaces in the base
Table 4.1 Interface Description
No.
Description
1
Reset key: Reset MCU program
During resetting, the LED indicator on the base turns yellow. About 5 seconds
later, if the LED indicator turns green, it indicates that the reset is successful
2
Functional key:
Short press: Start running offline program
Long press for 2 seconds: Starting homing procedure
3
Communication interface/UART interface: Connect with Bluetooth, WIFI and
so on
The Dobot protocol is adopted.
4
USB interface: Connect with PC
5
Power interface: Connect with power adaptor
6
Peripheral interface: Connect with air pump, extruder, sensor and other
peripheral equipment. For details about peripheral interfaces, please see Table
4.2
Table 4.2 lists the peripheral interface description.