
Manual

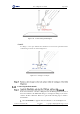


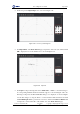
Table Of Contents
- 1. Security Precautions
- 2. Quick Start
- 3. Introduction
- 4. Interface Description
- 5. Operation
- 5.1 Introduction to the DobotStudio
- 5.2 Performing Teaching & Playback Tasks
- 5.3 Working in Offline Mode
- 5.4 Writing and Drawing
- 5.5 Performing Laser Engraving Tasks
- 5.6 Engraving a Grayscale Image
- 5.7 Controlling with your Hand Gesture
- 5.8 Controlling with your Mouse
- 5.9 Operating 3D Printing
- 5.10 Calibration
- 5.11 Connecting with WIFI Kit
- 5.12 Connecting with Bluetooth Kit
- 5.13 Operating Blockly
- 5.14 Scripting
- 5.15 Operating Stick Controller Kit
- 5.16 Operating Sliding Rail
- 5.17 Multiplexed I/O Demo
- Appendix A Dobot Magician Homing Operation

Dobot Magician User Guide 5 Operation
Issue V1.7.0 (2019-01-09) User Guide Copyright © Yuejiang Technology Co., Ltd.
57
Figure 5.36 Install a writing and drawing kit
NOTE
To change to a new pen, unfasten the four M3*5 set screws in the pen holder with a
1.5mm hexagon wrench, as shown in Figure 5.37.
Figure 5.37 Change to a new pen
Connecting the DobotStudio
If the current firmware of the Dobot Magician is the 3D Printing firmware instead of
the Dobot firmware, the Select tool dialog box is displayed, asking if you want to
switch to the Dobot firmware. In this case, perform the following steps to switch to
this firmware.
Select DobotStudio to upgrade the Dobot firmware, as shown in Figure 5.38.