
Manual

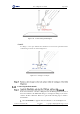


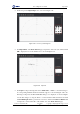
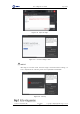
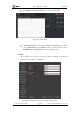
Table Of Contents
- 1. Security Precautions
- 2. Quick Start
- 3. Introduction
- 4. Interface Description
- 5. Operation
- 5.1 Introduction to the DobotStudio
- 5.2 Performing Teaching & Playback Tasks
- 5.3 Working in Offline Mode
- 5.4 Writing and Drawing
- 5.5 Performing Laser Engraving Tasks
- 5.6 Engraving a Grayscale Image
- 5.7 Controlling with your Hand Gesture
- 5.8 Controlling with your Mouse
- 5.9 Operating 3D Printing
- 5.10 Calibration
- 5.11 Connecting with WIFI Kit
- 5.12 Connecting with Bluetooth Kit
- 5.13 Operating Blockly
- 5.14 Scripting
- 5.15 Operating Stick Controller Kit
- 5.16 Operating Sliding Rail
- 5.17 Multiplexed I/O Demo
- Appendix A Dobot Magician Homing Operation

Dobot Magician User Guide 5 Operation
Issue V1.7.0 (2019-01-09) User Guide Copyright © Yuejiang Technology Co., Ltd.
63
Click a shape in the Input Shapes area, as shown in Figure 5.48.
Figure 5.48 Insert a system image file
Click Input Texts on the Write & Draw page to input texts, and set its style, and then click
OK to display the text on the annular area, as shown in Figure 5.49.
Figure 5.49 Input text
Click Open to import an image file such as BMP, JEPG, or PNG to convert this image to
its corresponding SVG file that the DobotStudio supports, as shown in Figure 5.50. Once
this image is imported, the SVG Converter dialog box is displayed, as shown in Figure
5.51. In this dialog box, drag the slider to set the black and white threshold, and click
Convert Bitmap To SVG to perform the conversion, and then click Plot to Main Scene
to display the converted SVG file on the annular area of the Write & Draw page.