2011 user guide
If you are the first registered owner of your vehicle, you may obtain a complimentary printed copy of the Owner’s Manual, Navigation/Media Center Manuals or Warranty Booklet by calling 1-800-423-6343 (U.S.) or 1-800-387-1143 (Canada) or by contacting your dealer. The driver’s primary responsibility is the safe operation of the vehicle. Driving while distracted can result in loss of vehicle control, resulting in a collision and personal injury.
TABLE OF CONTENTS INTRODUCTION/WELCOME Welcome From Chrysler Group LLC . . . . 2 CONTROLS AT A GLANCE Driver Cockpit . . . . . . . . . . . . . . . 4 Instrument Cluster . . . . . . . . . . . . . 6 GETTING STARTED Key Fob . . . . . . . . . . . . . . . . . . Remote Start . . . . . . . . . . . . . . . Keyless Enter-N-Go . . . . . . . . . . . . Theft Alarm . . . . . . . . . . . . . . . . Seat Belt . . . . . . . . . . . . . . . . . Supplemental Restraint System (SRS) — Air Bags . . . . . . . . . . . . . . . . .
INTRODUCTION/WELCOME WELCOME FROM CHRYSLER GROUP LLC Congratulations on selecting your new Chrysler Group LLC vehicle. Be assured that it represents precision workmanship, distinctive styling, and high quality - all essentials that are traditional to our vehicles. Your new Chrysler Group LLC vehicle has characteristics to enhance the driver's control under some driving conditions. These are to assist the driver and are never a substitute for attentive driving. They can never take the driver's place.
INTRODUCTION/WELCOME Vehicles Sold In Canada With respect to any vehicles sold in Canada, the name Chrysler Group LLC shall be deemed to be deleted and the name Chrysler Canada Inc. used in substitution therefore. WARNING! • Pedals that cannot move freely can cause loss of vehicle control and increase the risk of serious personal injury. • Always make sure that objects cannot fall into the driver foot well while the vehicle is moving.
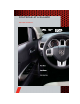
CONTROLS AT A GLANCE DRIVER COCKPIT 4
CONTROLS AT A GLANCE 5
CONTROLS AT A GLANCE INSTRUMENT CLUSTER Warning Lights - Low Fuel Warning Light - Charging System Light** - Oil Pressure Warning Light** - Anti-Lock Brake (ABS) Light** - Airbag Warning Light** - Electronic Throttle Control (ETC) Light - Tire Pressure Monitoring System (TPMS) Light - Engine Temperature Warning Light - Seat Belt Reminder Light BRAKE - Brake Warning Light** - Malfunction Indicator Light (MIL)** - Electronic Stability Control (ESC) Activation/Malfunction Indicator Light** (See page 65 for
CONTROLS AT A GLANCE Indicators - Turn Signal Indicators - High Beam Indicator - Front Fog Light Indicator - Vehicle Security Indicator* - Electronic Stability Control (ESC) Off Indicator - Electronic Speed Control ON Indicator - Electronic Speed Control SET Indicator * If equipped ** Bulb Check with Key On 7
GETTING STARTED KEY FOB Locking And Unlocking The Doors/Liftgate • Press the LOCK button once to lock all the doors and the liftgate. Press the UNLOCK button once to unlock the driver’s door only and twice within five seconds to unlock all the doors and liftgate. • All doors can be programmed to unlock on the first press of the UNLOCK button. Refer to Programmable Features in this guide. Panic Alarm • Press the PANIC button once to turn the panic alarm on.
GETTING STARTED • The vehicle must be cycled to the ON/RUN position after two consecutive timeouts. WARNING! • Do not start or run an engine in a closed garage or confined area. Exhaust gas contains Carbon Monoxide (CO) which is odorless and colorless. Carbon Monoxide is poisonous and can cause you or others to be severely injured or killed when inhaled. • Keep Key Fob transmitters away from children.
GETTING STARTED Driver Door 1st Press” and “Unlock All Doors 1st Press”, refer to the Uconnect Touch™ Settings in your vehicle's Owner's Manual on the DVD or Programmable Features in this guide for further information. • If a Key Fob is detected in the vehicle when locking the vehicle using the power door lock switch, the doors and liftgate will unlock and the horn will chirp three times. On the third attempt, your Key Fob can be locked inside the vehicle.
GETTING STARTED • If the shift lever is not in PARK, the ENGINE START/STOP button must be held for two seconds and vehicle speed must be above 5 mph (8 km/h) before the engine will shut off. Accessory Positions with Engine Off NOTE: The following functions are with the driver’s foot OFF the Brake Pedal (Transmission in PARK or NEUTRAL Position). Starting With The Ignition Switch In The OFF Position: • Press the ENGINE START/STOP button once to change the ignition switch to the ACC position.
GETTING STARTED To Disarm • Keyless Enter-N-Go button installed: Press the Key Fob UNLOCK button or with one of the Key Fobs located outside the vehicle and within 5 ft (1.5m) of the driver's and passenger front door handles, grab the Keyless Enter-N-Go door handle and enter the vehicle, then press the Keyless Enter-N-Go Start/Stop button (requires at least one valid Key Fob in the vehicle).
GETTING STARTED SUPPLEMENTAL RESTRAINT SYSTEM (SRS) — AIR BAGS • This vehicle has Advanced Front Air Bags for both the driver and right front passenger as a supplement to the seat belt restraint system. The Advanced Front Air Bags will not deploy in every type of collision. • Advanced Front Air Bags are designed to provide additional protection by supplementing the seat belts in certain frontal collisions depending on the severity and type of collision.
GETTING STARTED CHILD RESTRAINTS • Children 12 years and under should ride properly buckled up in a rear seat, if available. According to crash statistics, children are safer when properly restrained in the rear seats rather than in the front. • Every state in the United States and all Canadian provinces require that small children ride in proper restraint systems. This is the law, and you can be prosecuted for ignoring it.
GETTING STARTED Installing The LATCH - Compatible Child Restraint System • Your vehicle’s second row passenger seats are equipped with the child restraint anchorage system called LATCH, which stands for Lower Anchors and Tether for CHildren. • All three second-row passenger seating positions have lower anchors that are capable of accommodating LATCH-compatible child seats. • Rigid fixed lower attachments can only be used in the outboard seating positions.
GETTING STARTED Installing The Child Restraint Using The Vehicle Seat Belts • To install a child restraint, first, pull enough of the seat belt webbing from the retractor to route it through the belt path of the child restraint and slide the latch plate into the buckle. • Next, extract all the seat belt webbing out of the retractor and then allow the belt to retract into the retractor. Finally, pull on any excess webbing to tighten the lap portion around the child restraint.
GETTING STARTED FRONT SEATS Power Seats • The power seat switch, located on the outboard side of the seat near the floor, controls forward/back, up/down, and tilt adjustment. Power Lumbar • Push the switch forward to increase the lumbar support. Push the switch rearward to decrease the lumbar support. • Pushing upward or downward on the switch will raise and lower the position of the support.
GETTING STARTED Fold-Flat Front Passenger Seat • The front passenger seat can be folded flat to allow for extended cargo space. Pull up on the seatback release lever to fold down the seatback. Flip 'n Stow™ Front Passenger Seat Storage • The seat latch release-loop is located in the center of the seat cushion between the seat cushion and the seatback. Pull the loop upward to release the latch and then forward to open the seat to the detent position.
GETTING STARTED WARNING! (Continued) • Be certain that the seat cushion is locked securely into position before using the seat. Otherwise, the seat will not provide the proper stability for passengers. An improperly latched seat cushion could cause serious injury. REAR SEATS 60/40 Split Second-Row Passenger Seats To Lower The Seatback • Locate the seatback release lever on the lower outboard side of the seat. • Place one hand on the seatback and apply a gentle pressure.
GETTING STARTED Stadium Tip ’n Slide™ (Easy Entry/Exit Seat) — Seven Passenger Models To Move The Second-Row Passenger Seat Forward NOTE: Raise the 20% seatback/armrest before moving the 60% seat to allow for full seat travel. • To allow passengers to easily enter or exit the third-row passenger seats move the Tip ’n Slide™ control lever on the upper outboard side of the seatback forward, and in one fluid motion, the seat cushion flips upward and the seat moves forward on its tracks.
GETTING STARTED WARNING! • Be certain that the seatback is locked securely into position. Otherwise, the seat will not provide the proper stability for child seats and/or passengers. An improperly latched seat could cause you and others to be severely injured or killed. • Do not allow a passenger to sit in a third row seat without having the head restraint unfolded and locked in place or seatback(s) folded flat.
GETTING STARTED Uconnect Touch™ 8.4 • Press the Controls soft-key located on the Uconnect Touch™ screen. • Press the Driver or Passenger seat soft-key once to select HI-level heating. Press the soft-key a second time to select LO-level heating. Press the soft-key a third time to shut the heating elements OFF. • If the High-level setting is selected, the system will automatically switch to Low-level after approximately 60 minutes.
GETTING STARTED TILT / TELESCOPING STEERING COLUMN • The tilt/telescoping control handle is located below the steering wheel at the end of the steering column. • Push down on the handle to unlock the steering column. • To tilt the steering column, move the steering wheel upward or downward as desired. To lengthen or shorten the steering column, pull the steering wheel outward or push it inward as desired. • Pull upward on the handle to lock the column firmly in place.
OPERATING YOUR VEHICLE TURN SIGNAL/WIPER/WASHER/HIGH BEAM LEVER Turn Signal/Lane Change Assist • Tap the lever up or down once and the turn signal (right or left) will flash three times and automatically turn off. Front Wipers Intermittent, Low And High Operation • Rotate the end of the lever to the first detent position for one of five intermittent settings, the second detent for low wiper operation and the third detent for high wiper operation.
OPERATING YOUR VEHICLE HEADLIGHT SWITCH Automatic Headlights/Parking Lights/Headlights • Rotate the headlight switch, located on the instrument panel to the left of the steering wheel, to the first detent for and to the parking lights . second detent for headlights • With the parking lights or low beam headlights on, push the headlight switch once for fog lights. • Rotate the headlight switch to “AUTO” for AUTO headlights.
OPERATING YOUR VEHICLE SPEED CONTROL • The speed control switches are located on the steering wheel. Cruise ON/OFF • Push the ON/OFF button to activate the Speed Control. will appear on the • CRUISE instrument cluster to indicate the Speed Control is on. • Push the ON/OFF button a second time to turn the system off. Set • With the Speed Control on, push and release the SET – button to set a desired speed.
OPERATING YOUR VEHICLE WARNING! (Continued) • Electronic Speed Control can be dangerous where the system cannot maintain a constant speed. Your vehicle could go too fast for the conditions, and you could lose control. A collision could be the result. Do not use Electronic Speed Control in heavy traffic or on roads that are winding, icy, snow-covered or slippery. CLIMATE CONTROL Uconnect Touch™ 4.
OPERATING YOUR VEHICLE Uconnect Touch™ 8.
OPERATING YOUR VEHICLE Climate Control Knobs • For your convenience the climate controls can be operated by using the soft-keys located on the touch screen or the climate control knobs below the Uconnect Touch display. Automatic Operation • Press the AUTO button or AUTO soft-key. • Select the desired temperature by pressing the Temperature Controls for the driver or passenger. • The system will maintain the set temperature automatically.
OPERATING YOUR VEHICLE ® PARKVIEW REAR BACK-UP CAMERA • You can see an on-screen image of the rear of your vehicle whenever the shift lever ® is put into REVERSE. The ParkView Rear Back-Up Camera image will be displayed on the radio display screen, located on the center stack of the instrument panel. • If the radio display screen appears foggy, clean the camera lens located on the liftgate. WARNING! ® Drivers must be careful when backing up even when using the ParkView Rear Back-Up Camera.
OPERATING YOUR VEHICLE WARNING! • Never leave children in a vehicle with the key in the ignition switch. Occupants, particularly unattended children, can become entrapped by the power sunroof while operating the power sunroof switch. Such entrapment may result in serious injury or death. • In a collision, there is a greater risk of being thrown from a vehicle with an open sunroof. You could also be severely injured or killed.
ELECTRONICS YOUR VEHICLE'S SOUND SYSTEM 32
ELECTRONICS 33
ELECTRONICS IDENTIFYING YOUR RADIO Uconnect Touch™ 4.3 & 4.3S • Models 4.3 and 4.3S have a 4.3” touch screen with hard–keys to each side of it. • Model 4.3S has all Model 4.3 features, ® plus SIRIUS Satellite Radio (1 year trial subscription included). • Model 4.3S is identified by the presence of SAT on the band button, indicating the presence of satellite radio. Uconnect Touch™ 8.4 & 8.4N • Models 8.4 and 8.4N have an 8.4” touch screen. • Model 8.4N has all Model 8.
ELECTRONICS Uconnect Touch™ 4.3 & 4.3S AT A GLANCE Displaying the Time • If the time is not currently displayed at the top of the screen when in Radio mode, press the Settings button, then touch clock. Select Show Time, then touch On. Setting the Time • Press the Settings hard-key, then touch the Clock soft-key. • Touch the Set the Time soft-key. • Touch the up or down soft-keys to adjust the hours, minutes or AM/PM. NOTE: 12hr format and 24hr format can also be set.
ELECTRONICS Equalizer • Touch the Equalizer soft-key to adjust the Bass, Mid and Treble. Use the + or soft-key to adjust the equalizer to your desired settings. Press the back arrow soft-key when done. Balance/Fade • Touch the Balance/Fade soft-key to adjust the sound from the speakers. Use the arrow soft-key to adjust the sound level from the front and rear or right and left side speakers. Touch the Center "C" soft-key to reset the balance and fade to the factory setting.
ELECTRONICS Setting the Time • Model 8.4N synchronizes time automatically via GPS, so should not require any time adjustment. If you do need to set the time manually, follow the instructions below for Model 8.4. • For Model 8.4, turn the unit on, then touch the time display at the top of the screen. Touch Yes. • If the time is not displayed at the top of the screen, touch More soft-key and then Settings soft-key. In the Settings screen, touch the Clock soft-key, then check or uncheck this option.
ELECTRONICS RADIO Models 4.3 & 4.3S Models 8.4 & 8.
ELECTRONICS • To access the Radio mode, touch the Radio hard-key on the upper left side of the faceplate (4.3 & 4.3S) or the Radio soft-key at the lower left of the screen (8.4 & 8.4N). • Unless otherwise noted, the information provided on the operation and functionality of the radios in this section is common to all Uconnect Touch™ radios. Selecting Radio Stations • Touch the Radio band soft-key to cycle through AM, FM or SAT (4.3 & 4.3S) or the desired radio band (AM, FM or SAT) soft-key (8.4 & 8.4N).
ELECTRONICS Selecting SIRIUS Satellite Channels Seek Up/Seek Down • Touch the Seek arrow soft-keys for less than 2 seconds to seek through channels in SAT mode. • Touch and hold either arrow soft-key for more than 2 seconds to bypass channels without stopping. The radio will stop at the next listenable channel once the arrow soft-key is released. Direct Tune • Tune directly to a SAT channel by pressing the “Tune” button on the screen, and entering the desired station number. Info (4.
ELECTRONICS Browse • Lets you browse the SIRIUS channel listing, Favorites, Genres, Game Zone, and Weather channels. Jump setting, and also provides the SIRIUS channel list. Browse contains many sub-menus. Browse Sub-Menu All Genre Presets (8.4 & 8.4N Only) Favorites Game Zone Traffic/Weather (4.3S only) Jump (8.4 & 8.4N only) Sub-Menu Description Shows the channel listing. Provides a list of all genres, and lets you jump to a channel within the selected genre.
ELECTRONICS PLAYER Models 4.3 & 4.3S • Select Player source by pressing the Player hard-key to enter the Player main screen, then touch the source soft-key and choose between Disc, ® AUX, iPod or Bluetooth. NOTE: Uconnect Touch™ will usually automatically switch to the appropriate mode when something is first connected or inserted into the system.
ELECTRONICS Models 8.4 & 8.4N • Select Player source by pressing the Player soft-key to enter the Player main screen, then touch the source soft-key ® and choose between Disc, AUX, iPod , Bluetooth or SD Card. NOTE: Uconnect Touch™ will usually automatically switch to the appropriate mode when something is first connected or inserted into the system. ® GARMIN NAVIGATION (8.4N ONLY) • Uconnect Touch 8.4N integrates Garmin’s consumer-friendly navigation into your vehicle.
ELECTRONICS Main Navigation Menu Acquiring Satellites • The GPS Satellite strength bars indicate the strength of your satellite reception. • Acquiring satellite signals can take a few minutes. When at least one of the bars is green, your device has acquired satellite signals. If no signal is found the Navigation system still can operate with internal gyro direction & location based on data provided by the vehicle.
ELECTRONICS Searching Near Another Location • From the main Navigation menu, touch Where To?, then touch a destination and then touch Near. • Select an option from the available choices. Following Your Route • Your route is marked with a magenta line on the map. If you depart from the original route, your route is recalculated. A speed limit icon could appear as you travel on major roadways. • Lane Assist helps you decide which lane to be in at upcoming junctions.
ELECTRONICS Taking a Detour • To take a detour you must be navigating a route • Touch Detour NOTE: If the route you are currently taking is the only reasonable option, the device might not calculate a detour. Setting or Changing Your Home Location • Touch the NAV soft-key in the menu bar to access the Navigation system and the Main Navigation menu. • Touch Where To?, then touch Go Home.
ELECTRONICS SIRIUS TRAVEL LINK (8.4N ONLY) • SIRIUS Travel Link brings a wealth of useful information into your vehicle and right to your fingertips. • To access Travel Link, touch More soft-key, then the Travel Link soft-key NOTE: SIRIUS Travel Link requires a subscription, sold separately after the 1 year trial subscription included with your vehicle purchase.
ELECTRONICS PLAYING iPod/USB/MP3 DEVICES ® • There are many ways to play music from iPod /MP3 players or USB devices through your vehicle's sound system. 1. Audio Jack • The Audio Jack allows a portable device, such as an MP3 player or a cassette player, to be plugged into the radio and utilize the vehicle’s sound system, using a 3.5 mm audio cable, to amplify the source and play through the vehicle speakers.
ELECTRONICS NOTE: ® • When connecting your iPod device for the first time, the system may take several minutes to read your music, depending on the number of files. For example, the system will take approximately 5 minutes for every 1000 songs loaded on the device. Also during the reading process, the Shuffle and Browse functions will be disabled. ® This process is needed to ensure the full use of your iPod features and only happens the first time it is connected.
ELECTRONICS Start pairing procedure on the radio • Models 8.4, 8.4N: Touch the Phone soft-key and then the Settings soft-key. Next, touch Add Device. • Models 4.3, 4.3S: Press the More hard-key, then touch the Phone soft-key. Next, touch the settings soft-key and then Add Device. • Uconnect™ Phone will display an “In progress” screen while the system is connecting. Start pairing procedure on mobile phone • Search for available devices on your ® Bluetooth enabled mobile phone.
ELECTRONICS Select the mobile phone's priority level • When the pairing process has successfully completed, the system will prompt you to choose whether or not this is your favorite phone. Selecting Yes will make this phone the highest priority. This phone will take precedence over other paired phones within range. Only one phone can be paired at a time. Models 4.3 & 4.3S • You are now ready to make hands-free calls. Press the Uconnect™ Phone button on your steering wheel to begin. Models 8.4 & 8.
ELECTRONICS Phone Menu Screen – Models 4.3 & 4.3S Phone Menu Screen – Models 8.4 & 8.
ELECTRONICS Making A Phone Call • Press the Uconnect™ Phone button . • (After the BEEP), say “dial” (or “call” to a name). • (After the BEEP), say number (or name). NOTE: You can also initiate a call by using the touch-screen on the Phone main screen. Receiving A Call – Accept (And End) • When an incoming call rings/is announced on Uconnect™, press the Phone button . • To end a call, press the Phone button .
ELECTRONICS • You can “barge in” while the system is talking to you, enabling you to enter your response without waiting. Just press the Voice Command button on the steering wheel to barge in. Changing The Volume • Start a dialogue by pressing the Phone button example - "Help". , then say a command for • Use the radio ON/OFF VOLUME rotary knob to adjust the volume to a comfortable level while the Uconnect™ system is speaking.
ELECTRONICS • Use the radio ON/OFF VOLUME rotary knob to adjust the volume to a comfortable level while the Voice Command system is speaking. The volume setting for Voice Command is different than the audio system. • Refer to the Understand The Features Of Your Vehicle section of your vehicle's Owner's Manual on the DVD for further details. Common Voice Commands (Examples) Switch Modes Radio (FM, AM) SIRIUS Satellite Radio SIRIUS Travel Link Navigation “AM” “FM” “Satellite” “95.5” “95.
ELECTRONICS Operation Of The Touch-Screen Radio • To view a DVD video, press the OPEN/CLOSE or LOAD hard-key and insert the disc. Playback will begin automatically after the DVD is recognized by the disc drive. If playback does not begin automatically, follow these steps: • Press the MENU hard-key, then touch the Rear VES™ soft-key. If a chapter list appears on the right side of the screen touch the HIDE LIST soft-key to display the Rear VES™ Control screen.
ELECTRONICS ELECTRONIC VEHICLE INFORMATION CENTER (EVIC) • The EVIC features a driver interactive display that is located in the instrument cluster. Pressing the controls on the left side of the steering wheel allows the driver to select vehicle information and Personal Settings. For additional information, refer to Programmable Features in this guide.
ELECTRONICS PROGRAMMABLE FEATURES Electronic Vehicle Information Center (EVIC) – If Equipped • The EVIC can be used to view or change the following settings. Press the UP or DOWN button until System Setup displays, then press the SELECT button. Scroll through the settings using the UP or DOWN buttons. Press the button to change the setting. Press the BACK button to scroll back to SELECT a previous menu or sub menu.
ELECTRONICS Uconnect Touch™ 8.4 Customer Programmable Features • The Uconnect Touch™ 8.4 system allows you to access Customer Programmable feature settings such as Display, Clock, Safety/Assistance, Lights, Doors & Locks, Heated Seats, Engine Off Operation, Compass Settings, Audio, Phone/ Bluetooth and SIRIUS Setup through soft-keys. • Touch the More soft-key to on the bottom of the screen, then touch the Settings soft-key to access the Settings screen.
ELECTRONICS NOTE: • Only use this transceiver with a garage door opener that has a “stop and reverse” feature as required by Federal safety standards. This includes most garage door opener models manufactured after 1982. Do not use a garage door opener without these safety features. Call toll-free 1–800–355–3515 or, on the Internet, at www.HomeLink.com for safety information or assistance.
ELECTRONICS POWER INVERTER • There is a 115 Volt, 150 Watt power inverter outlet located on the back of the center console. This outlet can power cellular phones, electronics and other low power devices requiring power up to 150 Watts. Uconnect Touch™ 4.3 System • Press the More hard-key (located next to the Uconnect Touch™ screen). • Press the Outlet soft-key to turn the power inverter On or Off. Uconnect Touch™ 8.4 System • Press the Controls soft-key (located at the bottom of the Uconnect Touch™ screen).
ELECTRONICS • A third 12 Volt power outlet is located on the back of the center console. This outlet has power available when the ignition switch is in the LOCK, ON or ACC position. • A fourth fused 12 Volt power outlet is located on the left quarter trim panel in the cargo area. This outlet has power available when the ignition switch is in the ON or ACC position. NOTE: • Do not exceed the maximum power of 160 Watts (13 Amps) at 12 Volts.
7,300 lbs (3 311 kg) 7,300 lbs (3 311 kg) Max. GTW (Gross Trailer Wt.) 22 sq ft (2.0 sq m) 1,000 lbs (454 kg) which includes up to 5 persons & Luggage 2,500 lbs (1 134 kg) which 32 sq ft (3.0 sq m) includes 1 to 2 persons & Luggage 2,000 lbs (907 kg) which includes 32 sq ft (3.0 sq m) 3 to 4 persons & Luggage 1,500 lbs (680 kg) which includes 32 sq ft (3.0 sq m) 5 to 7 persons & Luggage Frontal Area 100 lbs (45 kg) 150 lbs (68 kg) 200 lbs (91 kg) 100 lbs (45 kg) Max. Tongue Wt.
UTILITY RECREATIONAL TOWING (BEHIND MOTORHOME, ETC.) Towing This Vehicle Behind Another Vehicle (Flat Towing With All Four Wheels On The Ground) Recreational towing for this vehicle is not recommended. NOTE: If the vehicle requires towing, make sure all four wheels are off the ground.
WHAT TO DO IN EMERGENCIES 24-HOUR TOWING ASSISTANCE • Dial toll-free 1-800-521-2779 or 1-800-363-4869 for Canadian residents. • Provide your name, vehicle identification number and license plate number. • Provide your location, including telephone number, from which you are calling. • Briefly describe the nature of the problem and answer a few simple questions. • You will be given the name of the service provider and an estimated time of arrival.
WHAT TO DO IN EMERGENCIES • Your vehicle has also been equipped with a TPMS malfunction indicator to indicate when the system is not operating properly. The TPMS malfunction indicator is combined with the low tire pressure telltale. When the system detects a malfunction, the telltale will flash for approximately one minute and then remain continuously illuminated. This sequence will continue each time the vehicle is restarted as long as the malfunction exists.
WHAT TO DO IN EMERGENCIES BRAKE - Brake Warning Light • The Brake Warning light illuminates when there is either a system malfunction or the parking brake is applied. If the light is on and the parking brake is not applied, it indicates a possible brake hydraulic malfunction, brake booster problem or an Anti-Lock Brake System problem. • Please have your vehicle serviced immediately. WARNING! Driving a vehicle with the red brake light on is dangerous. Part of the brake system may have failed.
WHAT TO DO IN EMERGENCIES - Anti-Lock Brake (ABS) Light • This light monitors the Anti-Lock Brake System (ABS). • If the light is not on during starting, stays on, or turns on while driving, we recommend you drive to the nearest service center and have the vehicle serviced immediately. - Electronic Throttle Control (ETC) Light • This light informs you of a problem with the Electronic Throttle Control (ETC) system. • If a problem is detected, the light will come on while the engine is running.
WHAT TO DO IN EMERGENCIES IF YOUR ENGINE OVERHEATS • In any of the following situations, you can reduce the potential for overheating by taking the appropriate action. • On the highways — slow down. • In city traffic — while stopped, place the transmission in NEUTRAL, but do not increase engine idle speed. NOTE: There are steps that you can take to slow down an impending overheat condition: • If your air conditioner (A/C) is on, turn it off.
WHAT TO DO IN EMERGENCIES JACKING AND TIRE CHANGING Jack Location • The jack and jack-handle are stowed underneath a cover in the rear storage bin in the cargo area. • Remove the pouch containing the scissors jack, jack handle, and tools. Spare Tire Stowage NOTE: On Seven-Passenger Models, fold the third-row passenger seats flat. This will provide more space when accessing the jacking tools and when operating the winch mechanism.
WHAT TO DO IN EMERGENCIES Preparations For Jacking • Park on a firm, level surface. Avoid ice or slippery areas. • Set the parking brake and place the shift lever into PARK. • Turn the ignition to LOCK and turn on the Hazard Warning flasher. • Block both the front and rear of the wheel diagonally opposite of the jacking position. For example, if changing the right front tire, block the left rear wheel. NOTE: Passengers should not remain in the vehicle when the vehicle is being jacked.
WHAT TO DO IN EMERGENCIES Jacking And Tire Changing Instructions • Remove the spare tire, jack and tools from the stored location. • Loosen (but do not remove) the wheel lug nuts by turning them counterclockwise one turn while the wheel is still on the ground. • Assemble the jack and jacking tools. Connect the jack handle driver to the extension, then to the lug wrench. • Place the jack underneath the lift area that is closest to the flat tire.
WHAT TO DO IN EMERGENCIES WARNING! • Do not attempt to change a tire on the side of the vehicle close to moving traffic. Pull far enough off the road to avoid the danger of being hit when operating the jack or changing the wheel. • Getting under a jacked-up vehicle is dangerous. The vehicle could slip off the jack and fall on you. You could be crushed. Never get any part of your body under a vehicle that is on a jack.
WHAT TO DO IN EMERGENCIES JUMP-STARTING • If your vehicle has a discharged battery it can be jump-started using a set of jumper cables and a battery in another vehicle or by using a portable battery booster pack. • Jump-starting can be dangerous if done improperly so please follow the procedures in this section carefully. NOTE: When using a portable battery booster pack follow the manufacturer's operating instructions and precautions.
WHAT TO DO IN EMERGENCIES • Disconnect the opposite end of the positive (+) jumper cable from the positive (+) post of the booster battery. • Disconnect the positive (+) end of the jumper cable from the remote positive (+) post of the discharged vehicle. • Reinstall the protective cover over the remote positive (+) battery post of the discharged vehicle. • If frequent jump-starting is required to start your vehicle you should have the battery and charging system inspected at your authorized dealer.
WHAT TO DO IN EMERGENCIES SHIFT LEVER OVERRIDE • If a malfunction occurs and the shift lever cannot be moved out of the PARK position, you can use the following procedure to temporarily move the shift lever: • To access the shift lever override, remove the cubby bin liner located in the center console behind the shift lever. The override access port is at the front of the cubby bin. • Firmly set the parking brake. • Turn the ignition switch to the ACC or ON position without starting the engine.
Shift lever must be in Recommended Method NEUTRAL. The distance to be traveled must not exceed 15 mi (25 km), and the towing speed must not exceed 25 mph (40 km/h). NOT Permitted Recommended Method Shift lever must be in Recommended Method NEUTRAL, the distance to be traveled must not exceed 15 mi (25 km), the towing speed must not exceed 25 mph (40 km/h), and both front and rear wheels must be on the ground.
WHAT TO DO IN EMERGENCIES FREEING A STUCK VEHICLE • If your vehicle becomes stuck in mud, sand or snow, it can often be moved by a rocking motion. Turn your steering wheel right and left to clear the area around the front wheels. Then, move the shift lever back and forth between REVERSE and DRIVE. Using minimal accelerator pedal pressure to maintain the rocking motion, without spinning the wheels, is most effective.
WHAT TO DO IN EMERGENCIES EVENT DATA RECORDER (EDR) • This vehicle is equipped with an event data recorder (EDR). The main purpose of an EDR is to record, in certain crash or near crash-like situations, such as an air bag deployment or hitting a road obstacle, data that will assist in understanding how a vehicle’s systems performed. The EDR is designed to record data related to vehicle dynamics and safety systems for a short period of time, typically 30 seconds or less.
MAINTAINING YOUR VEHICLE OPENING THE HOOD • Pull the release lever located below the instrument panel and in front of the driver’s door. • Raise the hood and locate the safety latch, in the middle of the hood opening. • Move the safety latch while lifting the hood at the same time. • Insert the support rod into the slot on the hood. • To close the hood, remove the support rod and place it in the retaining clip, then lower the hood slowly.
2.
3.
MAINTAINING YOUR VEHICLE FLUIDS AND CAPACITIES Component Fluid, Lubricant, or Genuine Part ® MOPAR Antifreeze/Coolant Five Year/100,000 Mile Formula HOAT (Hybrid Organic Additive Technology) or equivalent. ® MOPAR Antifreeze/Coolant Five Year/100,000 Mile Formula HOAT (Hybrid Organic Additive Technology) or equivalent. ® MOPAR Antifreeze/Coolant Five Year/100,000 Mile Formula HOAT (Hybrid Organic Additive Technology) or equivalent.
MAINTAINING YOUR VEHICLE Component Power Steering Reservoir Power Transfer Unit (PTU) Rear Drive Assembly (RDA) 84 Fluid, Lubricant, or Genuine Part ® MOPAR Power Steering Fluid + 4 ® ® or MOPAR ATF+4 Automatic Transmission Fluid or equivalent ® licensed ATF+4 product. ® MOPAR Gear Lubricant 75W-90 or equivalent. ® MOPAR Gear Lubricant 75W-90 or equivalent.
24 X X X X X X X X 42 X X 91,000 48 X • Refer to the Owner's Manual on the DVD for the complete maintenance schedule. Inspect and replace PCV Valve if necessary. Flush and replace the engine coolant at 104,000 miles (169,000 km) or 60 months whichever comes first. Flush and replace the engine coolant at 60 months or 104,000 miles (169,000 km) whichever comes first. Replace the spark plugs (3.6L engine). Replace the spark plugs (2.4L engine).
MAINTAINING YOUR VEHICLE Maintenance Record Odometer 8,000 Miles (13,000 km) or 6 Months 16,000 Miles (26,000 km) or 12 Months 24,000 Miles (39,000 km) or 18 Months 32,000 Miles (52,000 km) or 24 Months 40,000 Miles (65,000 km) or 30 Months 48,000 Miles (78,000 km) or 36 Months 56,000 Miles (91,000 km) or 42 Months 64,000 Miles (104,000 km) or 48 Months 72,000 Miles (117,000 km) or 54 Months 80,000 Miles (130,000 km) or 60 Months 88,000 Miles (143,000 km) or 66 Months 96,000 Miles (156,000 km) or 72 Months
MAINTAINING YOUR VEHICLE FUSES 87
MAINTAINING YOUR VEHICLE Integrated Power Module (fuses) • The Integrated Power Module (fuses) is located in the engine compartment near the air cleaner assembly. This center contains fuses and relays.
MAINTAINING YOUR VEHICLE Cavity M10 Cartridge Fuse Mini-Fuse 15 Amp Blue M11 10 Amp Red M12 M13 30 Amp Green 20 Amp Yellow M14 M15 20 Amp Yellow 20 Amp Yellow M16 10 Amp Red M17 15 Amp Blue M18 15 Amp Blue M19 M20 25 Amp Natural 15 Amp Blue M21 M22 M23 M24 M25 M26 20 10 10 25 20 10 M27 10 Amp Red M28 10 Amp Red Amp Amp Amp Amp Amp Amp Yellow Red Red Natural Yellow Red Description Vanity Lamps/Hands-Free Module (HFM) - if equipped, Remote Display - if equipped, Satellite Digital Audi
MAINTAINING YOUR VEHICLE Cavity M29 Cartridge Fuse Mini-Fuse 10 Amp Red M30 15 Amp Blue M31 M32 20 Amp Yellow 10 Amp Red M33 10 Amp Red M34 10 Amp Red M35 M36 M37 10 Amp Red 20 Amp Yellow 10 Amp Red M38 25 Amp Natural Description Occupant Classification Module (OCM) Rear Wiper Module Module/Power Folding Mirror, J1962 Diag Feed Back-Up Lights Occupant Restraint Controller (ORC) NGC (Powertrain Control Module) Battery Feed/TCM Power Assist Module, HVAC Module, Headlamp Washers, Compass Module
MAINTAINING YOUR VEHICLE WARNING! (Continued) • Improperly inflated tires are dangerous and can cause collisions. Under-inflation is the leading cause of tire failure and may result in severe cracking, component separation, or “blow out”. Over-inflation reduces a tire’s ability to cushion shock. Objects on the road and chuck holes can cause damage that results in tire failure. Unequal tire pressures can cause steering problems. You could lose control of your vehicle.
CONSUMER ASSISTANCE CHRYSLER GROUP LLC CUSTOMER CENTER P.O. Box 21–8004 Auburn Hills, MI 48321–8004 Phone: 1–800–423–6343 CHRYSLER CANADA INC. CUSTOMER CENTER WARNING! Engine exhaust, some of its constituents, and certain vehicle components contain, or emit, chemicals known to the State of California to cause cancer and birth defects, or other reproductive harm.
CONSUMER ASSISTANCE REPORTING SAFETY DEFECTS IN THE 50 UNITED STATES AND WASHINGTON, D.C. • If you believe that your vehicle has a defect that could cause a collision or cause injury or death, you should immediately inform the National Highway Traffic Safety Administration (NHTSA) in addition to notifying the manufacturer. • If NHTSA receives similar complaints, it may open an investigation, and if it finds that a safety defect exists in a group of vehicles, it may order a recall and remedy campaign.
MOPAR ACCESSORIES ® AUTHENTIC ACCESSORIES BY MOPAR • The following highlights just some of the many Authentic Dodge Accessories by Mopar featuring a fit, finish, and functionality specifically for your Dodge Journey. • In choosing Authentic Accessories you gain far more than expressive style, premium protection, or extreme entertainment, you also benefit from enhancing your vehicle with accessories that have been thoroughly tested and factoryapproved.
INDEX Air Conditioning . . . . . . . . . . . . 27 Airbag . . . . . . . . . . . . . . . . . . 13 Alarm, Panic . . . . . . . . . . . . . . . 8 Arming Theft System (Security Alarm) . . . . . . . . Audio Settings . . . . . . . . . Automatic Headlights . . . . . Automatic Temperature Control (ATC) . . . . . . . . . . . . . . . . . . . 11 . . 35,37 . . . . 25 . . . . 27 Automatic Transmission Fluid Type . . . . . . . . . . . . . . 83 Auxiliary Audio/Video Input Jacks . . 56 Axle Fluid . . . . . . . . . . . . .
INDEX Jack Location . . . . . . . . . . . . . . 70 Jump Starting . . . . . . . . . . . . . . 74 Key Fob . . . . . . . Keyless Enter-N-Go Lock/Unlock . . . Starting/Stopping . . . . . . . . . . . . . . . . . . . . . . . . . . . . . . . . . . . . . . 8 . . 9 9,10 . 10 Lane Change Assist . . . . . . . . . . 24 LATCH (Lower Anchors and Tether for CHildren) . . . . . . . . . . . . . . . . 15 Lights Warning (Instrument Cluster Description) . . . . . . . . . . . . . . 6 Maintenance Record . . . . . . . . . .
INDEX Jacking . . . . . . . . . . . Pressure Warning Light . . Towing . . . . . . . . . . . . . 24-Hour Towing Assistance Disabled Vehicle . . . . . . Recreational . . . . . . . . Towing Vehicle Behind a Motorhome . . . . . . . . . . Trailer Towing Trailer and Tongue Weight Trailer Weight . . . . . . . . . Transmission Fluid . . . . . . . . . . . . Turn Signals . . . . . . . . . . . . . . . . . . . . . . . . . . . . . . . . . . . . . . . . 72 65 63 65 77 64 Universal Garage Door Opener (HomeLink®) .
NOTES 98
NOTES 99
NOTES 100
NOTES 101
NOTES 102
NOTES 103
NOTES 104
Driving and Alcohol: Drunken driving is one of the most frequent causes of collisions. Your driving ability can be seriously impaired with blood alcohol levels far below the legal minimum. If you are drinking, don’t drive. Ride with a designated non-drinking driver, call a cab, a friend, or use public transportation. WARNING! Driving after drinking can lead to a collision. Your perceptions are less sharp, your reflexes are slower, and your judgment is impaired when you have been drinking.
This guide has been prepared to help you get quickly acquainted with your new Dodge and to provide a convenient reference source for common questions. However, it is not a substitute for your Owner’s Manual. For complete operational instructions, maintenance procedures and important safety messages, please consult your Owner’s Manual, Navigation/Media Center Manuals, Multimedia User Manual and other Warning Labels in your vehicle. Not all features shown in this guide may apply to your vehicle.