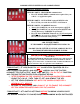
TM MYGIG LOCKPICK V. 3 INSTALLATION UNPLUG ORIGINAL RADIO GRAY CONNECTOR THEN PLUG IN HERE PLUG INTO RADIO PLUG AND PLAY NO OTHER CONNECTIONS ARE NECESSARY FOR STANDARD FUNCTIONS OPTIONAL POWER OUTPUTS CONNECT USB CABLE HERE FOR FUTURE UPDATES REVERSE CAM 12V POWER OUTPUT FOR FULL CONTROL OF YOUR FACTORY REAR CAMERA, EVEN WHILE IN DRIVE, CONNECT THIS ORANGE WIRE AS INSTRUCTED IN YOUR INSTALLATION MANUAL.
Coastal Electronic Technologies, Inc. Chrysler/Dodge/Jeep MYGIG LOCKPICK™ V.3 Installation and Operation Instructions C C OP O Y AS R TA IGH L T EL 20 EC 10 TR O N IC TE C H N O LO G IE S, IN C Thank you for your purchase of the Coastal Electronic Technologies, Inc. MYGIG LOCKPICK V.3. The MYGIG LOCKPICK V.3 has many features and capabilities to unlock and allow full use of your Chrysler/Dodge/Jeep MYGIG radio.
TE C H N O LO G IE S ,I N C OK, let’s get started. On your MYGIG LOCKPICK V.3 control box are switch settings which allow you to program your Lockpick for the features you would like to enable. The diagram below will detail the function of each. More than one switch may be turned on at a time to create the feature list you desire. Default setting when shipped is 1, 2, and 3 down, the rest up. This turns on all options for high speed communications in vehicles with a navigation radio.
APPLICATION GUIDE ADDITIONAL VEHICLES MAY APPLY OR BE ADDED LATER IMPORTANT VEHICLE COMMUNICATION PROGRAMMING SETTINGS IDENTIFY YOUR VEHICLE FROM THE APPLICATION GUIDE BELOW AND PLACE SWITCH 1 UP OR DOWN AS DIRECTED BEFORE PLUGGING IN THE LOCKPICK N IC TE C H N O LO G IE S, IN C HIGH SPEED APPLICATIONS SWITCH 1 DOWN 2008-2010 CHRYSLER TOWN AND COUNTRY 2008-2010 DODGE CARAVAN 2007 – 2010 DODGE NITRO 2008-2010 JEEP LIBERTY 2007-2010 JEEP WRANGLER 2009-2010 JOURNEY 2009-2010 DODGE RAM C C OP O Y AS
COMMON SWITCH SETTINGS AND COMBINATIONS DEFAULT SHIPPED SETTING SWITCH 1 DOWN - HIGH SPEED communication • Place UP if LOW SPEED communication required for your vehicle – see application guide SWITCH 2 DOWN - NAVIGATION equipped MYGIG radio • Place 2 UP if your radio does not have a NAV button O LO G IE S, IN C SWITCH 3 DOWN – UCONNECT function • Always place DOWN if your radio is navigation equipped • Always place DOWN if your non-navigation MYGIG radio already has factory UCONNECT operational • Place
The MYGIG LOCKPICK V.3 is designed with a simple “T” harness connector, equipped with factory male and female connectors for direct connection to your screen. Specific links with videos demonstrating methods of gaining access to the rear of the standard MYGIG radio and placement of the module is available for viewing at various links at: http://www.coastaletech.com/MYGIG.
IN C N C C OP O Y AS R TA IGH L T EL 20 EC 10 TR O 7. IC TE C H N 6. O LO G IE S, 5. Installation of the REVERSE CAMERA POWER wire to enable factory camera operation in all gears is simply a matter of running a wire to the factory camera and connecting it in place of the original power wire. Remove any panels covering the rear hatch in your vehicle. Then use a meter or indicator lamp to determine the reverse power connection on the factory camera connector.
MYGIG LOCKPICK V.3 OPERATION INSTRUCTIONS PRESS UCONNECT 2X: TURN ON REAR CAMERA TURN OFF ANY CAMERA CURRENTLY ON HOLD TO CHANGE DEFAULT SETTINGS S, IN C AFTER REAR CAMERA IS ON PRESS POWER 2X: TURN ON BABY/FRONT CAMERA PRESS 2X AGAIN TO TOGGLE BACK TO REAR CAM O LO G IE ***The MYGIG LOCKPICK V.3 has many features which are preset and ready to go right out of the box. You are free to change each of these options to limit or expand the operations according to your installation needs or desires.
C C OP O Y AS R TA IGH L T EL 20 EC 10 TR O N IC TE C H N O LO G IE S, IN C camera view and return to the standard radio view by pressing the Uconnect button 2x. The front camera will then stop displaying until the vehicle accelerates past 8 mph and then slows to below 8 mph again. • To stop the front camera from automatically activating while the vehicle is below 8mph and return to manual only activation, first place the vehicle in PARK and activate the front camera manually.
Thank you for your trust in Coastal Electronic Technologies, Inc. S, Installation Q & A: IN C the UP position while the module is unplugged, and then plugging it back in and restarting the car. 5. The Lockpick will support the installation of an aftermarket Bluetooth handsfree kit and activate an audio input for phone conversations when the handsfree kit is engaged in a phone call.
O LO G IE S, IN C USB UPDATING (make sure module is also connected to Lockpick harness and vehicle) C C OP O Y AS R TA IGH L T EL 20 EC 10 TR O N IC TE C H N Your Lockpick V.3 interface includes the ability to be updated via a USB connection to a PC. Included with your interface is a cable designed to plug into the mini USB jack on the Lockpick module and connect it to the standard USB jack on a laptop computer. A software program is available for download and installation on our website at www.