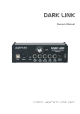
Dark link Owners Manual DOEPFER MUSIKELEKTRONIK GmbH
DOEPFER Dark link User Manual Inhalt: Safety Instructions………………………………… 4 1. Introduction 1.1. Preface………………………………..5 1.2. Preparations…………………………6 1.2.1. Setup………………….…….6 1.2.2. Connections………………..6 2. Overview………………………………………8 3. Functions 3.1. MIDI Connections…………………..9 3.2. MIDI Channel Selection……………9 3.3. The MIDI-to-CV/Gate Interface…. 10 3.4. Learn Mode / MIDI Functions…....11 3.5. The Glide Control……………….…14 3.6. Initialisation……………………….. 14 3.7. Firmware Update…………………..15 3.8.
Safety Instructions Please follow the instructions for use of the instrument carefully because this will guarantee proper operation of the instrument. Due to the fact that these instructions touch on Product Liability, it is absolutely imperative that they be read carefully. Any claim for defect will be rejected if one or more of the items has not been observed. Disregard of the instructions can void the two years covered by warranty.
DOEPFER Dark link Introduction 1. Introduction 1.1. Preface Doepfer thanks you! First of all we would like to thank you for having purchased Doepfer Dark Link! We really appreciate your choice and promise you an extraordinary support throughout, including useful information, easy service, and innovative product development. May your Dark Link be an important and useful tool for ages to come. What‘s this? Dark Link is an easy to use but pretty powerful USB/MIDI-to-CV/Gate-Interface.
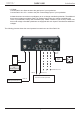
DOEPFER Dark Link Introduction 1.2. Getting started When lifting Dark Link out of its box for the first time, please make sure that everything is in its right place. You will find the following component parts in the box: • • • • Dark Link USB/MIDI-to-CV/Gate-Interface wall-wart (12V AC / 200mA) USB cable (A-B type) this owners´ manual You will also need: • A suitable monophonic sound generation device with CV/gate connectors. • A suitable MIDI/USB keyboard, -controller (e.g.
Dark link DOEPFER Introduction • CV/Gate: Connect Dark Link‘s Gate socket to the gate input of your synthesizer. Connect Dark Link‘s CV-1 socket to the pitch controlvoltage input of your synthesizer. At least these two connections are obligatory to run a voltage controlled synthesizer. The additional three control voltage provided by Dark Link (broken lines) make your voltage controlled synth ”listen” to pitchbender, velocity and modwheel (resp. a MIDI controller of your choice).
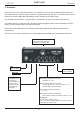
DOEPFER Dark link Overview 2. Overwiev Dark Link uses a very simple user-interface. To be exactly, it is not much more than the learn button and one additional knob. The learn-button is used to configurate Dark Link and ”tell” it, in which manner it has to transform incomming MIDI data into analogue control voltages and the gate signal. The GLIDE knob controls the – you guessed it – the glide time of Dark Link‘s internal glide function.
DOEPFER Dark link Functions 3. Functions In this section, we will explore all of Dark Link‘s functions in detail. First, we will have another and more closer look at the MIDI/USB hookup. Next to this, we will become familiar with Dark Link‘s learn mode and the way to configure it‘s functions easily via MIDI programm change commands. 3.1.
DOEPFER Dark link Functions 3.3.2. MIDI to CV/Gate interface The „USB/MIDI-to-CV/Gate“ interface generates not only a pitch control voltage and a gate signal to trigger the envelope with, it also produces several control voltages derived from incoming MIDI velocity and MIDI controller data. The MIDI-to-CV interface also features a simple but useful arpeggiator and a so-called reference pitch.
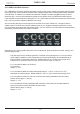
Dark link DOEPFER Functions 3.4. Learn Mode / MIDI Functions In „learn“ mode you will determine how Dark Link will process incoming MIDI data. In addition to this, you will control the settings of the internal arpeggiator and set the reference tone which will determine the lowest key of Dark Link‘s resp. your connected CV/gate synthesizer‘s keyboard range. You can access each function via MIDI program changes. The table below lists all functions. The notes (1) to (10) explain all functions in detail.
DOEPFER Dark link Functions For setting these parameters, MIDI Program Change messages coming from your MIDI device are used. Normally, you will have to press the program change keys on your MIDI keyboard or MIDI synthesizer while in „learn“ mode. Bear in mind that some manufacturers count the MIDI program change numbers from 0 to 127 rather than from 1 to 128 as defined by the MIDI standard.
DOEPFER Dark link Functions (7) Arpeggiator Dark Link features an internal arpeggiator. An arpeggiator splits the notes of a sustained chord into a successive pattern of single notes. In music, splitting chords into a pattern of successive pitches is generally called „arpeggio“. Dark Link‘s arpeggiator makes use of the following parameters: • Tempo of the arpeggio can be determined by Dark Link itself or synced to an external MIDI device.
DOEPFER Dark link Functions • Octave – MIDI controller # 0 – Value range: 0 - 6 (The pattern will be transposed up to 7 octaves, until it starts again with note „one“.) Since Dark Link‘s note range covers a maximum of 5 octaves, higher notes will be ignored and produce „pauses“ within the pattern. This effect can be used in a creative way to create musical phrases. Example: With the setting „octave 1“, the played chord A3-C4-F4-G4 will produce exactly the same pattern.
DOEPFER Dark link Functions To reset the device, depress and hold the learn button while the power supply is plugged in. The LED will light up and you have to keep the button depressed for a few seconds until the LED starts flashing. Pressing the button again gets you back into normal operation mode and the LED will turn on. After resetting, Dark Link‘s parameters are set to the following default values: - MIDI channel 1 - Reference note 36 (i.e.
DOEPFER Dark link Nuts‘n bolts of MIDI-CV/Gate conversion JP1 position for 5 Volts gate signal (middle and rightmost contacts – default setting) JP2 position for CV2 range -2,5V to +2,5V (set to JP2A – default setting) JP1 JP2A JP1 position for 12 Volts trigger (middle and leftmost contacts) JP2 position for CV2 range 0V to +5V (set to JP2B) JP1 JP2B To generate a switch trigger, the jumper (JP1) has to be taken off.
DOEPFER Dark link Nuts‘n bolts of MIDI-CV/Gate conversion 4. Nuts and bolts of MIDI to CV/Gate conversion As you may certainly know, synthesizers from the early days of electronic music (1970s and early 1980s) used so-called „analog“ sound generators. Oscillators, filters, and amplifiers generated and processed sound while parameters as pitch, timbre, and volume were controlled by analog voltages.
DOEPFER Dark link Nuts‘n bolts of MIDI-CV/Gate conversion Some vintage Moog synthesizers (e.g. the Mini Moog or the Prodigy) require a so-called ”switch trigger” or ”s-trigger”. Setting the internal jumper on Dark Link‘s board will enable it to generate a switch trigger as well. Please bear in mind that you reverse trigger polarity by using switch trigger.
DOEPFER Dark link Addendum 5. Addendum Service and terms of warranty. Concerning service and warranty conditions, please refer to our terms of business. You will find our terms of business at: www.doepfer.de Doepfer Musikelektronic GmbH Geigerstr.
Dark link DOEPFER MUSIKELEKTRONIK GmbH