280C AVAILABLE IN 2-DOG SYSTEM: 282C Owner's Manual Please read this manual thoroughly before operating the 280C training e-collar.
IMPORTANT SAFETY AND PRODUCT INFORMATION WARNING Please read all safety and product information below before using your Dogtra product. Failure to follow these safety instructions could result in injury to you, your dog and others, or it could result in damage to your Dogtra product or other property. PRODUCT SAFETY Training Methods Dogtra products may be used with a variety of training methods. However, each dog may have a different reaction to training methods and to Dogtra products.
product and/or cause fire, explosion, injury, or property damage. Medical Device Interference Dogtra products contain electrical and magnetic components that emit low level electromagnetic waves and radio frequencies. These electromagnetic waves or radio frequencies may interfere with pacemakers, defibrillators, or other medical devices. Consult your physician or medical device maker before using your medical device with a Dogtra product.
CONTENTS AT A GLANCE ............................................................... MAIN FEATURES ........................................................... OVERVIEW ..................................................................... UNDERSTANDING YOUR TRAINING SYSTEM 1. TURNING THE 280C ON/OFF .............................. 2. TRANSMITTER BUTTON FUNCTION .................. 3. RECEIVER FITTING ................................................. 4. FINDING THE RIGHT STIMULATION ................... 5.
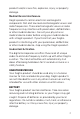
AT A GLANCE Transmitter Owner's Manual Receiver Battery Charger Splitter Cable Belt Clip Optional Accessories Auto Charger The auto charger for the 280C has an input of 12-volts to 24-volts and has an output of 5-volts 1000mAh. European Charger Dogtra’s European chargers are designed for use with a 220 volt AC electrical outlet. To purchase accessories, please visit www.dogtra.com or call customer service at (888) 811-9111.
MAIN FEATURES • 1/2-mile range • IPX9K waterproof certified • 2 stimulation types - Nick & Constant • Rheostat Dial with stimulation levels 0-127 • HPP (High Performance Pager) vibration • LCD screen • Enhanced contact points • Compact receiver • Checkered grip on handheld transmitter • For dogs as small as 10 lbs • Medium output receiver 6
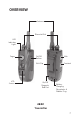
OVERVIEW Antenna Rheostat Dial LED Indicator Light Pager LCD Screen On/Off Button Nick Belt Clip Constant On/Off Magnetic Red Dot Battery Charging Receptacle & Rubber Plug 280C Transmitter 7
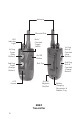
Antenna Rheostat Dial LED Indicator Light 1st Dog Pager (Gray Button) 2nd Dog Pager (Orange Button) LCD Screen Nick/ Constant Toggle Switch On/Off Button Belt Clip On/Off Magnetic Red Dot 282C Transmitter 8 1st Dog Nick & Constant (Gray Button) 2nd Dog Nick & Constant (Orange Button) Battery Charging Receptacle & Rubber Plug
Collar Strap On/Off Magnetic Red Dot LED Indicator Light Contact Points Battery Charging Receptacle & Rubber Plug 280C, 282C Receiver 9
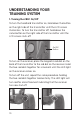
UNDERSTANDING YOUR TRAINING SYSTEM 1. Turning the 280C On/Off To turn the handheld transmitter on, hold down the button on the right side of the transmitter until the LCD screen illuminates. To turn the transmitter off, hold down the same button on the right side of the transmitter until the LCD screen shuts off. On/Off Button To turn on the receiver, place the magnetic red dot on the back of the transmitter to the red dot on the receiver.
2. Transmitter Button Function 280C The transmitter for the 280C has four buttons (one on the face of the transmitter, two on the left side, and one on the right side). Nick On/Off Button Pager Constant Nick Button The Nick button is located on top on the left side of the handheld transmitter. When the Nick button is pressed, the receiver emits a single pulse of electrical stimulation. Constant Button The Constant button is located on the bottom of the left side of the handheld transmitter.
Pager Button The Pager button is located on the face of the transmitter. Pressing it will give a vibration for as long as the button is pressed, for up to 12 seconds. On/Off Button The on/off button is located on the right side of the transmitter. 282C The 282C has five buttons and a toggle switch on the transmitter (two on the face of the transmitter, two on the left side, and one on the right side.).
Nick & Constant Toggle Switch Located on the face of the transmitter is a toggle switch. The toggle switch has a setting for Nick and another for Constant. The color-coordinated buttons (orange for the orange receiver and gray for the black receiver) will implement the desired stimulation based on the toggle switch setting. When either the orange or gray stimulation button is pressed and the toggle is set on Nick, the receiver emits a single pulse of electrical stimulation.
3. Receiver Fitting Proper Fit The receiver should be fitted so that the medical grade stainless steel contact points press firmly against the dog’s skin. You should be able to fit two fingers underneath the collar strap. The best location is on either side of the dog’s windpipe. Improper Fit A loose fit can allow the receiver to move around on the dog’s neck. When this happens, the contact points may rub against the skin and cause irritation.
Attention! Leaving the receiver in the same location on the dog’s neck for an extended period of time can cause skin irritation due to the sensitivity from the contact points. If the dog is to wear the receiver for long periods, occasionally reposition the receiver every few hours so that the contact points are moved to a different location on the dog’s neck and remove the receiver after 8 hours of usage. Make sure you check for skin irritation each time you use the unit. 4.
5. Maximizing the Distance The 280C has a 1/2-mile range. Depending on the way you use your transmitter, the transmitter range may vary. To get the greatest range, hold the transmitter away from your body and avoid touching the antenna. Keep your unit properly charged for maximum signal strength.
6. LED Indicator The LED indicator flashes every 4 seconds when the receiver is on and ready for use. The LED indicator will blink on both the transmitter and the receiver when the transmitter buttons are pressed. The LED indicator color indicates the battery life level. Green = Full charge Amber = Medium charge Red = Needs charge If the unit is used while the LED indicator is red, it may shut down automatically.
7. Charging the Battery The Dogtra 280C uses a lithium polymer battery. Recharge the unit if the indicator light is red or does not come on, the transmitter LCD shows only 1 bar on the indicator, or the system will not stay on when any button is pressed. NOTE 1: Only use Dogtra-approved batteries, chargers, and accessories for your Dogtra e-collars. This will prevent any damage that can be incurred from attempting to use a different charger.
Follow the steps below to charge your system: 1. Open the rubber plugs on the battery charging receptacles and plug in the charging cable. 2. Plug the charger into a 120-volt wall outlet or, if using the auto charger, plug into a cigarette lighter only for lithium polymer batteries (use a 220 volt European charger for Europe). All indicator lights should glow red when properly plugged in and the unit will automatically shut off during the charging process.
8. Handheld Transmitter LCD The LCD screen indicates the stimulation level on the screen ranging from (0-127). The battery life indicator shows: 3 bars = full charge 2 bars = medium charge 1 bar = needs charge The battery life indicator only shows the remaining charge of your transmitter. To find the remaining charge for your receiver, observe the LED indicator light on the receiver.
in agreement with the dial. In this situation, it is ideal to either wait until your transmitter is back in working order before emitting a correction or while holding the Constant button down, slowly turn the Rheostat Dial while watching your dog’s reaction. Do not turn the Rheostat Dial rapidly, because the receiver will emit a static correction based on the level of the Rheostat Dial, which might not be correctly reflected on the LCD screen.
9. Attaching the Belt Clip Follow the instructions below to attach the included belt clip to the transmitter. 1. Align the belt clip to the grooves on the back of the transmitter. 2. With a firm grip, screw on the belt clip's Phillips head screws with a screwdriver. Caution Tighten until firmly in place. Be careful not to over tighten.
GENERAL TRAINING TIPS Your dog must know some basic obedience commands before beginning training with the 280C. A dog learns by first being shown a command, followed by lots of repetition over an extended period. As the dog becomes proficient at these commands, the trainer can introduce distractions and different locations to strengthen them.
reminder when the dog does not comply with your commands at home or in the field. Keep your initial training sessions short and positive as dogs have a short attention span. How Much Stimulation to Use Always start with low levels of stimulation and work your way up depending on the disposition of your dog and the given situation. By using the correct amount of stimulation to get your point across, you will have a more controllable environment and a dog that is under less stress.
MAINTENANCE Basic Maintenance Make sure the rubber charging cap is securely in place when the system is in use. After each training session, carefully inspect the unit for any missing parts or damage to the casing. Damaged or broken casing may affect the waterproof guarantee on the unit. After confirming that there is no damage to the casing, rinse the receiver and clean out any dirt or debris. Storage Maintenance The unit should be fully charged before storing for extended periods.
TROUBLESHOOTING GUIDE 1. My dog is not reacting to the system. - Make sure the receiver and transmitter are on. - Make sure the collar strap is tight enough so both contact points are touching the dog’s skin. – The contact points may be too short for the dog. To place an order for longer contact points that are more appropriate for your dog, please call (888) 811- 9111.
3. The transmitter has no range or stimulation is less when the dog is farther away. – The antenna(s) may be damaged. To order parts, please contact customer service at (888) 811- 9111 or go to www.dogtra.com. – The range indicated on the unit’s box is for flat terrain. Heavy brush, trees, hills, or moisture will affect the range of your unit. For best range, hold the transmitter vertically above your head, and/or try moving to higher ground.
DOGTRA PRODUCT WARRANTY LIMITED WARRANTY For Dogtra Products Purchased from Dogtra Authorized Dealers One-Year Warranty Except as otherwise provided below, Dogtra warrants to the original retail purchaser (“You”) that its Dogtra products shall be free of defects in materials and workmanship for a period of one (1) year from the date of purchase (“Warranty”).
DISCLAIMER OF OTHER WARRANTIES THE FOREGOING WARRANTY IS PROVIDED IN LIEU OF ALL OTHER WARRANTIES, WHETHER EXPRESS OR IMPLIED. DOGTRA DISCLAIMS ANY IMPLIED WARRANTIES INCLUDING, BUT NOT LIMITED TO, THE IMPLIED WARRANTIES OF MERCHANTABILITY AND FITNESS FOR A PARTICULAR PURPOSE. Limitation of Remedies Dogtra’s liability is limited to the cost of repair or replacement of the Dogtra product under Warranty.
How to Obtain Warranty Service Should your Dogtra product require warranty service, please contact Customer Service by phone or email for a warranty evaluation (see below for contact information). Upon approval of your warranty work, Dogtra will repair or replace (at Dogtra’s election) your product without charge for labor or parts. You are responsible for shipping, including cost, of your product to Dogtra for warranty service.
FCC Warning This device complies with part 15 of the FCC Rules. Operation is subject to the following two conditions: (1) This device may not cause harmful interference, and (2) This device must accept any interference received, including interference that may cause undesired operation. This is a sensitive radio device. Any unauthorized changes or modifications to this device that are not expressly approved by Dogtra will void the warranty and may void the user's authority to operate the equipment.