
User Manual


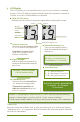


Charging the Transmitter and Receiver Collar
FULLY CHARGE THE TRANSMITTER AND THE RECEIVER COLLAR BEFORE USING THE FIRST TIME.
■
To charge the transmitter and/or the receiver collar, plug the power adaptor
into an electrical outlet and insert the other end securely into the charging
port. Use the “Y” connector to charge both the
transmitter and the receiver at the same time.
• It takes approximately 3-4 hours to charge.
• We recommend charging your batteries when
not in use. A protection circuit prevents overcharging.
• Both the transmitter and the receiver collar use a rechargable
lithium polymer battery.
■ Transmitter screen: Battery icon
• Comes on and flashes when the battery is low.
• Stays on in a steady state when charging.
• When charging is complete: Battery icon turns off.
(Note: The LCD screen backlight stays illuminated when transmitter is plugged-in.)
■ Receiver collar: Battery status light
• Flashes red when the battery is low.
• Turns steady red when the receiver collar is charging.
• Turns steady green when charging is complete (plugged-in).
• Flashing green light = charged battery (unplugged and turned on).
For battery replacement information, see page 19.
3
Getting Started
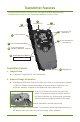
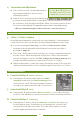
ON/OFF
Alignment Markers
{
{
Hold the Alignment
Markers Together
▲▲ ▲
▲ ▲▲
■ When the transmitter and receiver collar turn “on”, you hear a low-to-hi
“beep” tone and the LCD screen turns on.
■ Follow the same procedure to turn “off” the receiver and the transmitter.
You will hear a hi-to-low “beep” tone and the screen will turn off. Turning
your system “off” when not in use will help preserve the battery life.
Turning the Transmitter and Receiver “ON” and “OFF”
Both the transmitter and receiver must be turned “on” to operate.
■
To turn the transmitter and receiver “on” or “off”, hold the transmitter and
receiver next to one another so the alignment markers (indicated below) on
the transmitter match the alignment markers on the receiver.
See summary on page 8.
See illustration on page 5
.
Battery Icon