
User Manual


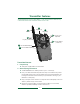

4. Correction Levels
■
The correction levels can be adjusted up or
down, 0-10, by pressing the correction level
adjustment buttons.
■
Start at 1 and gradually increase the level until
you get the correct response from your dog.
Small and sensitive dogs usually respond to low correction levels; large,
aggressive or stubborn dogs may require a stronger correction level.
✧ We recommend using the lowest effective correction level. ✧
■
When working with 2 dogs (two collars), the transmitter will remember the
most recent setting for each collar.
5. Dog 1 / Dog 2 Feature
Every transmitter comes with two dog capability. Your transmitter comes pre-set
for use with one dog but can easily be programmed for use with two dogs.
■
If you are working with two dogs, you will need two receiver collars.
Information about setting the remote trainer to work with with two dogs is
provided with the additional collar.
■
The Dog 1 and Dog 2 buttons allow you to change commands between the
two collars. The transmitter will store the most recent setting for each collar.
■
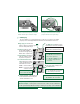
When working with 2 dogs, the display on the LCD screen will indicate if the
transmitter is set to send the signal to the collar on Dog #1 or Dog #2.
6. Correction Button A [Audible]
■
Pressing the ‘A’ button sends an audible warning
(sound only) to the dog’s receiver collar. This audible
warning sound continues as long as you press the button (up to 8 seconds.)
7. Correction Button B [Brief]
■
Pressing the ‘B’ button sends a brief correction (1 second) to the dog’s
receiver collar. Additional brief corrections may be sent after releasing the
button.
8. Correction Button C [Continuous]
■
Pressing the “C’ button sends a continuous correction as long as you hold
the button down (up to 8 seconds.) If the button is not released, the
correction will automatically stop after 8 seconds. The collar will be ready to
receive another signal after the button is released.
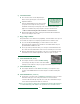
When a correction button is pushed, the communication link line and transmitter
icon will blink briefly. This indicates the signal has been sent and received.
5
Correction Buttons
Use the ▲ and ▼ buttons
to the right of the LCD
display to adjust the
correction level.
Brief
Audible
Continuou
s