
User Manual


1 - 3 = Mild Correction
4 - 6 = Moderate Correction
7-10 = Strong Correction
4
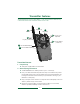
Correct Transmitter Position
Hold the transmitter away from your body
with the antenna up for maximum range.
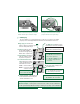
■
The large number displays the
Correction Level
■
Paw Icon
indicates that
the receiver collar is ‘on’
and functioning properly.
Blinks when signal is lost.
■
Transmistter Icon blinks to
indicate activation when
any button is pushed.
■
Communication Link
Line
indicates the status
of the signal between the
transmitter and collar.
Solid = communicating
Blinks = correction signal
sent & received
Incorrect Transmitter Position
Pointing the transmitter antenna toward
your pet will reduce the signal range.
Top example = strong signal, correction level 3, collar 1, and low batteries
Bottom example = weak signal, correction level 9, collar 2, and good batteries.
A weak signal usually indicates the dog is moving out of range of the transmitter.
■
The Battery Icon displays when
the battery needs to be charged.
Upper icon: collar battery.
Lower icon: transmitter battery.
■
Dog 1/Dog 2 Icon
indicates
which collar is receiving the signal
when working with 2 dogs.
■
Signal Strength is indicated by the
horizontal lines between the paw
and the transmitter icons.
Battery Icons
• Icon flashes when battery is
about 75% depleted.
• Icon flashes rapidly just prior
to complete depletion and
shut down.
No Line + Blinking Paw
= Not Communicating
2
1
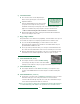
3. LCD Display
The LCD display on your transmitter lets you know your system is operating
properly. The LCD display will illuminate when the transmitter is turned on.
Correction Level 0 = Safety Mode
No Audible / No Correction