Owner’s Guide
Thank you for purchasing a DogWatch® SmartFence! It’s all about your dog.™ You’ve purchased the most technologically advanced hidden fence available, thanks to our patented SafeLink® FMdigital technology, AutoMemory™, FastReact™ and other PetFriendly™ features. The DogWatch Hidden Fence is the only underground pet-containment system recognized as a Premium Selection “Best Buy” by Consumers Digest. If you have any questions, please contact your local authorized DogWatch Dealer. http://www.dogwatch.
TABLE OF CONTENTS 1 DogWatch System Overview System Components .................................................................... System Basics .............................................................................. 2 Setup How the SmartFence is Installed .................................................. How to setup your SmartFence Portal ......................................... How to setup your SmartFence WebApp .....................................
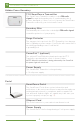
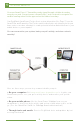
1 SYSTEM COMPONENTS Hidden Fence Boundary T-10 SmartFence Transmitter The Smart Fence Transmitter sends a coded FM radio signal through the boundary wire. If your boundary wire is broken, damaged or if there is a loss of power the SmartFence Transmitter can notify you via text and/or email. Boundary Wire The boundary wire carries the coded digital FM radio signal around the perimeter of your property.
SYSTEM COMPONENTS 1 SmartCollar SmartCollar™ The lightweight collar unit, worn by your dog, identifies the coded FM radio signal from the boundary wire. It will notify your dog with an audible signal when he/she is approaching the boundary wire. If your dog continues towards the wire, after hearing the audible warning, the SmartCollar will create a stimulation.
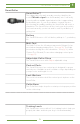
1 SYSTEM BASICS Your new Smart Fence™ Transmitter sends signal through a hidden boundary around your yard. Your pet wears a SmartCollar™ and is trained to recognize the audible warning when he/she approaches the hidden boundary. Your DogWatch SmartFence Portal collects system information (See Page 7) from the SmartCollar and Transmitter.
SYSTEM BASICS 1 1 3 2 1 SmartCollar 2 SmartFence Transmitter 3 SmartFence Portal SmartFence Information Your Dog’s Profile Set up your pet’s profile with a photo! Your profile displays your pet’s Breed, Size and Date of Birth. Manage your Contacts Add your contact information to receive important system information via text messages and/or email. Add multiple contacts for family members and dog walkers.
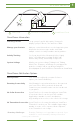
2 HOW THE HIDDEN FENCE IS INSTALLED The boundary wire creates the perimeter for the DogWatch Hidden Fence System, and can enclose any area up to 200 acres. The wire is buried 3-4” beneath the surface of the yard or can lie on top of the ground (e.g. in wooded or rocky areas). Each boundary wire is customized for your home, and can be configured to keep your pet out of the pool, out of your garden, or away from other designated areas.
HOW THE HIDDEN FENCE IS INSTALLED Your SmartFence Transmitter is mounted on a wall near a power outlet. The Transmitter is connected to your boundary wire through a surge protector which prevents lightning power surges from damaging your system (as shown below).
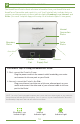
2 SMARTFENCE PORTAL SETUP The SmartFence Portal collects all status information from your SmartCollar and SmartFence Transmitter and sends it to you! Your Portal will also indicate that your system is working properly via three indicator lights: Boundary Loop, Internet, and Collar. (You must complete App profile setup for all indicator lights to turn green.
SMARTFENCE WEBAPP PROFILE SETUP STEP 1 - Activate Your Profile 1. Go to smartfence.dogwatch.com (On Smartphone, Tablet, or computer) 2. Click on the link: New Account Follow prompts for a New System Setup Account Information Enter your email address and create a password that you will use to login into the SmartFence WebApp. System Information Default system name is “Home”. Your serial numbers are printed on your Transmitter, Portal and SmartCollar.
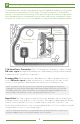
3 SMARTFENCE TRANSMITTER FEATURES & SETTINGS The Transmitter’s coded digital FM radio signal can be adjusted, allowing you to control the settings of the Hidden Fence around your property. 8 9 Training Mode Switch Rate Adjustment 7 1 Range Control Power On/Off 6 Range & Boundary Loop Monitor Display Bottom View 2 3 4 Power Supply PowerPak ™ Ground Wire 5 Boundary Loop Plug * Never adjust the transmitter while your dog is wearing the receiver collar. 1.
SMARTFENCE TRANSMITTER FEATURES & SETTINGS 3 6. Range and Boundary Loop Monitor Display: The Range and Boundary Loop Monitor Display (LMD) provides a visual indication of the status of your boundary wire and signal range. On traditional boundary wire configurations, each number on the scale represents the signal range in feet. Range is the distance the signal is being broadcast from each side of the wire.
3 SMARTCOLLAR ™ FEATURES The SmartCollar is a lightweight radio receiver worn by the dog identifies the coded FM radio signal from the boundary wire. It creates an audible warning followed by stimulation if he comes too close to the boundary wire. It operates on a rechargeable battery and is waterproof when the battery charge port is closed. 11 Contact Posts 10 9 Lock Washers Collar Bone GentileFit Contact Posts (optional) 8 Test Light 3.
SMARTCOLLAR ™ FEATURES & SETTINGS 3 9. Collar Bone: The Collar Bone, metal lock washers and contact posts fasten the receiver to the nylon collar. (A Collar Bone is not used with the GentleFit™ posts) 10. Lock Washers: See #9 above. 11. Contact Posts: The receiver comes with a set of stainless steel contact posts (stainless steel or composite with stainless steel tips.) Conductive plastic ‘GentleFit’™ contact posts may be purchased separately if preferred or if recommended by your Dealer.
3 SMARTCOLLAR ™ FEATURES & BATTERIES BATTERIES Resetting the Low Battery Light 1. Remove the old battery. 2. Before inserting a new battery, let the SmartCollar sit for five minutes with no battery. If you forget to wait prior to inserting a new battery, the “low battery” light will continue to blink red until it automatically resets itself after 24 hours. 3. After five minutes, insert the new battery.
SMARTCOLLAR ™ STATUS LIGHT 3 STATUS LIGHT The status light on your SmartCollar continuously monitors your receiver and provides these features. Status Light • Start-Up When you first insert the battery, the status light will flash red and green. This indicates that the receiver has started properly. Once started, the status light will continue to flash green once every 40 seconds indicating normal operation.
3 SMARTCOLLAR LEVELS & TRANSMITTER SETTINGS RECEIVER TRAINING LEVELS TRANSMITTER MODE AND RATE SETTINGS Mode A Mode A Mode A Mode B Rate 1 Rate 2 Rate 3 QuickAlert™ Audible Only* Transmitter Rate Fixed at Medium (extra low) 1 Slow Medium Fast Slow (low) 2 Slow Medium Fast Medium (low medium) 3 Slow Medium Fast Fast (medium) 4 (medium high) 5 (high) 6 (extra high) 7 Fast Fast X-Fast X-Fast XX-Fast XX-Fast } AutoMemory™ self activates and advances to the next level.
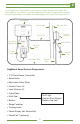
SMARTFENCE PORTAL FEATURES 3 Internet Connection 5 Status Boundary Status 6 4 Collar Status Rear View Ethernet 1 Port 2 Power Supply Port 3 Antenna 1. Ethernet Port: The SmartFence connects to your existing home network and transmits information to the WebApp. Connect your ethernet cable to your Portal here. 2. Power Supply Port: Connect your power supply here. 3. Antenna: The antenna assists the Portal in communicating with your SmartFence system. Keep your antenna raised when Portal is in use. 4.
3 WEBAPP PROFILE FEATURES & SETTINGS DogWatch SmartFence’s Home, Activity, Profile and Settings are areas that you’ll use often on your SmartFence profile site. Home: Get a quick view of your DogWatch system status and you pet’s activity levels. Activity: See how active your dog is daily, weekly and monthly. Profile: Manage your pet’s information including a Photo, Breed, Size, and Date of Birth. Settings: Manage DogWatch settings & notifications for yourself and your contacts.
WEBAPP PROFILE FEATURES & SETTINGS 3 F E System Alert (Collar) System Alert (Transmitter) G 21 E. SmartCollar Alert F. SmartFence Transmitter Alert G.
3 WEBAPP PROFILE FEATURES & SETTINGS Activity Below are your Activity screens, where you can: A. See daily, weekly, or monthly activity views A.
WEBAPP PROFILE FEATURES & SETTINGS Profile Below is your pet’s Profile screen, where you can: A. View your pet’s profile settings B. Change your dog’s profile settings A. B.
3 WEBAPP PROFILE FEATURES & SETTINGS Settings Below is your Settings screen, where you can: A. Manage Pets B. Manage Alerts B. Manage Collars C. Manage Systems D. Account Info E. Contacts B. A. E. D. C. F.
IMPORTANT SAFEGUARDS & REMINDERS 3 • Keep the Transmitter and SmartCollar out of reach of children. • Never attempt to service the Transmitter or SmartCollar yourself. • Be sure your Transmitter and surge protector are properly grounded. • Fit the collar snugly around your dog’s neck. • Make sure that battery is fresh and is inserted correctly. • Train your dog as outlined in this manual. • Never adjust the Transmitter or Receiver while your dog is wearing the SmartCollar.
4 PET-FRIENDLY ™ CONTAINMENT TRAINING This section provides general guidelines for training your dog to remain within the designated boundary of your property. Your DogWatch Dealer will customize the training for your dog and teach you the appropriate training approach. Your DogWatch Dealer will install your DogWatch SmartFence, set the system to the appropriate training levels for your dog’s personality, and place boundary flags around the perimeter of your yard.
PET-FRIENDLY ™ CONTAINMENT TRAINING 4 Safety and Avoidance Zones 1. SAFETY ZONE: This is the area where the dog is free to play. 2. AVOIDANCE ZONE: The Avoidance Zone is the area between the flags and the boundary wire where there is a signal created by the wire. When your dog crosses into the signal field, the receiver collar emits an audible warning (or a vibration warning if it is a vibration receiver.
4 PET-FRIENDLY ™ CONTAINMENT TRAINING Containment Training Reminders Purpose: To teach your dog where the boundary is and how to react to it. 1. Only a portion of the yard, the Avoidance Zone, is to be avoided. 2. Playtime is very important! Remember to reinforce the Safety Zone and play with your dog before, during, and after each training session. 3. Never throw a ball or toy into the Avoidance Zone during training. 4.
PET-FRIENDLY ™ CONTAINMENT TRAINING 8. When your dog enters the Avoidance Zone, he will receive an audible “beep” (or vibration) warning. Immediately say, “Watch out!” and quickly tug on the leash and direct him back into the Safety Zone and praise. 9. Repeat several times in different locations (where flags are visible) and watch for hesitation as you approach the flags. Your dog may turn or shake his head when he hears the beep (or feels the vibration).
4 PET FRIENDLY ™ CONTAINMENT TRAINING 3 PHASE 3 (2-5 days) Introduction to Distractions 1. Put the receiver collar on your dog at least 20 minutes before going outside. 2. Clip on the green DogWatch training leash and take your dog outside and play a few minutes in the Safety Zone. 3. Walk around the Safety Zone and have an assistant (friend or family member) appear outside the Safety Zone at least 10 to 15 feet back from the flags.
PET FRIENDLY ™ CONTAINMENT TRAINING 1. If your dog retreats to the Safety Zone, drop the leash (but keep it within reach) and reintroduce the distraction. Praise and Play. 2. If your dog is afraid to move, pull him back into the Safety Zone. Continue to train with distractions for 2-5 days 4 Remember: Play and praise at the end of each training session. 5 PHASE 5 (2-5 days) Letting Your Dog Off The Leash 1. Put the SmartCollar on your dog at least 20 minutes before going outside to train. 2.
4 TRAINING TIPS Training Tips 1. Never call your dog to “come” or give a recall command when you are outside the flag line. 2. Never walk your dog through the flags during the training process. 3. Always reinforce the retreat concept by shaking the flag while saying “Watch out!” and commanding “back-back-back” when your dog receives an audible warning or a correction during the training process. 4. Adjust the SmartCollar, test the battery regularly, keep the contact posts clean. 5.
WARRANTY Warranty Registration Your SmartFence warranty registration is automatically submitted when you complete the SmartFence WebApp setup. Manufacturer’s Warranty DogWatch Inc., subject to the terms and conditions set forth hereunder, hereby warrants that it will repair or replace, at its own discretion, without charge for parts or labor, the Product or any part thereof (other than insulated wire) which is found by DogWatch Inc.
FAQs System FAQ’s 34
This device complies with part 15 of the FCC Rules. Operation is subject to the following two conditions: (1) This de vice ma y not cause harmful interference, and (2) this device must accept any interference received, including interference that may ca use undesired operation. Changes or modifications not expressly approved by DogWatch, Inc., could void the user’s authority to operate the equipment.
SmartFence™ System Information Portal ID: Transmitter ID: Collar 1 ID: Collar 2 ID: Collar 3 ID: Dealer ID: Note your customer’s profile information E-mail Password