Model CP650 Digital Cinema Processor User’s Manual Issue 3 Part Number 91570
Dolby® CP650 Digital Cinema Processor User’s Manual Dolby Laboratories, Inc. Corporate Headquarters Dolby Laboratories, Inc. 100 Potrero Avenue San Francisco, CA 94103-4813 USA Telephone 415-558-0200 Fax 415-863-1373 www.dolby.com European Headquarters Dolby Laboratories, Inc.
Dolby® CP650 Digital Cinema Processor User’s Manual Table of Contents Chapter 1 Introduction Chapter 2 Operating Instructions 2.1 The CP650 Front Panel............................................................................ 2-1 2.1.1 Front-Panel Display.................................................................... 2-2 2.1.2 Level Display ............................................................................. 2-4 2.1.3 Main Fader Knob .......................................................
Dolby® CP650 Digital Cinema Processor User’s Manual Chapter 3 Maintenance and Calibration 3.1 Soundhead Maintenance...........................................................................3-1 3.1.1 Analog Sound System.................................................................3-1 3.1.2 Digital Sound System..................................................................3-1 3.1.3 Replacing the Cat. No. 700 Exciter Lamp ..................................3-1 3.2 Dolby Level Calibration ..............
Dolby® CP650 Digital Cinema Processor User’s Manual List of Figures Figure 2-1 CP650 Front Panel ..................................................................................................... 2-1 Figure 2-2 Front-Panel Display Showing All Possible Channels Active .................................... 2-2 Figure 2-3 Front-Panel Display Showing Dolby Digital Film Playing ....................................... 2-3 Figure 2-4 Front-Panel Display Showing Dolby Digital Surround EX Film Playing ...........
Virtual Dolby Technologies Test DVD Track List iv
Dolby® CP650 Digital Cinema Processor User’s Manual Chapter 1 Introduction The Dolby® CP650 Digital Cinema Processor is the heart of your theatre sound system. All sound sources are connected to the CP650, which processes the signals appropriately and feeds them to the power amplifiers. Entirely self contained, the CP650 provides both Dolby Digital and Dolby analog processing. An easy-to-read front-panel screen and uncomplicated front-panel buttons make it simple to operate.
Dolby® CP650 Digital Cinema Processor User’s Manual 1.1 Introduction About This Manual This user’s manual has been prepared specifically to help projectionists get the most from the CP650 and the theatre sound system once it has been installed and aligned. (Installation and alignment instructions are supplied to the local distributor or installation company.) We suggest that you keep this manual readily available.
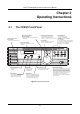
Dolby® CP650 Digital Cinema Processor User’s Manual Chapter 2 Operating Instructions 2.1 The CP650 Front Panel Projector Signal Indicators Bypass Power Supply Failure Indicator P1 and P2 show which projector's output is being processed by the CP650. Indicates a problem detected in the bypass power supply. Setup Control Panel Access Door Level Display For use by the service engineer. Displays fader setting. Ranges from 0.0 to 10. Normally set to 7.0.
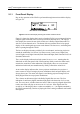
Dolby® CP650 Digital Cinema Processor User’s Manual 2.1.1 Operating Instructions Front-Panel Display Day-to-day operation of the CP650 is performed through interaction with the display in Figure 2-2. L Le C Re R Rs Bsr Bsl Ls SW Figure 2-2 Front-Panel Display Showing All Possible Channels Active Figure 2-2 shows the display that is active when the CP650 is processing and playing a digital signal connected to the CP650 input with all channels active.
Dolby® CP650 Digital Cinema Processor User’s Manual Operating Instructions Other Possible Front-Panel Sound Format Displays L C R Rs Ls SW Figure 2-3 Front-Panel Display Showing Dolby Digital Film Playing Figure 2-3 shows the display when the CP650 is playing a Dolby Digital soundtrack with no Dolby Digital Surround EX decoder board installed. Since there are no Le, Re, Bsr, or Bsl channels present in this configuration, no signal bars are indicated for those channels.
Dolby® CP650 Digital Cinema Processor User’s Manual 2.1.2 Operating Instructions Level Display The main fader level is displayed as a two-digit number. Starting at 0.0, the level increases as the fader knob is rotated clockwise. As with previous generations of Dolby cinema processors, a fader setting of 7.0 is the correct operating level. This setting matches the level used during production of the film. 2.1.3 Main Fader Knob Use the main fader knob to adjust the sound level.
Dolby® CP650 Digital Cinema Processor User’s Manual 2.1.8 Operating Instructions Setup Control-Panel Access Door The setup control-panel access door is for use only by the service or installation engineer. 2.1.9 Mute Button Press the mute button to fade down the sound on all channels without disturbing the current fader setting. The speed of fade-in/fade-out is adjustable from 0.2 to 5 seconds. The button flashes red when mute is activated. 2.1.
Dolby® CP650 Digital Cinema Processor User’s Manual 2.2 Operating Instructions Normal Operation This section describes the normal operation of the CP650. Section 2.3 describes operation when the CP650 has switched to emergency bypass. 2.2.1 Power On Each time the CP650 is connected to power, it automatically sets itself to the selected wake-up state.
Dolby® CP650 Digital Cinema Processor User’s Manual Operating Instructions Format Selection Select the desired film soundtrack format or your nonsync source by pressing the appropriate front-panel button. The button illuminates and the format number appears on the screen to confirm that the format was selected. Common formats are: • 01 Mono—For all optical prints of any vintage with conventional mono optical (Academy) soundtracks. • 04 Dolby A-type—For Dolby releases, except those marked SR or Digital.
Dolby® CP650 Digital Cinema Processor User’s Manual 2.2.3 Operating Instructions Auditorium Fader If an analog auditorium fader pot (not a Dolby Cat. No. 779 Digital Remote Unit or Cat. No. 771 Remote Fader) has been installed, it is activated by performing the following menu steps: Fader Setting Main Fader 1. Press multiple times, or press and hold the button while rotating the front-panel knob to move to the Fader Setting screen. 2. Rotate the fader knob to select Auditorium. 3.
Dolby® CP650 Digital Cinema Processor User’s Manual 2.2.5 Operating Instructions Automatic Selection of the Dolby Digital Format CP650 units equipped to play Dolby Digital films can be set up to sense the presence of Dolby Digital data on the film and automatically switch the CP650 to the Dolby Digital format from any other film format. In other words, if the CP650 is operating in format 01, 04, 05, or 11, it will automatically switch to format 10 when a Dolby Digital film is detected.
Dolby® CP650 Digital Cinema Processor User’s Manual 2.2.6 Operating Instructions Setting the Auto Dolby Digital Target This menu item allows you to select which format button will activate when a Dolby Digital film is detected automatically. If you have assigned the Dolby Digital format to multiple buttons, choose the button you wish to use. 1. Press multiple times, or press and hold the button while rotating the front-panel knob to move to the Auto Digital Target screen. Auto Digital Target 2.
Dolby® CP650 Digital Cinema Processor User’s Manual 2.2.8 Operating Instructions Assigning Front-Panel Buttons to Formats Any available format can be assigned to the front-panel 01, 04, 11, U1, U2, or NS buttons. When the button is pressed, that format will be selected. steps through the button selections, 01, 04, 1. Pressing 11, U1, U2, and NS. 2. Rotate the fader knob to select one of the many format choices available. This example shows Format 80 assigned to Button 01.
Dolby® CP650 Digital Cinema Processor User’s Manual 2.2.10 Operating Instructions Selecting the Power-On Format Each time the CP650 is connected to power, it automatically sets itself to the selected power-on format. Use this menu item to store a specific power-on format or to select the format that was active when power was turned off. 1. Press to move to the Power On Format Select menu, then rotate the front-panel knob to select which format button will be active at power-on. Power On Format 2.
Dolby® CP650 Digital Cinema Processor User’s Manual 2.3 Operating Instructions Bypass Operation The CP650 has an independent power supply for emergency operation. If the main power supply or processor circuitry fails, the unit automatically switches to bypass operation, allowing the show to continue with limited sound processing functions. The front-panel bypass power button glows red when the unit is operating in bypass.
Virtual Dolby Technologies Test DVD Track List iv
Dolby® CP650 Digital Cinema Processor User’s Manual Chapter 3 Maintenance and Calibration Having the very best equipment in your installation does not in itself guarantee that you will always achieve the best results. A number of routine maintenance and adjustment procedures, requiring no special test equipment or technical knowledge, are necessary to realize the full potential of the sound system on a day-to-day basis. These procedures can also prevent costly show cancellations and service calls.
Dolby® CP650 Digital Cinema Processor User’s Manual Maintenance and Calibration will depend on your theatre’s hours of operation. Use only a General Electric EPT, reflector-type, 42 watt lamp (Dolby Part Number 34010). To replace the exciter lamp: 1. Disconnect AC mains power, then carefully remove the six screws holding the rear cover/power supply assembly. 2. Allow the lamp to cool, if necessary.
Dolby® CP650 Digital Cinema Processor User’s Manual Maintenance and Calibration 5. Press mute. 3.2.1 Automatic Calibration 1. Press multiple times, or press and hold the button while rotating the front-panel knob to move to the Automatic Optical Level Adjust, Projector 1 menu. 2. Press OK to begin the automatic level calibration for projector 1. With the Dolby tone test film running, the CP650 automatically calibrates the Left and Right channels to the Dolby tone playing on the film.
Dolby® CP650 Digital Cinema Processor User’s Manual Maintenance and Calibration 4. Press to select the Right channel, and adjust in the same manner. The number displayed on the bottom line will move to the Right-channel column. Manual Level P1 L O 5. Press OK to save your level settings for projector 1. Saving Changes..... ... ● ● O O R O O O XX 6. Stop the projector, and load and run Cat. No. 69T film loop on projector 2, if so equipped. 7.
Dolby® CP650 Digital Cinema Processor User’s Manual Maintenance and Calibration The sound quality of the digital track degrades differently than the analog track. With any analog track, print wear reduces the quality more or less gradually; the more wear, the lower the quality of the sound. With a digital soundtrack, wear has no audible effect until the print is degraded beyond usability (by which time the picture quality is usually unacceptable, as well).
Virtual Dolby Technologies Test DVD Track List iv
Dolby® CP650 Digital Cinema Processor User’s Manual Chapter 4 Troubleshooting Your theatre sound system consists of a number of critical audio components in addition to the Dolby® CP650. Thus, the first step when something goes wrong with the sound is to determine which component is causing the problem. If you are unable to solve the problem using the information that follows, call your local authorized service engineer. Appendix C.4 contains a list of circuit boards available.
Dolby® CP650 Digital Cinema Processor User’s Manual Troubleshooting If One Channel Fails or Is Distorted If one channel in your theatre system fails or sounds distorted, take the following steps: 1. Switch the CP650 to Bypass mode by pressing the front-panel bypass power switch. A mono signal is fed to all three screen channels. If the problem in one channel persists, the power amplifier or speaker for that channel is probably at fault.
Dolby® CP650 Digital Cinema Processor User’s Manual Troubleshooting Table 4-1 Troubleshooting Chart Symptom Possible Cause Recommended Action NO SOUND AT ALL No sound, front-panel lights look normal. No sound, front panel is dark, bypass power button is not glowing red. No power to CP650. No sound, and switching to Bypass mode doesn’t restore sound. Film sound reader on the projector. Verify that the selected format, mute status, and fader setting are correct.
Dolby® CP650 Digital Cinema Processor User’s Manual Symptom Possible Cause Troubleshooting Recommended Action NO SOUND IN SOME FORMATS No Dolby Digital sound (format 10). Front panel looks normal, analog film format (05) plays OK. No Dolby Digital data available. Not a Dolby Digital print. Projector not running. Digital data on the film badly damaged. Digital film reader not working. Film not threaded correctly in digital reader.
Dolby® CP650 Digital Cinema Processor User’s Manual Symptom Possible Cause Troubleshooting Recommended Action CONTROL PROBLEMS CP650 won’t accept a format button selection, and gives “Format Unavailable” message. When the digital format 10 is selected, front-panel display reads “Reverted!” and “Optical Dolby SR.” CP650 doesn’t have the optional modules needed for that format, or that part of the system is not working. No Dolby Digital data available. Not a Dolby Digital print. Projector not running.
Virtual Dolby Technologies Test DVD Track List iv
Dolby® CP650 Digital Cinema Processor User’s Manual Appendix A Advanced Operations A.1 Using Auditorium Assist The Dolby® Auditorium AssistTM feature provides an indication of the stability and characteristics of your theatre’s speakers, crossovers, amplifiers, and auditorium acoustics. Use of this feature requires a Dolby Cat. No. 735 microphone mounted along the rear wall of the auditorium. After installation of the microphone, the installation engineer performed the initial reference calibration.
Dolby® CP650 Digital Cinema Processor User’s Manual 3. Auditorium Assist automatically begins the measurement sequence, beginning with an auditorium noise floor measurement, then cycling through all channels. The channel being measured is displayed. The CP650 outputs pink noise at 85 dBC for the Left, Center, and Right channels; 82 dBC for each of the surround channels; and +10 dBr for the subwoofer.
Dolby® CP650 Digital Cinema Processor User’s Manual A.3 Advanced Operations Display Information About This CP650 Unit The last menu items provide information about the hardware and software installed in your CP650 unit. This information is useful for discussions with your service engineer. multiple times, or press and hold the button while rotating the front-panel 1. Press knob to move to the About this CP650 screen. This menu is made up of four menu screens. 2.
Dolby® CP650 Digital Cinema Processor User’s Manual A.4 Advanced Operations Format 80/81 PCM Options Use this menu to change the settings for processing a PCM digital input to the CP650. Dolby Pro Logic® decoding can be applied to the signal if desired. Auto mute causes the CP650 outputs to mute automatically if a Dolby Digital bitstream input is not present. When a PCM input bitstream is detected, the CP650 outputs will mute. Use this option with caution.
Dolby® CP650 Digital Cinema Processor User’s Manual Appendix B The Evolution of Dolby Film Sound Going to the movies today is more exciting and involving than ever before, thanks in large part to a continuing effort to improve film sound undertaken by Dolby Laboratories in the early 1970s. Indeed, the history of cinema sound over the past three decades closely mirrors the history of Dolby® film sound technologies.
Dolby® CP650 Digital Cinema Processor User’s Manual The Evolution of Dolby Film Sound speakers. The result was to ignore the improved high-frequency response of the newer, better units. To forestall compatibility problems, in the late 1930s a de facto standardization set in, the cinema playback response that today is called the Academy characteristic. Cinema owners knew what to expect from the films, and therefore what equipment to install.
Dolby® CP650 Digital Cinema Processor User’s Manual The Evolution of Dolby Film Sound Dolby Gets Involved By the late 1980s, the situation that prevailed in the mid-1970s had completely changed. Thanks to new technology and a turnaround in the financial decline of the industry, almost all major titles by that time were being released with wide-range multichannel stereo soundtracks, as is the case today.
Dolby® CP650 Digital Cinema Processor User’s Manual The Evolution of Dolby Film Sound The Digital Age Begins The next film sound development from Dolby Laboratories was Dolby Digital, introduced in 1992. Dolby Digital puts a six-channel digital optical soundtrack in addition to a four-channel SR analog track on 35 mm prints.
Dolby® CP650 Digital Cinema Processor User’s Manual The Evolution of Dolby Film Sound processes, and this has necessitated new approaches to soundtrack production. Admittedly, the results can vary—the final reproduced soundtrack can be no better than the elements it comprises—but Dolby film sound at its best means not only better quality sound, but sound in the theatre that consistently realizes the director’s original intentions.
Virtual Dolby Technologies Test DVD Track List iv
Dolby® CP650 Digital Cinema Processor User’s Manual Appendix C Reference Information C.1 How to Identify Soundtracks on Prints Edge of film Dolby Digital soundtrack Analog soundtrack Picture area Figure C-1 Film Sound Track Layout A Dolby® Digital film print, a stereo analog optical print (A-type or SR), or a mono analog optical print should be identified as such on both the film can and leader. However, with handling, the identification may be lost.
Dolby® CP650 Digital Cinema Processor User’s Manual Dolby Digital or Dolby Digital Surround EX Print The digital data blocks are clearly visible between perforations next to the analog track. The analog track is Dolby SR encoded. Analog Stereo Print Clear differences between channels will be seen in some places along the track. Reference Information Mono Print Both tracks are the same.
Dolby® CP650 Digital Cinema Processor User’s Manual Reference Information A Center screen channel is necessary to ensure the precise localization of front sounds for all viewers, including those seated off to the sides. Dolby Digital Surround EX brings similar benefits to the surround sound field. With Surround EX, a Back Surround channel is reproduced by the speaker array at the back of the theatre, while Left Surround and Right Surround channels are reproduced by the side arrays.
Dolby® CP650 Digital Cinema Processor User’s Manual C.3 Reference Information Test and Demonstration Films Several test and demonstration films produced by Dolby Laboratories are available from your equipment supplier. For proper system maintenance, the Cat. No. 69T test film is required, and the Cat. No. 251 Jiffy test film is strongly recommended. The Cat. No. 69T test film should be formed into loops for ease of use. Other test films are for use by your service engineer with special test equipment.
Dolby® CP650 Digital Cinema Processor User’s Manual Reference Information Jiffy Test Film Specifications: • • • Duration: Eight minutes Picture format: 35 mm color, can be screened either 1.85:1 widescreen or 2.39:1 anamorphic Sound formats: Dolby Digital and Dolby SR Cat. No. 69P, 97, 151B, and 566 Test Films The Cat. No. 69P, 97, 151B, and 566 test films are specialized analog test films for use only by trained engineers with special test equipment, and need not be kept on hand at the theatre.
Virtual Dolby Technologies Test DVD Track List iv
Dolby® CP650 Digital Cinema Processor User’s Manual Appendix D CP650 Menu Listing The options shown in bold are the default settings when the unit was shipped from the factory. menu menu OK OK Notes This is the top-level menu display.
Dolby® CP650 Digital Cinema Processor User’s Manual CP650 Menu Listing CP650 User Menu, Continued menu menu OK OK Notes 17 Auto Mute: Disabled/Enabled Decode: L/R Stereo/Pro Logic Format 80/81 PCM Options 18 Mute Fade-In Time 0.2–5 seconds 19 Mute Fade-Out Time 0.2–5 seconds 20 Power-On Format Select 21 Contrast Adjustment Set the display contrast. 22 Event Log Scroll up and down the event listing. 23 24 25 Select from Format list or select Last Format used.