Satellite Receiver User’s Guide Changing Entertainment. Again.
Important Information WARNING To reduce the risk of fire or electric shock, do not expose this product to rain or moisture. Cautions CAUTION RISK OF ELECTRIC SHOCK. DO NOT OPEN. Caution: To reduce the risk of electric shock, do not remove cover (or back). No user serviceable parts inside. Refer servicing to qualified service personnel. This symbol indicates "dangerous voltage" inside the product that presents a risk of electric shock or personal injury.
Introduction Key Features Overview Your digital satellite receiver is equipped with features that will add to your viewing experience. The following information summarizes a few of these features. Chapter 3 provides more information about the rest of the TV’s features and how to use them.
Introduction VCR One-button Record Description: Records any program being watched with the touch of one button. The receiver sends infrared commands to the VCR to execute the recordings at the proper time. Requirements: Connect the satellite receiver to the VCR and attach the infrared cable on top of the VCR’s remote control sensor. Set up the digital satellite receiver system using the first-time assisted setup and follow the directions on page 19 to select the VCR type.
Table of Contents Connections & Setup ................................................................................................ 5 Things To Consider Before You Connect Components ............................................. 6 Choose Your Connection ........................................................................................... 7 Excellent Connection ........................................................................................... 8 Very Good Connection .........................
Table of Contents Using the Menu System ......................................................................................... 39 Using the Menu System ........................................................................................... 40 On-screen Buttons and Context Help ............................................................... 40 Main Menu Items ............................................................................................... 41 The Program Guide ...........................
Chapter 1 Connections & Setup Chapter Overview: • Things to Consider Before You Connect • Choose Your Connection • Place Batteries in the Remote Control • Assisted Setup • Order Programming Changing Entertainment. Again.
Connections & Setup Things To Consider Before You Connect Components Protect Your Components from Power Surges • Connect all components before plugging any power cords into the wall outlet. • Always turn off the digital satellite receiver, TV and other components before you connect or disconnect any cables. Position Cables Correctly to Avoid Audio Hum or Interference • Insert all cable plugs firmly into their jacks.
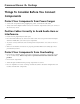
Connections & Setup Choose Your Connection There are several ways to connect your digital satellite receiver depending on the components you want to connect and the quality of the signal you want to achieve. Please use the following chart to determine which connection is best for you. Proceed to the appropriate page and connect your satellite receiver. For more information about the relationship between cables, jacks, and the quality of the signal, go to pages 15-16.
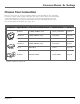
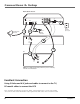
Connections & Setup Digital Satellite Receiver VCR R GROUND SATELLITE IN PHONE JACK LOW SPEED DATA L OUT TO TV IN FROM ANT S-VIDEO Satellite Dish Antenna 1 2 4 AUDIO 5 DIGITAL AUDIO RJ11 modular phone jack Cable or Off-air Antenna VCR CH3 CH4 VIDEO IN FROM ANT 6 OUT TO TV 7 TV 3 R L IN FROM ANT AUDIO VIDEO S-Video Note: Your VCR and TV back panels may not look exactly like the ones illustrated.
Connections & Setup What you will need: • Two (2) RF coaxial cables • Two (2) A/V cables • One (1) S-Video cable • One (1) telephone line cord • Coaxial cable lines fed from a digital satellite antenna and a standard TV antenna (or cable line) Making the Connection 1. Connect the satellite dish antenna feed (RG-6 coaxial cable) to the SATELLITE IN jack on the satellite receiver. 2.
Connections & Setup Digital Satellite Receiver VCR R GROUND SATELLITE IN PHONE JACK LOW SPEED DATA L OUT TO TV IN FROM ANT S-VIDEO Satellite Dish Antenna 1 2 4 Cable or Off-air Antenna VCR CH3 CH4 VIDEO AUDIO DIGITAL AUDIO 5 RJ11 modular phone jack 6 IN FROM ANT OUT TO TV 3 TV R L IN FROM ANT AUDIO VIDEO Note: Your VCR and TV back panels may not look exactly like the ones shown.
Connections & Setup What you will need: • Two (2) RF coaxial cables • Three (3) Audio/Video cables • One (1) telephone line cord • Coaxial cable lines fed from a digital satellite antenna and a standard TV antenna (or cable line) Making the Connection 1. Connect the satellite dish antenna feed (RG-6 coaxial cable) to the SATELLITE IN jack on the satellite receiver. 2.
Connections & Setup Digital Satellite Receiver VCR R GROUND SATELLITE IN PHONE JACK LOW SPEED DATA L OUT TO TV IN FROM ANT S-VIDEO Satellite Dish Antenna 1 2 AUDIO DIGITAL AUDIO 5 4 Cable or Off-air Antenna VCR CH3 CH4 VIDEO RJ11 modular phone jack IN FROM ANT OUT TO TV 3 TV IN FROM ANT Note: Your VCR and TV back panels may not look exactly like the ones shown. Basic Connection Using RF Coaxial cables for all connections This connection provides standard picture quality.
Connections & Setup What you will need: • Two (2) RF coaxial cables • One (1) telephone line cord • Coaxial cable lines fed from a digital satellite antenna and a standard TV antenna (or cable line) Making the Connection 1. Connect the satellite dish antenna feed (RG-6 coaxial cable) to the SATELLITE IN jack on the satellite receiver. 2. Connect one end of an RF coaxial cable to the OUT TO TV jack on the satellite receiver, and the other end to the antenna INPUT jack on the VCR. 3.
Connections & Setup Receiver or Decoder with Optical Input DIGITAL AUDIO INPUT Digital Satellite Receiver VCR R GROUND SATELLITE IN PHONE JACK LOW SPEED DATA L OUT TO TV IN FROM ANT VIDEO S-VIDEO AUDIO DIGITAL AUDIO Advanced Audio (Digital Audio Output Connection) Cables: Optical (SPDIF) Use this connection to take advantage of Dolby Digital* quality sound, when available. Notes: Your digital receiver back panel may not look exactly like the one pictured.
Connections & Setup Jacks and Cables Below is a description of the jacks and cables you can use to make connections. Not all cables come with your digital satellite receiver. S-Video Jack and Cable S-VIDEO S-Video jacks/cables provide this receiver’s best picture quality. Remember to connect the left and right audio cables to the TV because the S-Video cable carries only the picture signal, not the sound.
Connections & Setup VCR PHONE JACK SATELLITE IN LOW SPEED DATA OUT TO TV IN FROM ANT VIDEO AUDIO S-VIDEO DIGITAL AUDIO Satellite Receiver Rear Panel This diagram illustrates each of the back panel jacks found on your digital satellite receiver. When working with cables, be sure to connect corresponding OUTPUTS and INPUTS (Video OUT to Video IN, Right Audio OUT to Right Audio IN, etc.).
Connections & Setup Place Batteries in the Remote Control Follow these steps whenever you need to install or change the batteries in your digital satellite receiver’s remote control. Note: When replacing old batteries, you may need to reprogram the remote control to operate other devices. 1. Remove the cover from the battery compartment. 2. Insert batteries in the battery compartment, matching the + and – end of each battery. 3. Replace the cover.
Connections & Setup Satellite Receiver (Back Panel) VCR R PHONE JACK SATELLITE IN LOW SPEED DATA L OUT TO TV IN FROM ANT VIDEO AUDIO S-VIDEO DIGITAL AUDIO VCR (Front Panel) Remonte Control IR Sensor Connect the VCR Controller To use the One-Touch Record and Timer features, you need to attach the VCR Controller cable to the VCR and the satellite receiver. 1. Plug the VCR Controller into the VCR jack on the satellite receiver. 2. Affix the other end in front of the remote control sensor on your VCR.
Connections & Setup Selecting a VCR Type In order to use the One-Touch Record and Timer features, you need to tell the satellite receiver which VCR brand you are using. 1. Tune the TV to its satellite receiver viewing channel (either 03, 04, or the TV’s appropriate input channel depending on your connections). 2. Press MENU on the remote control to display the satellite receiver’s Main menu. 2. Highlight and select number 7, System Setup. 3. Highlight and select number 3, System Options. 4.
Connections & Setup Order Programming Tip When you order programming, you need to know your access card number. To get the number, select System Setup from the Main menu, then System Test. Wait for the system to run all of its tests. The access card number is displayed at the end of the system test. Write the access card number in the space below for easy reference: 20 After you have installed your DIRECTV System, you should contact DIRECTV to order DIRECTV® programming.
Chapter 2 Using the Remote Control Chapter Overview: • Remote Control Buttons • Buttons on Top of the Digital Satellite Receiver • Programming the Remote Control • Using the Remote Control to Operate Another Component • Modes of Operation • Controlling a Second Satellite Receiver • Remote Control Codes Changing Entertainment. Again.
Using the Remote Control Remote Control Buttons in Alphabetical Order LED ON • OFF VCR1 DVD VCR2 TV SAT AUX SKIP MUTE ANTENNA In TV mode, lets you toggle between the satellite and standard TV/ cable signals when the satellite receiver is connected to the TV using the OUT TO TV jack. In VCR mode, ANTENNA functions as a TV/VCR input button. Arrows Use the navigation arrows to move the on-screen highlight up, down, left, or right.
Using the Remote Control OK/i (interactive) Selects a highlighted choice if you are in the menu system. Press the OK button when the DIRECTV INTERACTIVE™ icon ( ) appears during interactive programs and commercials. Pressing OK will display more information and offer the chance to interact with what is displayed on screen. ON•OFF Turns the component you are controlling on or off.
Using the Remote Control Top of the Digital Satellite Receiver This diagram illustrates the buttons on the top (also referred to as the front panel) of the digital satellite receiver. For more information on the function of the front panel buttons and many other features of your digital satellite receiver, press the MENU button and select System Setup from the Main menu, then select System Index.
Using the Remote Control Programming the Remote Control LED Component buttons and ON•OFF button ON • OFF VCR1 DVD VCR2 TV SAT AUX The digital satellite receiver’s remote can be programmed to control most brands of remote controllable components. The remote is already programmed to control most RCA, GE and Proscan components; it may need to be programmed to control other manufacturers’ brands.
Using the Remote Control Using Direct Entry 1. Turn on the component to be programmed. 2. Look up the brand and code number(s) for the component on the code list at the end of this section. 3. On your remote control, press and hold the component button you want to program. 4. While pressing the component button, enter a code from the code list. 5. Release the component button, and then press ON•OFF to see if the component responds to the remote control commands.
Using the Remote Control Remote Control Codes TV Abex ............................................................................ 1172 Admiral .............................................................. 1001, 1173 Adventura .................................................................... 1174 Aiko ............................................................................. 1016 Akai .............................................................................. 1002 Alleron ........................
Code List Remote Control Codes (Cont.) VCR Admiral ........................................................................ 2131 Zaiko ............................................................................ 2027 Aiwa ................................................................... 2002, 2026 Akai .......... 2003, 2004, 2005, 2007, 2008, 2111,2112, 2113 American High ............................................................ 2021 Asha ................................................................
Chapter 3 Using the Satellite Receiver’s Features Chapter Overview: • What is a Program Guide? • The interactive programming feature • The Channel Banner and other on-screen displays • How to use the on-screen programming schedule Changing Entertainment. Again.
Satellite Receiver Features Current user profile Current time and date Program titles and information Selectable Advertisements (highlight and select for more information). Viewing Suggestions Scroll down Sorts by Movies Active Profile’s Preferences Sorts by Sports AlphaSort™ Scout™ Channel sort Anatomy of a Program Guide The following diagram shows you the kind of information you will see in the program guides.
Satellite Receiver Features Active Profile Program titles and information Interactive content indicator Viewing Alternate audio Main menu AlphaSort™ Mailbox Dolby Digital suggestions and alternate System lock/unlock Scout™ Caller ID Program details audio indicators Using The Channel Banner The channel banner appears whenever you do one of the following: • Tune to a channel. • Press the remote control’s INFO, SAT, or GO BACK buttons while watching programming.
Satellite Receiver Features The DIRECTV INTERACTIVE™ Feature Your digital satellite receiver includes DIRECTV INTERACTIVE™, powered by Wink Communications®, a free service that gives you the opportunity to interact with TV programming and advertising. You can use your remote control to get program-related information, respond to free offers during commercials and even make purchases while you watch TV.
Satellite Receiver Features DVD Getting Around In the Guides ON • OFF VCR1 VCR2 TV This section describes how to change channels and move around a program guide.
Satellite Receiver Features Tuning to a Program To tune directly to a current program listed in the guide, point to the program and press OK. To see information about a program in the guide, point to the program and press INFO. Then, you can select: • View Channel to tune to that channel • Record Program to record the program • Remind Me to set up a Watch Timer. This will display a prompt allowing you to quickly change the channel when the program is about to begin.
Satellite Receiver Features Additional Program Guides Besides the Detail and Grid Guides, there are a few more to choose from: the Channel Guide, the Logo Guide, and the Viewing Suggestions Guide. You can access these guides from the Main menu by selecting Program Guides. The Channel Guide Displays the programming schedule for the selected channel. The Logo Guide Displays channel logos for the current user’s channel list.
Satellite Receiver Features Sorting the Guides Sorting the guide is a way of organizing the information to show only the types of programs that interest you. There are several on-screen icons that sort the guide in different ways. You can list programs by sports or movie themes, for example. You can customize the themes to meet your tastes, and each profile can have its own default program sorting.
Satellite Receiver Features Active Profile’s Preferences Each individual can edit preferences so customized themes and topics appear when a sorting icon is pressed. The Active profile’s preferences can be quickly accessed by selecting this icon at the bottom of all on-screen guides. To Change the Active Profile’s Preferences: 1. Press the GUIDE button on the remote control to display the default guide. 2.
Satellite Receiver Features AlphaSort™ The AlphaSort feature lists all the program titles stored in the current guide in alphabetical order. Select the AlphaSort icon to search for specific program titles that are in the stored program guide in alphabetical order. Use the arrow buttons on the remote control to highlight a character, then press OK. For example, to search for the program Auto Racing, point to and select “A.” (Words like “The,” “A,” and “An” appear at the end of a title.
Chapter 4 Using the Menu System Chapter Overview: • Using the Menu System • Program Guides • Messages • Using the Purchases Menu • Recording with Timers • User Profiles • Personal Settings • System Setup Changing Entertainment. Again.
Using On-Screen Menus Using the Menu System To display the Main menu, press MENU on the remote control. To use the menu system, you need to use the remote control’s arrow buttons to highlight your on-screen choice, then use the OK button to select it. In menus that use numbered choices, you can use the remote control’s number buttons to select an item quickly. On-screen Buttons and Context Help Tip: No Menus? If the Main menu doesn’t appear when you press MENU, the remote control might not be in SAT mode.
Using On-Screen Menus Main Menu Items This section briefly describes each of the options available from the Main menu. More information about each menu and its features is included later in this chapter, and you can always get more information when an item is highlighted by pressing the remote control’s INFO button. Program Guides Selecting this button will display a menu with a variety of different ways to view program guide information.
Using On-Screen Menus Active profile Current time and date Program titles and information Selectable Advertisements (highlight and select for more information). Viewing Suggestions Sorts by Movies Scroll down AlphaSort™ Scout™ Active Profile’s Preferences Sorts by Sports Channel sort The Program Guide Note: The program guide is described in detail in the previous chapter, Using the Satellite Receiver’s Features, starting on page 29.
Using On-Screen Menus Messages The Messages menu lets you access messages or phone calls. If you select Mail, it shows you messages that are sent from DIRECTV. For example, you may receive a message calling your attention to a new service. If you select Caller ID, this menu shows you Caller ID information from your telephone provider (if you subscribe to Caller ID service). Mail To tell if you have mail, you need to check the channel banner available when you press the remote control’s INFO button.
Using On-Screen Menus Caller ID Your digital satellite receiver is capable of displaying and storing Caller ID information provided by your local telephone company. To use this feature, you must have your receiver directly plugged into a telephone outlet (or a RC930 wireless modem) and you must subscribe to Caller ID or similar caller identification services from your telephone company. Your Caller ID enables you to: • Identify callers before you answer the phone.
Using On-Screen Menus Receiving Calls When your phone rings twice and Caller ID Message is set to On, a banner appears at the bottom of the screen. The banner may include the phone number, date, and time; or the name, phone number, date, and time. The banner information depends on the type of service your telephone company provides. The Caller ID banner will override closed captioning at the bottom of the screen and will appear for the amount of time selected in the Caller ID Setup screen.
Using On-Screen Menus The Caller ID List Screen The digital satellite receiver can store up to 20 call entries in the Caller ID List screen. When the memory is full, a new call automatically replaces the oldest call in memory. The list also tells you if you have received multiple calls from the same number. To access the call list: • Select Caller ID List from the Messages menu, or • Press the INFO button on the remote control and select the phone icon.
Using On-Screen Menus Spending Limits Use the Spending Limit option to indicate a per-event, and/or a monthly spending limit for Pay Per View programs. 1. Select Spending Limit. 2. Select the user profile you’d like to set a spending limit for, then use the digits or the arrow buttons on the remote control to enter program spending-limit information.
Using On-Screen Menus Timer Recordings The Timers feature allows you to preset your digital satellite receiver to automatically tune to a particular channel at a predetermined time. To use the Timers feature, select Timers from the Main menu. Select a Timer (1–16) and then use the arrow buttons to complete the on-screen details. When the information is complete, select Continue.
Using On-Screen Menus Schedule a Timer with the RECORD Button You can schedule a recording directly from the guide. 1. With a program highlighted, press the RECORD button on the remote control. The Program Details screen appears. 2. To schedule a timer to record, select: • Record Program to set a timer to record the program, or • Buy and Record to purchase the program and set up a timer to record the program.
Using On-Screen Menus Setting the Profile Name The first step when creating a new profile is to set a name. This will be the name that appears when repeatedly pressing the WHO•INPUT button. To set the profile name: 1. In the Profiles menu, press the 1 button to select Name. 2. Use the remote controls arrow and OK buttons to highlight and select the different letters of the profile name.
Using On-Screen Menus Setting the Rating Limit The Rating Limit menu enables you to set a maximum rating viewing limit for rated movies (based on the MPAA rating system) and TV programs. Unrated movies and TV programs can also be restricted from individual profiles. 1. In the Profiles menu, select Rating Limits. 2. Highlight the desired rating feature to set (Movie Ratings, TV ratings, or Not Rated Events). 3. Press the remote control’s OK button. 4.
Using On-Screen Menus Locking a User’s Profile Users can be assigned a personal password to lock their profile. When a password is assigned, users must enter the password before they can view programs using that profile. Profile passwords do not allow access to, or editing of, the profile limits (you must enter the system password to edit profile limits). Note: Each profile that can be easily accessed using the WHO•INPUT button on the remote control. To lock an individual profile: 1.
Using On-Screen Menus Unlocking the System When the system is unlocked, the channel, spending, viewing, and ratings limits that you set are no longer in effect. To unlock: 1. Highlight and select Unlock System in the Profiles menu. 2. Highlight and select Yes to confirm that you want to unlock the system. The unlock icon should be displayed in the channel banner.
Using On-Screen Menus Choosing Your Profile Each time you turn on the digital satellite receiver, the Family profile is selected by default, so this should be the profile with the most restrictive limits you want enforced across all profiles. To select another profile: 1. Press the WHO•INPUT button to display a list of profiles. 2. Use the remote control’s arrow and OK buttons to select the desired profile. Then enter the four-digit password to activate the profile.
Using On-Screen Menus Guide Sorting Lets you choose whether the default guide is sorted numerically by channel numbers or alphabetically by channel names. Color Scheme Lets you pick which colors appear in the guide and menu systems. Translucency Lets you choose how see-through the channel banner, the Fetch menu, and the Main menu are when displayed. Use the remote control’s arrow buttons to access and slide the indicator bar to make the screens more or less opaque.
Using On-Screen Menus To assign one function to the FETCH button: 1. Press MENU to bring up the Main menu. 2. Select Personal Settings, 3. Select the desired profile (each profile can have a different Fetch Menu). 4. Select Edit Fetch. 5. Select Fetch Control. 4. Select Assign One Function. 5. Select Fetch List from the Edit Fetch menu. TIP: Getting Help If you ever have a question about the menu you are in, select the on-screen help button (?).
Using On-Screen Menus System Index The System Index feature allows you to get detailed information about your digital satellite receiver. Details that can be viewed from within the System Index menu include program guide information, details about the menu system, explanations of the remote control, front panel, and back panel of the receiver, and even a glossary of words common when discussing digital satellite receivers.
Using On-Screen Menus Output Channel This feature allows you to change the channel to which the satellite receiver broadcasts its signal. The default setting is channel 3. Note: If you used A/V cables to connect your digital satellite receiver to your TV, then you must use the TV’s video line input to see the satellite broadcast. Remote Setup This allows you to choose which remote control button will control the digital satellite receiver. You can choose between SAT and AUX buttons. The default is SAT.
Using On-Screen Menus Dolby Digital* Setup Dolby Digital soundtracks (when available) provide up to six independent soundtrack channels through a digital audio output jack. Your digital satellite receiver has a SPDIF [IEC-958] digital PCM digital audio output jack. This can be connected to an external Digital Audio Receiver/Decoder equipped with a compatible digital audio input (see page 14 in the Setup and Connections section for more information).
Using On-Screen Menus Time Zone Using this feature allows you to set the local time zone and to enact a DaylightSaving time option. Accurate time is necessary for Timer Recordings and Watch and Remind features, but setting the time zone is normally automatic, and generally does not require you to do anything. Setting the time zone should only be done in rare circumstances, such as if the program times are wrong after the system card has been activated.
Using On-Screen Menus Enter Zip Code LNBs This feature allows you to find dish-pointing coordinates from your local zip code. 1. In the Dish Pointing menu, use the remote control’s arrow buttons to select Enter Zip Code. 2. Use the numeric buttons on the remote control to enter in the proper zip code. 3. After entering the final digit, the receiver displays the dish-pointing coordinates. For convenience, record the numbers in the spaces below.
Using On-Screen Menus Tip If your system fails a test, run the system test several times before concluding that there is a problem. Occasional fluctuations in the phone line or satellite signal can give temporary false readings. System Test This function allows you to perform a system-level diagnostic test on the satellite receiver. There are four sub-tests within this system test. Each one will display results after the testing for that area is complete.
Chapter 5 Other Information Chapter Overview: • Troubleshooting • Finding the TV’s Video Line Input • Running the System Test • Limited Warranty • Accessory Order Form • Index Changing Entertainment. Again.
Other Information Troubleshooting Many problems can be corrected by performing a simple reset of the digital satellite receiver. If you experience the following: • Image freezes • Blank screen • Audio freezes • Won’t respond to front panel or remote try this: press and hold the INFO and right arrow buttons for at least three seconds. If the problems persist, try unplugging the digital satellite receiver for 15 seconds to 2 minutes and then plug it in again.
Other Information Satellite receiver turns on or changes channels unexpectedly • Scheduled Watch or Record timer has been activated. Blank screen • Your satellite receiver may be hooked incorrectly to the TV. Change channels using the satellite receiver’s front panel buttons to see if the channel banner appears. If it does not, check the Setup and Connections section for instructions about connecting your satellite receiver.
Other Information Finding the TV’s Video Input Channel TV Button ON • OFF VCR1 DVD VCR2 Note: If your TV is connected with just coaxial cables, you only need to tune to channel 3 or 4. TV SAT AUX SKIP MUTE VOL VOL CH + CH FETCH GO BACK GUIDE INFO If you used audio/video cables to connect your TV to the digital satellite receiver, you must tune your TV to the video input channel to view DIRECTV® programming and menus.
Other Information Running the System Test The System Test allows you to run a basic diagnostics check on your digital satellite receiver. If you are experiencing any trouble with your receiver, run the system test. It will also allow you to get your access card number or to initiate diagnostic procedures on your digital satellite receiver. First make sure that: • all connections—jacks, cables, etc.—are correctly in place. See Chapter One, Setup and Connections, for more information.
Other Information Limited Warranty What your warranty covers: • Defects in materials or workmanship. For how long after your purchase: • 90 days from date of purchase - Unit exchange, which includes parts and labor. • 91 days to 1 year from date of purchase - Unit exchange, which includes parts only; you pay the labor. • The warranty for rental units begins with the first rental or 45 days from date of shipment to the rental firm, whichever comes first.
Other Information To receive a replacement receiver after we have received your unit: • Write the SR number on the outside of the carton used to return the unit. Make sure you insure your shipment in case of damage or loss. • Carefully pack the unit using the original box and packing material if possible. Please retain all accessories that were included with your unit such as the remote control hand unit and access card. • Include with the shipment: 1. Evidence of purchase date such as a bill of sale. 2.
Other Information FCC Registration Information Your digital satellite receiver is registered with the Federal Communications Commission and is in compliance with parts 15B and 68, FCC Rules and Regulations. 1. Notification to the Local Telephone Company. On the back of this equipment is a label indicating among other information, the FCC Registration number and Ringer Equivalence Number (REN) for the equipment. You must, upon request, provide this information to your telephone company.
Other Information Accessory Order Form Description Part No. Price Qty Total RG-6 Coaxial Cable RG-6 Coaxial Burial Cable with weatherproof “F” connectors comes in a variety of lengths. S-Video Cable comes in 12 foot lengths. 12 feet DT12C $14.95 25 feet DT25C $24.95 50 feet DT50C $39.95 S-Video Cable 12 feet DT12S $19.95 Weatherproof “F” Connector (2) D905 $5.95 Optical/SPDIF Cable (3-ft) DV3 $15.95 Optical/SPDIF Cable (6-ft) DV6 $19.95 TVRO Bullet Amplifier D903 $22.
Other Information Charge your order on your VISA, MasterCard, or Discover Card by filling in below Placing an Order To place your order by phone, have your Visa, MasterCard or Discover Card ready and call the toll-free number listed below. Use this number only to place on order for accessory items listed on this order form.
Other Information Glossary Automatic Code Search A method to program the remote control by using a series of preset codes. Programming the remote control is necessary to operate other components. Channel Banner A transparent banner at the top of the picture allows direct access to the key features of your digital satellite receiver including viewing suggestions, The Guardian™ channel locking system, on-screen message display, and the Scout™ keyword/phrase and the AlphaSort™ alphabetical search features.
Index A D M R Access card number 20 Accessories 71 Accessory Order Form 71 AlphaSort button 31, 38 Arrows on remote 22 Assisted setup 19, 67 Attractions Guide 35 Audio Hum 6 Audio/Video jacks/cables 15 AUX button 22 Deleting calls 46 Deleting purchases 46 Detail Guide 32 DIRECTV INTERACTIVE™ 2, 32 Dish Pointing 60 Dolby Digital 1, 14 DVD button 22 Mail checking 43 deleting 43 icon 31 MENU button 22 Menu system 40 icons 48 Menus Profiles 49 Program Guide 42 Timers 48 Messages 43 Caller ID 46 Movies ico
Index U Universal Remote Control 1, 73 Unlocking the system 53 User Preferences 36 V VCR code list 28 Controller 15 recording 23, 26, 48 remote button 23 set type 19 Video input channel 9, 11 Viewing hours limit 51 W WHO•INPUT button 23 Wink.
This page left intentionally blank
This page left intentionally blank
If your digital satellite receiver needs service, please contact your dealer or the nearest Service Center from the Yellow Pages. Please do not send any products to the Indianapolis address listed in this manual or on the carton. This will only add delays in service for your product. The software used to display images in this product is based in part on the work of the Independent JPEG Group. Thomson multimedia Inc. 10330 North Meridian Street Indianapolis, IN 46290 ©2002 Thomson multimedia Inc.