DVD+VCR HOME THEATER SYSTEM R CD-R CD-RW JPG FILES HIGH QUALITY OWNER'S MANUAL IMPORTANT This Unit does NOT allow copying from DVD to VCR Tape
Important Safety Instructions WARNING This video cassette recorder (VCR) uses "ONLY" cassette tapes, NTSC video signals (standard in US). The lightning flash with an arrowhead symbol, within the equilateral triangle, is intended to alert the user to the presence of uninsulated "dangerous voltage" within the product's enclosure that may be of sufficient magnitude to cause an electric shock. WARNING: TO REDUCE THE RISK OF ELECTRIC SHOCK, DO NOT REMOVE COVER (OR BACK). NO USERSERVICEABLE PARTS INSIDE.
Important Safety Instructions 1. Read these instructions. 2. Keep these instructions. 3. Heed all warnings. 4. Follow all instructions. 5. Do not use this apparatus near water. 6. Clean only with a damp cloth. 7. Do not block any of the ventilation openings. Install in accordance with the manufacturer’s instructions. 8. Do not install near any heat sources such as radiators, heat registers, stoves, or other apparatus (including amplifiers) that produce heat. 9.
Table of Contents Special Functions ................................. 25-27 Display function (DVD) .......................................... 25 GOTO function (DVD) ........................................... 25 IMPORTANT Locating a specific title ......................................... 26 This Unit does NOT allow copying from DVD to VCR tape Locating a specific time ......................................... 27 Locating a specific title/chapter/track .................. 26 Angle setting ..............
Disc Formats The unit can playback. DVDs [8cm(3")/12cm(5”) disc] Compatible Audio CDs [8cm(3")/12cm(5”) disc] Region Management Information Region Management Information: This unit is designed and manufactured to respond to the Region Management Information that is encoded on DVD discs. If the Region number printed on the DVD disc does not correspond to the Region number of this unit, this unit cannot play that disc. The region number of this Unit is 1.
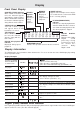
Parts and Functions Front Panel 1 2 3 4 20 19 18 17 16 15 5 14 6 13 12 11 10 1) POWER/ STANDBY button Turn the power on or off. 2) STOP button (for VCR) Stop playing a tape. 3) 4) 5) 6) 7) 8) 9) 10) 14) PLAY button (for VCR) Press to start or resume playback CHANNEL button UP/ DOWN (for VCR) Use to highlight selections on a menu screen and adjust certain setting. Video cassette compartment Open tray by pushing TAPE EJECT button. Disc tray Open or close tray by pushing DVD OPEN/CLOSE button.
Parts and Functions Rear Panel 21 22 23 24 25 26 AC 27 28 R A UD I O FM A N T. 3 0 0 ( Ω) IN L VID EO AM LO O P A N T.
Parts and Functions Remote Control OPEN/ CLOSE POWER RETURN FUNCTION 1 2 GOTO AM/PM 3 4 5 6 7 8 9 10 11 12 13 14 15 MEMORY 5.1 CH 2.1 CH SOUND VCR STOP CH+ INPUT TV/VCR PRO LOGIC CH- SP .EP REC VOLUME SETUP VCR ON/OFF STOP PREV 16 17 18 19 20 CLEAR ANGLE MENU ENTER SLOW PLAY PAUSE TUNING DISPLAY ZOOM SUBTITLE FM MODE NEXT AUDIO BAND A-B DISC REPEAT 1) POWER / button Turns the Unit on and puts it in standby mode.
Parts and Functions Remote Control 21 OPEN/ CLOSE POWER RETURN FUNCTION 22 GOTO 23 AM/PM 24 MEMORY 5.1 CH 2.1 CH SOUND VCR STOP CH+ INPUT TV/VCR PRO LOGIC CH- SP .EP REC VOLUME SETUP VCR ON/OFF MENU 25 26 27 28 29 30 31 ENTER SLOW 32 STOP PREV CLEAR ANGLE PLAY PAUSE TUNING DISPLAY ZOOM SUBTITLE FM MODE NEXT AUDIO BAND A-B DISC REPEAT 33 34 35 36 37 38 39 21) FUNCTION button Display the FUNCTION screen where you can check or change various setting.
Display Front Panel Display CHAPTER / TRACK indicator When a DVD is loaded in the Unit, this indicator appears along with the chapter number. When a Audio CD is loaded in the Unit, this indicator appears along with the track number. REPEAT 1 playback indicator Displayed during repeat playback. MEMORY indicator Displayed during programmed playback. STEREO indicator Tune into a station. "((ST))" will appear when an FM broadcast is in stereo.
Connections 1. Connecting to your TV The Unit can be connected to your TV in several different ways, depending on the design of your TV. 1. Connect the TV antenna (coaxial cable) to the input jack on the unit. 2. Attach one end of the supplied coaxial cable to the output jack on the unit, and the other end of the cable to the input jack on your TV. Alternate Connections: 1. If your TV has Audio/Video inputs, you can also connect the unit to your TV using the supplied Audio/Video cord. 2.
Connections Cable TV Connections Your VCR is capable of receiving the following non-scrambled channels. • Scrambled channels can be received with the cable box supplied by your cable TV company. Preparation Set the 3 4 Output Channel of the VCR to 3 or 4. See Setting the 3 4 Output Channel.
Connections B. Connection with cable box 1. Connect as shown. With this connection, it is possible to record descrambled CATV signals. Then plug in the power cords of the TV and cable box. Rear of Unit Cable Box IN OUT Coaxial cable (Not supplied) TV Rear From CATV system IN Coaxial cable (supplied) ANT/CABLE OUT VHF/UHF/ CATV Notes: • If the cable box is turned off, it will not output any signals, thus making it impossible to record or view a programme from the CATV system.
Connections C. Connection with cable box, A/B switch and splitter By using an A/B switch or splitter, it is possible to switch between the cable box and the VCR output. For example, while recording a TV programme with the VCR, it is possible to watch a CATV programme (including descrambled programmes) using the A/B switch. • Connect as shown. Then plug in the power cords of the TV and cable box.
Connections D. Connection with two cable boxes, A/B switch and splitter The following connection is necessary to record a cable TV programme (even those scrambled by a cable company) while watching another cable TV programme. The following connection requires two cable boxes, a 2way splitter and an A/B switch. • Connect as shown. Then plug in the power cords of the TV and cable box.
Connections 3. Connecting the speakers & subwoofer 1. The speaker cords have been color-coded to simplify connection. Just plug the POSITIVE (+) and NEGATIVE (-) ends of each speaker wire into the corresponding jacks on the rear of the Unit, matching the color tube on the end of the speaker wire to the color-coded connector. 2. Connect each of the speaker wires to the satellite speakers. The front left/right and rear left/right speakers are all the same.
Connections 5. Connecting Other Equipment You can connect other audio and/or video equipment to your unit in different ways. The following illustrations give a few examples of the connection possibilities.
Connections Mounting rear surround speakers 1) Mark the correct mounting position on the wall. 2) Insert a fixing screw(s) at the marked position on the wall. 3) Align the slot hole(s) of the speaker over the screw and pull the speaker downward until it is firmly hooked. Need More Help? DO NOT RETURN THIS TO THE STORE Please call Customer Service at 1-800-252-6123 or visit online help at http://www.1800customersupport.
Adjusting the Sound To adjust the surround sound balance while Pro Logic decoding is in effect Use the remote control to make the following changes to speaker balance: Front speaker (left) • Press the SOUND button repeatedly to display LEFT, then press the or CURSOR button to adjust the sound level. It will show on the display of the Unit. Front speaker (right) • Press the SOUND button repeatedly to display RIGHT, then press the or CURSOR button toadjust the sound level.
Adjusting the Sound To select the listening channel 1. When the disc is stopped, you can press 5.1 CH and 2.1 CH buttons on the remote control to select different speakers output status shown as below table. 2. You can active or off subwoofer output by setup menu. Note: The wording "2.1 CH" will be corresponded to the audio/sound output from Front Left and Front Right speaker plus the Subwoofer. The following tables show which speakers are working in the various modes. Audio Settings DISC DVD CD 5.
DVD CD Playing a Disc Basic playback This owner’s manual explains the basic instructions of this Unit. Some DVD discs are produced in a manner that allows specific or limited operation during playback. As such, the Unit may not respond to all operating commands. This is not a defect in the Unit. Refer to the instruction notes of discs. “ ” may appear on the TV screen during operation. A “ operation is not permitted by the Unit or the disc. ” means that the desired Playing a Disc 1.
Playing a Disc DVD Fast Forward/Fast Reverse CD 1. Press the TUNING or TUNING button when a disc is playing. • The disc begins fast scan at x2 speed. or TUNING • Four speeds are available. Each time TUNING button is pressed, the speed of fast scan changes in the following sequence: Note : You also can press and hold speed. 2.Press the REW and F.FWD buttons on front panel repeatedly to select different fast scan PLAY button when you reach the desired point to resume playback at normal speed.
Playing a Disc DVD Angle selection Some DVDs contain scenes which have been shot from a number of different angles. For these discs, the same scene can be viewed from each of these different angles. 1. While you are playing a DVD with different angles recorded, press the ANGLE button to view the number of the current angle. 2. Press the ANGLE button repeatedly to change the scene to the next angle in those recorded. • About two seconds later, playback continues from the new angle you selected.
DVD Playing a Disc Subtitle selection 1. While a DVD is playing, press the SUBTITLE button to display the current language setting, as shown in the example below. 2. Press the SUBTITLE button repeatedly to select the desired subtitle language. Notes : • If only one language is recorded, the language does not change. • About two seconds later, playback continues with the new subtitle you selected. • The number of languages recorded differs depending on the disc.
DVD Basic playback Special Functions DISPLAY function Using DISPLAY, you can check and change the current settings of the following items: ANGLE, AUDIO and SUBTITLE. • While the disc is playing, press the DISPLAY button to display the screen shown below. Elapsed time: Elapsed time from the beginning of the chapter which is currently playing. Remaining time: Remaining time of the title which is currently playing.
Special Functions Basic playback Locating a specific title DVD If a DVD disc contains title numbers, you can locate a specific title by directly selecting a title number. 1. In stop mode, press the GOTO button. 2. Press , or button to highlight a specific field and press the corresponding number button(s) for the title you want. 3. Press the ENTER button to confirm. The Unit will start playback about 3 seconds later. Note : • Pressing the CLEAR button resets the title number.
Special Functions Basic playback Locating a specific time DVD CD You can move to a specific location by entering its corresponding time (hours, minutes, seconds) 1. Press the GOTO button. 2. Press or button to highlight time. DVD CD 3. Press the corresponding number buttons for the setting point you want. • The first two numbers you entered represent hours. • The second two numbers you entered represent minutes. • The third two numbers you entered represent seconds. 4.
Advanced playback CD / DVD programmable memory DVD Programmable memory The two types of programmed playback provided by this Unit are title programmed playback and chapter programmed playback. Title / Chapter programmed playback 1.Press the MEMORY button while the disc is stopped. 2.Enter the title numbers in in -- -- . Use or . button to move the highlight to chapter and enter the chapter numbers Title Chapter 3. Use , , or button to move to the other field. 4. Repeat steps 2 to 3. 5.
Advanced playback Repeat Playback You can play a specific title or chapter repeatedly. (Title repeat, chapter repeat, A-B repeat) Repeating a title DVD You can play the same title repeatedly. 1. While the disc is playing, press the REPEAT DISC button until the “ Repeat Title ” indicator displays on the screen. The current title is played repeatedly. Repeating a chapter You can play the same chapter repeatedly. 2.
Advanced playback Repeating a specific section Repeat Playback DVD You can play a specific section repeatedly. 1. While the disc is playing, press the REPEAT A-B button at the beginning of the section ( ) is displayed you want to play repeatedly. 2. Press the REPEAT A-B button again at the end of the section ( ) is displayed. 3. The Unit will immediately begin replaying your selection. To resume normal playback 4.
Playing Picture File Disc Playing a Picture file disc 1. Press the OPEN /CLOSE button, the disc tray opens. 2. Insert a Picture CD on the disc tray with the label side up. 3. Press the OPEN/CLOSE button, the disc tray closes. 4. The unit will take a short while to load the disc. 5. Press the PLAY button. The next picture will automatically display after 6 seconds.
Customizing the Function Settings LANGUAGE setting 1. Press the FUNCTION button until DVD appears on the display. 2. Press the STOP button so that no disc is playing. 3. Press the SETUP button. 4. Use the cursor or button to select the Language, then press the ENTER button. 5. Use the cursor or button to English, then press the ENTER button. The screen will change to English Wordings immediately. 6. To exit the FUNCTION SETUP MENU and return to the normal screen, press the RETURN button.
Customizing the Function Settings VIDEO setting TV Shape 1. Press the SETUP button. 2. Use the cursor or button to select Video, then press the ENTER button. 3. Use the cursor or button to select TV Shape, then press the ENTER button. 4. Use the cursor or button to shift and select the TV type, then press the ENTER button. 5. To exit the FUNCTION SETUP MENU and return to the normal screen, press the RETURN button. Cut off when a wide-screen video image is played.
Customizing the Function Settings Video Output 1. Press the SETUP button. 2. Use the cursor or button to select Video, then press the ENTER button. 3. Use the cursor or button to select Video Output, then press the ENTER button. 4. Use the cursor or button to shift and select the signal, then press the ENTER button. 5. To exit the FUNCTION SETUP MENU and return to the normal screen, press the RETURN button. Note: The RGB option is ONLY useful for use in Europe, and should not be selected.
Customizing the Function Settings Edges 1. Press the SETUP button. 2. Use the cursor or button to select Video, then press the ENTER button. 3. Use the cursor or button to select Edges, and then press the ENTER button. 4. Use the cursor or button to shift and select the Sharpen / Soften / Off, then press the ENTER button. 5. If you want to exit the SETUP MENU and return to the normal screen, press the RETURN button. Sharpen : Fine detail will be easier to see. Soften : Soft-focus effect.
Customizing the Function Settings AUDIO setting Digital Out 1. Press the SETUP button. 2. Use the cursor or button to select Audio, press the ENTER button. 3. Use the cursor or button to select Digital Out, and then press the ENTER button repeatedly to select Digital Out type. 4. To exit the FUNCTION SETUP MENU and return to the normal screen, press the RETURN button. Raw : Does not have a Dolby Digital Decode. PCM : Do have a Dolby Digital Decode. L/R Speaker 1. Press the SETUP button. 2.
Customizing the Function Settings Subwoofer 1. Press the SETUP button. 2. Use the cursor or button to select the Audio, press the ENTER button. 3. Use the cursor or button to Subwoofer, and then press the ENTER button. or button to select the desired setting, and then press the ENTER button. 4. Use the cursor 5. To exit the FUNCTION SETUP MENU and return to the normal screen, press the RETURN button. Subwoofer "On" should be selected if your subwoofer is connected.
Customizing the Function Settings Center Delay 1. Press the SETUP button. 2. Use the cursor or button to select the Audio, press the ENTER button. 3. Use the cursor or button to Center delay, then repeatedly press the ENTER button to select the desired Center Delay type. 0ms, 1ms, 2ms, 3ms, 4ms or 5ms appears. 4. To exit the FUNCTION SETUP MENU and return to the normal screen, press the RETURN button. Note: • This delay adjustment depends on the location of your center speaker.
VCR Setup MENU Screen MENU screen is a home screen used to select various screen functions. A submenu will appear once you select an item for the menu. MENU TIMER SET UP 4 1. Turn on the TV and select the video channel. (See Setting the 3 CHANNEL PRESET Output Channel) CLOCK LANGUAGE 2. Press the MAIN POWER button (MAIN POWER indicator will light up) and then press VCR ON/OFF button to select “VCR” (VCR indicator will light SELECT : up). ENTER : SET EXIT : MENU 3.
VCR Setup Set Up (with Auto Clock Setting) IMPORTANT (Caution during Set Up): • Do not press the VCR ON/OFF button on the VCR or remote control. • Do not insert a video cassette into the VCR. The Set Up function automatically sets the tuner channels and clock when the antenna cable is connected to the rear of the VCR and the power plug is then connected to an AC outlet. Importants: When using a cable box: • See Cable TV Connections.
VCR Setup Setting the 3 4 Output Channel The 3 4 Output Channel lets your change the VCR OUTPUT to standard TV broadcasting signals. Both your TV and VCR must be set to the same channel (i.e TV on channel 3 and VCR OUTPUT channel on 3 too). 1. Press the MAIN POWER button to turn the power off. 2. Press the TV/VCR button and if VCR POWER, TIMER and VCR indicators light up flashing. The VCR Output Channel is 3. VCR POWER, TIMER, VCR and REC indicators light up flashing. The VCR Output Channel is 4. 3.
VCR Setup Mode Selection You can use the SET UP selection screen to select the mode for basic features. Preparation • Turn on the TV and select the video channel. Press the VCR ON/OFF button (VCR ON indicator will light up) and then press the TV/VCR button to select “ VCR” (TAPE IN indicator will light up). 1. Press the MENU button. 2. Select “SET UP” with cursor ENTER button. MENU or button and press the MENU TIMER SET UP CHANNEL PRESET CLOCK LANGUAGE SELECT : ENTER : SET 3.
VCR Setup Channel Preset Your VCR can receive a maximum of 181 channels as shown below by presetting the channels into memory. (VHF: 2 to 13, UHF: 14 to 69, CATV: 1 to 125) Preparation • Make sure that the cable (antenna or CATV) is connected to the IN terminal on the rear of the VCR. 1. Press the MENU button. Select “CHANNEL PRESET” with or button and then press the ENTER button. MENU MENU TIMER SET UP CHANNEL PRESET CLOCK LANGUAGE SELECT : ENTER : SET 2.
VCR Setup Adding Channel Memory/Erasing Channel Memory Use this function to manually add or erase channels to/from the memory. 1. Select the channel to be added with the numbered buttons and the channel to be erased with the CH+, CH- or numbered buttons. 2. Press the MENU button. Select “CHANNEL PRESET” with cursor or button and press the ENTER button. MENU TIMER SET UP CHANNEL PRESET CLOCK LANGUAGE MENU SELECT : ENTER : SET 3. Select “CH SET” with cursor ENTER button.
VCR Setup Clock Auto Clock Setting (If you DO know a channel that carries EDS signals) Preparation • Make sure that the antenna cable is connected and connect the power cord. • Turn on your TV and select the video channel. (See Setting the 3 4 Output Channel.) • Press the VCR ON/OFF button (VCR ON indicator will light up) and then press the TV/VCR button to select “VCR’. (TAPE IN indicator will light up.) Importants: When using a cable box: • See Cable TV connections.
VCR Setup Manual Clock Setting Preparation • Turn on your TV and select the video channel. (See setting the 3 4 Output Channel.) • Press the VCR ON/OFF button (VCR ON indicator will light up) and then press the TV/VCR button to select “VCR”. (TAPE IN indicator will light up.) 1. Press the MENU button. Select “CLOCK” with the cursor or button and then press the ENTER button. MENU TIMER SET UP CHANNEL PRESET CLOCK LANGUAGE MENU SELECT : ENTER : SET 2.
VCR Setup Automatic Daylight Saving-Time (D.S.T.) Adjustment This VCR is equipped with an internal Automatic Daylight Saving-Time Adjustment function. In spring (first Sunday in April)and autumn (last Sunday in October), the time is adjusted as shown below. This function has been preset to ON at the factory. Set the D.S.T. mode in the clock setting screen. Note: • If the timer recording programme is affected by the D.S.T. time change, check your TV listing and find out when it reflects the time change.
VCR Playback Inserting a Video Cassette Gently insert the video cassette into the cassette compartment. The VCR turns on automatically and VCR ON indicator light up. If the cassette is inserted incorrectly, the loading system will not function. Do not force the cassette into the VCR. To remove the cassette, press the TAPE EJECT button during stop mode. Playback Preparation Turn on the TV and select the video channel. (See Setting the 3 ↔ 4 Output Channel.) 1. 2. 3. 4.
VCR Playback Slow Motion Playback 1. Press the SLOW button during playback. button to vary the slow motion playback speed between 1/5 and 1/30 of the normal playback 2. Press the SLOW speed. If noise bars appear on the screen, use the CH +/- buttons. If the picture experiences vertical jitter during the slow mode, set your VCR to the STILL mode and press the CH button again. +/- buttons to stabilize the picture. Then press the SLOW button to resume normal playback. 3.
VCR Playback Quick Start with Full Loading Mechanism Your VCR has a standby function (Full Loading Mechanism) to allow immediate recording and playback. After pressing the REC or PLAY button, it takes about 2 seconds until recording or playback is engaged when in the standby mode. Full Automatic Playback The Full Automatic Playback lets you enjoy playback with ease. When you insert a cassette with the erasure protection tab removed, your VCR automatically turns on the power and playback the tape.
VCR Recording IMPORTANT This Unit does NOT allow copying from DVD to VCR tape Recording a TV Programme Preparation • Turn on the TV and select the video channel. (See Setting the 3 ↔ 4 Output Channel.) • Press the VCR ON/OFF button (VCR ON indicator will light up) and then TV/VCR to select “VCR” (TAPE IN indicator will light up). • If necessary, set “SAP” on the SETUP selection screen. (See Mode Selection.) Without a Cable Box or Digital Satellite Receiver 1. 2. 3. 4.
VCR Recording Recording Speeds This VCR lets you select a recording speed (SP or EP), SP provides a better picture, although the recording time is shorter. Select the tape speed that best suits your needs. M ODE CA SSETTE T -60 T-120 T-160 Note: • This VCR can playback tapes recorded in LP (Long Play) mode. SP (Standard Play) 1 hr. 2 hrs. 2 hrs. & 40 min. EP (Extended Play) 3 hrs. 6 hrs. 8 hrs. Recording Hi-Fi Stereo Sound Your VCR records AUDIO signals on two types of audio tracks.
VCR Recording Monitor Output When Receiving a SAP Broadcast When receiving a SAP broadcast, if the SAP position is set to ON, change the audio output mode to select Monitor Output (MAIN or SAP) with the ENTER button selection screen. (See Mode Selection.) When enjoying a TV programme with MAIN sound Select L on the ENTER button selection screen. (See Audio Output Mode.) When enjoying a TV programme with SAP sound Select R or MONO on the ENTER button selection screen. (See Audio Output Mode.
VCR Recording Simple Recording Timer The Simple Recording Timer (SRT) enables you to set the recording stop time. The SRT can be set on the TV screen by using the remote control. The SRT cannot be set if the clock has not been set. Make sure the clock is set before setting the SRT. Preparation • Turn on the TV and select the video channel. (See Setting the 3 ↔ 4 Output Channel.) • Insert a cassette with the erasure protection tab opening covered.
VCR Recording Recording with the Timer Preparation • Turn on the TV and select the video channel. • Insert a cassette with the erasure protection tab opening covered. Power will turn on automatically (POWER ON indicator will light up). • Press the TV/VCR button to select “VCR” (TAPE IN indicator will light up). • Check that the clock is displaying the correct time. • If necessary, set “SAP” on the ENTER button selection screen. (See Mode Selection.
VCR Recording 7. Press the ENTER button. • To programme the additional timer settings, press the ENTER button and repeat steps 2-7. 8. Press the MENU button to finish settings. The display shown to the left appears on the screen for 5 seconds, after which the normal screen returns. 9. Press the VCR ON/OFF button to enter the timer standby mode. Be sure that the TIMER indicator lights up.
VCR Recording Confirming Timer Programmes You can see on the Timer setting screen a list of all timer programmes that are already set. Preparation • Turn on the TV and select the video channel. • Press the VCR ON/OFF button (VCR ON indicator will light up) and then press the TV/VCR button to select “VCR” (TAPE IN indicator will light up). 1. Press the MEMORY button. TIMER screen will appear. • Check the information displayed. 2.
Special Functions Auto Enhance 1. Press the DISPLAY button twice. “ AUTO ENHANCE ON (or OFF)” will appear on the TV screen for a few second. 2. Press the SET button on the unit. Each time the button is pressed, the mode switches between ON and OFF. (The AUTO ENHANCE is preset to ON at the factory.) ON: Normally leave the mode set to ON. This high picture quality function will create a clearer image during playback.
Radio Operation Tuning into a station manually 1. Press the FUNCTION button until the frequency band appears on the display. 2. Press the BAND button on the remote remote or on the front panel to select the desired band. 3. Press the TUNING STOP button button to tune in the desired station. FM Stereo • Press the FM MODE button on the remote until " appears on the display. " Weak FM stations • Press the FM MODE button on the remote until the " " word appears on the display.
Language Code List for Disc Language Code Language Name Code Language Name Code Language Name Code Language Name AA AB AF AM AR AS AY AZ BA BE BG BH BI BN BO BR CA CO CS CY DA DE DZ EL EN EO ES ET EU FA FI FJ FO FR Afar Abkhazian Afrikaans Ameharic Arabic Assamese Aymara Azerbaijani Bashkir Byerlorussian Bulgarian Bihari Bislama Bengali Bangla Tibetan Breton Catalan Corsican Czech Welsh Danish German Bhutani Greek English Esperanto Spanish Estonian Basque Persian Finnish Fiji Faroese French FY GA GB GL
Maintenance Cleaning Disc A defective or soiled disc inserted into the Unit can cause sound to drop out during playback. Handle the disc by holding its inner and outer edges. • Do NOT touch the surface of the unlabeled side of the disc. • Do NOT stick paper or tape on the surface. • Do NOT expose the disc to direct sunlight or excessive heat. • Clean the disc before playback. Wipe the disc from the center outward with a cleaning cloth. • NEVER use solvents such as benzine or alcohol to clean the disc.
Trouble Shooting Guide SYMPTOM CAUSE (AND REMEDY) • The location and orientation of the antenna are incorrect. If you use an indoor antenna, change to an outdoor antenna. • The TV antenna wire is too close to the Unit. Separate the antenna wire of the TV set from the Unit. No sound or only a very low-level sound is heard. • Check that the speakers and equipment are connected securely. • Make sure that you've selected the correct equipment on the system.
Trouble Shooting Guide SYMPTOM CAUSE (AND REMEDY) VCR No power. • Make sure the power cord is plugged in. VCR does not receive CATV channels. • Use the CHANNEL PRESET screen to change from AIR mode to CATV. (See Setting the Channels.) VCR does not operate. • Turn on the power. • Press the TAPE EJECT button several times. • Safety device in VCR is functioning. Unplug VCR and plug it in again after a few minutes. VCR does not record. • Cassette erasure protection tab is removed.
- 64 - 811-262991-032 Printed in China