P V R ersonal ideo ecorder User Manual Hard Disk Recorder and DVD Player Please read the manual in detail before using the unit. WARNING: AVOID THE EXPOSING THE UNIT TO WATER OR MOISTURE TO PREVENT THE POSSIBILITY OF FIRE OR ELECTRICAL SHOCK.
WARNINGS The lightning flash with arrowhead, within an equilateral triangle, is intended toalert the user to the presence of uninsulate "dangerous voltage" within the product's enclosure that may be of sufficient magnitude to constitute risk of electric shock to persons.
SAFETY INSTRUCTIONS READ INSTRUCTIONS-All safety and operating instructions should be read before the product is operated. RETAIN INSTRUCTIONS-The safety and operating instructions should be retained for future reference. POWER SOURCE-The product should be operated only from the type of power source indicated on therear panel. If you are not sure of the type of power supply to your home, consult your dealer or local power company.
SAFETY INSTRUCTIONS DAMAGE REQUIRING SERVICE Immediately unplug the productfrom thewall outlet or other power source and refer servicing to qualified service personnel under the following conditions: a)When the power cord or plug isdamaged. b)If liquid has been spilled, or objectshave fallen into the product. c)If the product has been exposed to rain or water. d)If the product does not operate normally by following the operating instruction; or exhibits a distinctchange in performance.
INDEX 1 2 3 4 5 6 7 8 9 10 11 12 13 14 15 16 17 18 19 20 21 22 23 Warnings Safety instructions PVR introduction Remote control Front panel and display System connections Main menu and front panel buttons DVD from the remote control DVD Setup menu operation Playing MP3 and JPEG images Playing MP3 and JPEG simultaneously Receiving TV channels Setting the time and display Setting timer recordings Editing timer recordings Recording a program Rename, move/copy, erase document and property display Format, repai
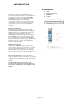
INTRODUCTION Thank you for choosing our PVR which could become the entertainment center of your family. This product has two channel AV input, and SVIDEO, SCART input, TV receiver, DOLBY PROLOGIC, DOLBY PROLOGIC 2 function. For the sophisticated operation of this product such as play, record, time recorder, usage of mp3 and jpeg. An optional usb port, use it you can connect PVR to a computer. ACCESSORIES: 1. Unit. 2. Remote control. 3. Batteries. 4. Cable.
REMOTE CONTROL: How to put the batteries in the remote control Removing the cover opens the battery compartment. Insert the batteries –type AAA- into the remote control according to the indicated polarity. - If the effectiveness of the remote control diminishes considerably, it is probable that the batteries are worn out. Replace the old batteries for some new ones. - If you don’t use the remote control for a long time, we advise you to removes the batteries. 5.
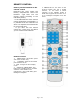
REMOTE CONTROL: 6. NUMBER KEYS: choose specific chapter, subtitle, track directly(note : not all discs support this function) you can choose the TV channel in the state of tv. 7. RESUME: continue from where it stopped last time. 8. STEP: play one frame by one frame. 23. A-B: repeat a certain period. 24. PROGRAM: program the order of playing. 9. SLOW: play in slow step. 25. REPEAT: switch repeat mode 10. SETUP: enter or exit the system menu. 26. PBC: play back control(on or off ). 11.
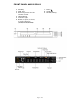
FRONT PANEL AND DISPLAY 7. PLAY /S 8. STOP /T 9. PAUSE (Setup). 1. Standby. 2. DVD Tray. 3. Receiving sensor for the remote control. 4. VFD DISPLAY. 5. Indicator light. 6. Button to open, to close, to verify selection (OPEN/CLOSE/ENTER).
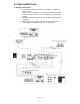
SYSTEM CONNECTIONS 1. Output connections: a. Connection: CVBS, Euroconector (SCART), S-videotape, Y Cb/Pb Cr/Pr. NOTE: it is not possible to connect the SCART and CVBS simultaneously, because this would affect to the display quality. b. Connection stereo: connection for speakers right front and left front. c. Digital connection (optics and coax): for connecting to an amplifier or decoder with coax or optic port.
SYSTEM CONNECTIONS 2. CONNECTIONS FOR 5.1. 3.
SYSTEM CONNECTIONS 4. INPUT CONNECTIONS: Inputs: input AV1, input AV2 (SCART), input S-videotape, input RF. NOTE: if using the S-video input the audio input AV1, AV2 and SCART cannot be connected at the same time.
MAIN MENU AND FRONT PANEL BUTTONS MAIN MENU On plugging the unit in, it will go into standby state automatically. Press standby to open self-check and then system menu will appear (if hard disc or CDROM are not connected correctly, it will prolong self-check and lead to malfunction. 1. WHEN DVD PLAYING Using. ST To move cursor, X or ENTER button to enter submenu, press ENTER to confirm or press W to return to the previous menu Press OPEN/CLOSE to open or close disc tray.
DVD INSTRUCTION REMOTE CONTROL OPERATION Press this button to turn the machine on or to standby. When the machine is playing a disc. Press the PAUSE to pause the playing. Press this button again, the machine resumes playing disc. Press this button to open the disc door and then you can put in or take out the disc. OSD: OPEN Press STOP to stop playing disc. OSD is STOP. When svcd, cvd, vcd discs are played, press STOP to return to the disc menu(PBC should be on).
DVD FROM THE REMOTE CONTROL When a DVD is playing, press the OSD button twice to show the time remaining on the disk. When a DVD is playing, press the button OSD three times to show the playing time of the chapters. When a DVD is playing, press the button OSD four times to show the remaining time of the chapters. When SVCD/VCD/CVD/CD discs are played, press OSD twice to show the rest playing time of the single song.
DVD FROM THE REMOTE CONTROL When an Mp3 disc is played, the playing time of a single song is shown automatically. ANGLE: When multi-angle discs are played, the icon for multi-angle shows. Press ANGLE to choose your wanted angle. The first number of icon shows the chosen angle, and the second number shows the total angles available. When an MP3 disc is played, press OSD to show the rest time of the single song.
DVD FROM THE REMOTE CONTROL PROGRAM (PROGRAMMING): Press MENU to return to the DVD chapter menu, if PBC is off. When PBC is off, press MENU to enter directly into the nine pictures. When PBC is off and DVD discs are played, press this button to enter the nine-picture screen. There are several nine-picture screens for you to choose. Use NUMBER KEYS, PREV, NEXT to choose songs or enter last or next menu. Procedures for programming when DVD, SVCD, CVD, VCD discs are played: 1. Make PBC off. 2.
DVD FROM THE REMOTE CONTROL Press MENU to enter the menu after STOP is pressed if it is a CD disc. Choice 1: INTRO; Each song will be played for 9s. When your wanted song is played, press number keys to play the song wholly. Choice 4: Exit from the menu. Press STOP, then press MENU to go back to INTRO to rechoose songs. SELECTION OF A SONG: choose chapter and title after pressing GOTO. The first number of TITLE 03/04 shows the title which is being played.
DVD FROM THE REMOTE CONTROL Cancel the function by pressing the button A-B three times. Press the PBC button again to make sure that the function is activated and press the button MENU to return to the menu. TITLE, CHAPTER, DISC AND REPEAT: Press the button REPEAT to repeat the chapter in a disk DVD. A-B: Choose the starting point of A by pressing the button A-B once. Press the REPEAT button twice to repeat the DVD. Choose the end point of B by pressing the button TO-B twice.
DVD FROM THE REMOTE CONTROL Press the button once REPEAT to repeat the SVCD, CVD, Videotape CD, CD, and MP3. VOL- + Press the button REPEAT twice to repeat the SVCD, CVD, VCD, CD and MP3. Press this button to adjust the volume; minimum 0 to a maximum 16. MUTE Press the button REPEAT three times to cancel. Press the button once to mute . Press the MUTE button again to renew the sound. ZOOM Press the button ZOOM to enlarge the image 1.5x, 2x, 3x and normal size. Use the direction keys.
DVD FROM THE REMOTE CONTROL L/R: ANGLE/LIVE TV: Press L/R button repeatedly and the audio mode will move AUDIO 1, AUDI02, AUDIO 1 VOCAL, AUD102 VOCAL (for DVD),within LEFTVOCAL, RIGHT VOCAL,MONO LEFT, MONO RIGHT, STEREO(for VCD). If the disc has two sound language, you can use this button to select one. Press the button to choose live video mode when the unit is in navigation mode. SUBTITLE / SMART NAV FB/FF: Press this button to return to the navigation mode from the live video mode.
REMOTE CONTROL INSTRUCTIONS SLOW MOTION DIRECTIONAL KEYS: CURSOR CONTROL: S T to move the cursor up or down X to move the cursor right W to move the cursor left ENTER to enter Slow the playing speed, in the case gives of a DVD by 2x, 4x and 8x and in the case of SVCD, CVD and VCD by 1x, 2x and 3x. RESUME: the selected function Resumes the playing of SVCD, CVD, VCD and CD from the memory stop mode. PLAYING FRAME BY FRAME: Playing a disk frame by frame.
DVD SETUP MENU - SET MENU MAIN PAGE -ANGLE MARK In the main page you can select general setup, speaker setup, audio setup, preferences & PVR control The angle marker will be shown automatically on screen (in the top right corner) if the disk has multiple angles of view for certain scenes. Choose OFF if you don't want to see the marker and ON if you want to have it activated. -GENERAL SETUP DISPLAYING FORMAT SETUP -OSD LANGUAGE Set 4:3 pan scan, 4:3 letterbox, 16:9 panoramic.
DVD SETUP MENU REAR SPEAKER -SCREEN SAVER To activate (ON) or to disable (OFF) the rear speaker. If the unit is without a picture for more than one minute, screensaver will operate to protect the screen. Choose ON to activate this function (default is OFF - disabled). SUBWOOFER -SPEAKER SETUP 5.1 CHANNELS & STEREO To activate (ON) or to disable (OFF) the subwoofer. -CENTER DELAY LT/RT: mixes the left & right channels and transfers it then to the left & right channels. STEREO: output stereo.
DVD SETUP MENU -TEST TONE Tests if all the speakers are connected correctly. -AUDIO OUT -DUAL MONO STEREO: standard output. L-mono: transfers the left channel to the left and right channels. R-mono transfers the right channel to the left and right channels Mix-mono: transfers both the left & right channels to the left & right outputs. -DYNAMIC You can choose between: Analog, RAW, digital and digital PCM. -OUTPUT MODE This option allows you to adjust the dynamic range.
DVD SETUP MENU PRO LOGIC II MODE PANORAMA This option allows selection of: Logic, Virtual, Music, Movie and Matrix. PRO LOGIC II CONTROL Activate (ON) or disable (OFF) the way CENTRE WIDTH This option allows selection and control. This option allows selection of central width from 0 at 4. DIMENSION SUBWOOFER FILTER Activate (ON) or disable (OFF). Adjust from 3 to +3.
DVD SETUP MENU SURROUND COHERENCE VIDEO OUTPUT MODE Activate (ON) or disable (OFF) this option. Select the output: S-video or Y, Cb, CR. LPCM OUTPUT AUDIO SETUP Choose 48k or 96k. Select the language for the sound channel. You can also choose the language in the option DIALOGUE LANGUAGE SETUP. Note: the DVD must support this function. PREFERENCES TV TYPE SETUP SUBTITLE SETUP Select PAL, NTSC or MULTI.
DVD SETUP MENU DISC MENU SMART NAVIGATION Choose the language for the menu. Note: the disk must support this function. LOCALE When playing MP3 files, the user can choose songs through the menu using the option WITH MENU is activated; If NO MENU is selected this selection is not possible DEFAULTS Each country has different standards of paternal control Select the option for your country. This option defaults.
MP3 AND JPEG Playing of MP3 and JPEG when the NO MENU option is selected. 1. After carrying out the selection, the folder shows all the files it contains. Press PLAY when the player has read the disc. When playing, user can only press previous, Next or 0-9, +10 numeric button to choose songs. Press Stop, previous appears. Cannot use STWX to choose songs, and use only 0-9, +10 to play. (e.g. song or picture No 19, press +10 first, then 9, and player will play the 19th song or picture.
MP3 AND JPEG MODE 10: wipe from edge to centre DISC: play songs or pictures of all folders MODE 11: horizontal blinds DISC REP: repeat playing all songs or pictures of all folders. MODE 12: random DISC SCAN: every song will play 10 for seconds (pictures can not play when in this mode.). ZOOM Press ZOOM when playing JPEG and press FF, FB to zoom out or zoom in.
PLAYING MP3 AND JPEG SIMULTANEOUSLY When the images and the songs are in the same folder Operation I: playing begins from the first song and continues until the end of the images. If the disk has JPEG and MPEG files, press ST to choose JPEG. Press STEP to open the music background (the OSD will show (MUSIC SLIDE SHOW) and press ENTER or PLAY to begin the reproduction. 3. Press the button A-B to select the MP3 file. 4. Use the keys UP, DOWN and ENTER to reach the folder that contains the picture files. 5.
PLAYING MP3 AND JPEG SIMULTANEOUSLY When music & pictures are in the same folders. When playing pictures and music, if the pictures can not play over the music, press PAUSE once to pause the pictures but the music will continue playing. Press PAUSE a second time and music & pictures will stop playing Press PAUSE a third or press PLAY to continue playing songs and pictures. When music & pictures in the different folders.
TUNING TV CHANNELS SCAN CHANNELS CHOOSE TV CHANNEL 1. Select the option PVR CONTROL inside the Menu for Configuration to carry out the tuning . Remember to configure the correct input format before carrying out this operation. 2. Select the option TUNER CONTROL. SEARCHING FOR CHANNELs If the signal or the color is poor, the user can modify the configuration to carry out another search or skip a channel. Steps: 1. When in TUNER CONTROL, press CHANNEL SETUP to enter. 2.
TIME AND DISPLAY SETTING DISPLAY AND WEEK SETTING TIME SETTING: Steps: 1. Select PVR Control in the SETUP menu. Only when the Menu is selected will the time and day of the week be displayed. 2. Choose CLOCK SETUP 3.Enter the year, month, day, hour and minute through the numeric keys. Note: The screen will show an error if the data is not correct. 4.Confirm the information to leave this screen. Choose the option CANCEL if you want to exit without keeping the changes.
TIMER RECORDING 4. TO PROGRAM TIME RECORDING This function sets the recorder to record unattended at some preset time. Steps 1. Press the button SETUP MENU and select MAIN PAGE, then select PVR Control. And press ENTER. Press CONFIRM to confirm the settings. If you want to cancel the entered program times etc press CANCEL. 5.The unit can record several programs, but it requires a minimum gives two minutes between the end of one timer recording and the beginning of the next.
TO EDIT A TIMER RECORDING 3. The unit allows you to see the recording and a DVD at the same time. NOTE: a red display will appear in the bottom left corner giving the state of the recording. 4. After having carried out the changes to the time press, CONFIRM to leave.
TO RECORD A PROGRAM Before time recording a program 3. Press STOP to stop the recording and return to the Smart NAVI. Before recording, go to PVR CONTROL, select the quality (XP, SP, LP, EP), the time shift mode and the format of the source(AUTO, SECAM). TO PLAY A RECORDED PROGRAM When playing a DVD, VCD, CD, SVCD, CVCD press REC to play a recorded program. When playing a CD only the format and title will be shown. Live recording 1.
TO RECORD A PROGRAM Recording in the background SETTING THE DEFAULTSOURCE Steps: 1. Select LIVE VIDEO in the main menu and enter CONFIRM. Through the option VIDEO IN select the source. 2. Select SMART NAVI to enter smart navi mode and press REC from the remote control to begin the recording in the background.
TO RECORD A PROGRAM B. Recording several MP3s or JPEGs: 1. Press SELECT in the OSD menu during playback of a DVD and select the item. The unit will automatically select one mode. If you want to select all the files, press SELECT twice. If you want to leave the select mode press SELECT three times. 2. After carrying out the confirmation, press S T to select the song/image. If the display is red it means that the song/image has already been selected.
TO RENAME, MOVE/COPY, ERASE A FILE AND TO VIEW ITS PROPERTIES Through the menu SMART NAVI you can rename, move, copy, erase files or see its properties. To rename A. From the SMART NAVI menu select the option RENAME (press the button OSD on the remote control) to change the name of a file. Select the CANCEL to leave. B. From this menu select RENAME, and use W X T S to select a letter or symbol and press ENTER to confirm the selection.
TO RENAME, MOVE, COPY AND ERASE C. The recording begins. Press STOP to stop the copying. To display properties NOTE: If there are no files to copy, move or delete, the option is not valid. To move files Move the cursor to the file or folders. Press OSD and PROPERTIES. You will be able to see the name, the file size, the playing time, the creation date. Press STOP to leave this option. Carry out the same steps as to copy files. To erase files Use T S to select the files that you want to erase.
TO FORMAT, REPAIR AND DEFRAGMENT THE HARD DISK To format to the hard disk To play a program 1. Choose SMART NAVI from the TOP MENU and use S T to select the program. Press ENTER or PLAY to play the program. Playing time will be shown. 1. From the configuration menu choose PVR Control. 2. Select FORMAT DISK from DISK TOOLS. Press W to return or ENTER to format the disk. EXPLANATION: The contents of the disk will be erased after the formatting. To repair a disk Press ENTER from the option REPAIR DISK.
TIMESHIFTING This function allows you to record programs to the hard disk. It can also play, advance, go back and pause a recording. Press LIVE TV, to see programs in real time from external sources. Go to the option PVR CONTROL in the configuration menu to select the display quality that you want for the recording. Four different levels exist: XP, SP, LP and EP. USB (if fitted). 1. Connect a USB cable to the unit. The unit will auto restart and show USB INSERT. 2.
TO CHANGE THE HARD DISK ATTENTION: Before you change the hard disk, you must switch off and unplug the PVR to avoid any possible damage to the hard disk or the circuit. After partitioning formatting the hard disk in a PC insert the new hard disk into the caddy. NOTE: You should prepare a new hard disk using FDISK to partition and format it in your PC before installing it in the PVR. The format must be FAT32 and the hard disk set to be in SLAVE mode. 1. Connect the two cables to the hard disk.
SPECIFICATIONS General specifications: Voltage: AC90V-260 50/60 Hz Consumption-operate mode - 40 W Consumption-standby mode: less than 2W Size: 430x440x60 mm Weigh: 5 Kg Temperature: 5-40º C Humidity: 15-75% DVD Supports DVD, SVCD, CVD, VCD 1.0/1.1/2.0, YOU CD-GIVES, MP3, KODAK PICTURE CD, CDR/RW. Output-video: 1.0Vp-p 75 Ohms. Output-audio: 1.0-2.0V 10 K ohms. S/N: >90 DB Frequency response: 20 Hz– 20Khz +-1dB.
BASIC FAULT FNDING No sound, No Video: - Check all the cables give audio are connected correctly. It is not possible to use an external source: - Check the input connections. -Check the external source. Long initiation time: (more than 20 seconds): -Check that the hard disk is correctly connected. The new hard disk you cannot be used: -The disk must be partitioned and formatted before use. External source errors: - Check the input cables are correctly connected. - The source signal is very weak.