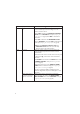
TABLE OF CONTENTS Changing the settings of a channel . . . . . . . . . . . . . . . . . . 16 Tuning channels automatically. 19 1. Important safety instructions ................................2 2. Safety information and useful tips . . . . . . . . . . . . . . . . . . . . . . . . . . . 4 3. Before calling service ......5 4. Basic TV connections ......8 Selecting cable or antenna mode . . . . . . . . . . . . . . . . . . . . . . . . 19 Selecting a virtual or physical channel . . . . . . . . . . . . .
1. Important safety instructions Read Before Operating Equipment 1. For the quickest and most trouble free installation, please consult the quick start guide that came packed in the television or download it from www.philips.com/ hospitality. 2. Keep these instructions. 3. Heed all warnings. 4. Follow all instructions. 5. Do not use this TV near water. 6. Clean only with a dry, soft, non-abrasive cloth. 7. Do not block any of the ventilation openings. 8.
Know these safety symbols CA U T I ON RISK OF ELECTRIC SHOCK DO NOT OPEN This “bolt of lightning” indicates material not insulated within your unit which may cause an electrical shock. For the safety of everyone in your property, please do not remove product covering. The “exclamation point” calls attention to features for which you should read the enclosed literature closely to prevent operating and maintenance problems.
2. Safety information and useful tips 1. Two people are required to lift and carry a TV that weighs more than 55 lb (25 kg). Improper handling of the TV can cause serious injury. 2. If you place the TV set on a solid surface. Ensure the surface is level and that it can withstand the weight of the TV. 3. Installing the TV on the wall requires special skill that should only be performed by a qualified personnel. You should not attempt to do the work yourself.
3. Before calling service Check this list of symptoms and suggested steps before you request service. D Note: Familiarize yourself with the commercial features described in the TV installation setup. The effects of several of these features, if not thoroughly understood, might appear as faulty operation.
Symptoms Power TV cannot be switched on Suggested steps The POWER . button of the remote control is used to set the TV to stand-by mode. Use the Digit 0-9 or CH + / – buttons to switch on the TV. Check if YES is selected in the REMOTE CONTROL LOCK feature in SECURITY menu (see Specifying the security options on page 24). Select NO to deactivate the lock function. Check if ALL is selected in the KEYBOARD LOCK feature in SECURITY menu.
Symptoms Remote Control TV does not respond to Guest Remote Control Suggested steps Change the batteries. Aim the remote control directly at remote control sensor lens on TV and press any button on the remote control. Check if YES is selected in the REMOTE CONTROL LOCK feature in SECURITY menu (see Specifying the security options on page 24). Select NO to deactivate lock function. Deselect HM - LINK in the COMMUNICATION feature if HM - LINK is selected (see Accessing the setup menu on page 14).
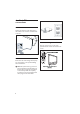
4. Basic TV connections 4.1 Antenna connection Connect the antenna or RF cable signal to the 75 Ω RF ‘:’ connector socket located on the TV. 4.3 Switching on the TV Press . on the TV or on one of the optional remote controls to switch the TV set on. 4.2 Mains connection Ensure that the mains voltage and frequency are correct. Refer to the product labelling and documentation. D Note: The power button . on the TV does not disconnect the television from the AC mains.
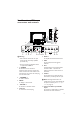
5. Overview of TV connectors and controls 18 19 USB CHANNEL 20 21 5 AV 1 DATA 1 S-VIDEO AUDIO IN SPDIF RS 232 PC AUDIO IN HDMI 1 HDMI 2 SERVICE 8 CVI AV 6 7 8 9 10 11 12 13 B Warning: • Risk of electric shock. The rear jack panel must be removed by qualified personnel only. • Do not connect any telephone cables or equipment to Data 1. 1. . POWER To switch the TV on and off.
11. SPDIF To connect to a HiFi / Home Theater system. 12. RS 232 To use serial communications to an external device. D Note: Serial Xpress must be selected as the communication source (see Selecting the communication source on page 15). 13. VGA In For input PC/Lap-top VGA. 14. PC Audio In To play audio from a PC. Only compatible if also connected to an HDMI or VGA input. 15. HDMI 1/2 To connect to peripheral equipment, including high-definition equipment. 16. 8 Ω [ To connect to a bathroom speaker.
6. Optional remote controls The following remote controls are applicable to TVs from Philips Commercial Solutions. These remote controls can be used for setup and configuration. 6.1 6.2 RC2573GR RC2573GR is an optional remote control. It is used for Philips Commercial Solutions features and SmartCard settings. It can be purchased separately. RC2888/01 POWER RECALL Guest Mode Remote Control (optional) TEXT SMART SLEEP CC Slide this button up to enter into Guest mode.
7. Description of guest remote control 1 2 3 4 5 10 11 12 13 14 6 7 15 16 8 6. Navigation cursors To navigate through the menus/ submenus. 7. Volume + / – To adjust the TV volume. 8. 0 to 9 Digit keys To select a TV channel. For a two digit number, enter the second digit before the dash disappears. 9. Alternate Channel To toggle between the alternate channels 10. Channel Guide To activate the channel guide function. 11. Standby To switch the TV on from standby oir back to standby.. 12.
8.
9. Accessing the setup menu The following remote control commands apply to Philips Commercial Solutions TV products. These can be used for setup and configuration purposes. Accessing TV Setup Menu using the Remote Control (RC2573GR) 1. Slide the button to the Setup location. POWER RECALL TEXT SMART SLEEP CC GUEST DCM SETUP 1 2 3 4 5 6 7 8 9 GUIDE 0 RESET CH M A/CH _ + + VOL + _ A _ B C E F CLOCK A/V CH D G 2. Press on the remote control to access the Setup Menu.
10. Installation 10.2 Selecting the communication source 10.1 Selecting the language The following options are available in the COMMUNICATION menu • SP - SPI You can select ENGLISH, ESPANOL or FRANCAIS as your preferred language. • • SP - I2C Press Æ repeatedly to select your preferred language.
• • • To use the specified color code to correspond to the remote control select MULTI RC (see Appendix A on page 38). Select SMART RC to access the SMOOVIETM functionality on this TV set. 10.3 Changing the settings of a channel This feature allows you to change the settings for a particular channel. Press Æ to enter the CHANNEL INSTALL menu. Select STORE and store all your selections.
with the options of RF CHANNEL NUMBER and MPEG PROGRAM NUMBER. Select an input source • TUNER, AV, SVIDEO, CVI, VGA, HDMI1, HDMI2, CARD-CVBS, CARD-YC, CARD CVI, SIDE AV or SIDE SVIDEO CHANNELSETUP INSTALL LANGUAGE COMMUNICATION CHANNEL INSTALL AUTO INSTALL TV CABLE TUNING USE CHANNEL TABLE CURRENT RING DIGITAL SETUP CONFIGURATION D Note: CARD-YC, CARD CVI, CARD-CVBS, SIDE AV and SIDE SVIDEO are available on certain models only.
Searching the Digital Minor Channel / MPEG Program Number • Press Î ï to key in the first character. • For DIGITAL MINOR CH / MPEG PROGRAM NUMBER, use 0 - 9 to key in the channel number (0 to 999). CHANNELINSTALL INSTALL CHANNEL CHANNEL TV 2 INPUT TUNER CHANNEL LOGO > DIGITAL YES DIGITAL CH SCROLL > DIGITAL MAJOR CH 1 DIGITAL MINOR CH 0 RINGS (1X ) ( 2 ) (3 ) (4 ) LABEL (SPO _ ) MUTE NONE • Press Í from Channel 0 to select NO. • If NO is selected, go back to DIGITAL MAJOR CH.
10.4 Tuning channels automatically 10.5 Selecting cable or antenna mode D Note: This option is only available when TUNER is selected at the INPUT item of the CHANNEL INSTALL menu. D Note: This option is only available when TUNER is selected as the INPUT item in the CHANNEL INSTALL menu. 1. Press Æ to enter START mode. Select YES to use Cable mode and NO to use Antenna mode.
10.6 Selecting a virtual or physical channel D Note: This option is only available when TUNER is selected at the INPUT item of the CHANNEL INSTALL menu. The USE CHANNEL TABLE option relates to the use of Virtual channels versus Physical channels. • Select NO to use a physical channel number. Most Pay-Per-View systems mandate that the TV uses physical channels. 10.7 Enabling your current ring A ring is a group of favorite channels. Four groups of RING are available.
Selecting the Digital Audio language • DIGITAL SETUP CHANNEL INSTALL CHANNEL SETUP AUDIO DIGITAL CC SETUP EMERGENCY ALERT > > > > Digital Audio allows you to select your preferred digital audio language (English, Spanish or French). DIGITAL SETUP CHANNEL INSTALL CHANNEL SETUP AUDIO DIGITAL CC SETUP EMERGENCY ALERT > > > > Setting up the VCHIP / DIGITAL RATING and FACTORY CH RESET • Press Æ to enter the CHANNEL SETUP mode.
Selecting the Digital Closed Caption options DIGITAL SETUP CHANNEL INSTALL CHANNEL SETUP AUDIO DIGITAL CC SETUP EMERGENCY ALERT DIGITAL CLOSED CAPTION SETUP allows you to select the default Closed Captioning option and also configure the digital text / background properties of digital CC. > > > > DIGITAL SETUP CHANNEL INSTALL CHANNEL SETUP AUDIO DIGITAL CC SETUP EMERGENCY ALERT > > > > • • Press the Î ï buttons to select MEDIUM or LOW. • Press Í Æ to select ON or OFF.
10.
ZOOM 16:9, SUBTITLE ZOOM, WIDESCREEN, SUPERWIDE or FULLSCREEN). • POWER ON: Select the status either LAST STATUS, ON, STANDBY or FORCED ON on the TV when switched on. If LAST STATUS is selected, the last power status will be activated when the TV is switched on. • BASS • BALANCE • AVL (Auto Volume Leveler) • Press ï to select PICTURE / SOUND.
is in STANDARD mode, it may be vulnerable to unauthorized operations. • KEYBOARD LOCK • REMOTE CONTROL LOCK • DECRYPTION CONTROL • VTRACK • Press ï and select SECURITY. CONFIGURATION CHANNEL INSTALL SWITCH ON / OSD PICTURE / SOUND SECURITY CONTROL VIDEO ADJUSTMENTS FEATURES CC / V-CHIP AMBILIGHT • • • Select YES to lock the TV keyboard buttons except for the POWER button. • Select ALL to lock all the TV keyboard buttons including the POWER button.
• Press ï to select DECRYPTION CONTROL SECURITY CHANNEL INSTALL SECURITY KEYBOARD LOCK REMOTE CONTROL LOCK DECRYPTION CONTROL VTRACK • DECRYPTION CONTROL CHANNEL INSTALL MODEL 32HF5860D/27 SERIAL SV1A07071000012 CURRENT MODE PPV NEW MODE STANDALONE PASSWORD --------CONVERT > STANDARD ALL YES > > • • Press Æ to enter the DECRYPTION CONTROL menu. • Key in the password (9 digits). For the password, contact the Philips Commercial Solutions Customer Care Center at +1 866 497-4225 for further assistance.
Using V-Track to watermark VTRACK allows you to activate the watermarking functionality of the TV. This prevents the copying of content from the TV. • VTRACK CHANNEL INSTALL VTRACK TIME SETTING DOWNLOAD CHANNEL YES 12:00 TV2 Press Æ to enter the VTRACK menu.
CONTROL CHANNEL INSTALL ESP DIGIT TIMEOUT 3 DIGIT ENTRY SOURCE MENU ITEM PIC FMT MENU ITEM CHANNEL GUIDE MIN VOLUME MAX VOLUME • CONTROL CHANNEL INSTALL ESP DIGIT TIMEOUT 3 DIGIT ENTRY SOURCE MENU ITEM PIC FMT MENU ITEM CHANNEL GUIDE MIN VOLUME MAX VOLUME OFF 3.0 NO NO NO NO 10 35 The ESP (Energy Saving Programmability) option allows you to select a specified period of time (from 1 HR / 2 HR ......... / 99 HR) to power down your TV automatically.
• PIC FMT MENU ITEM allows you to remove Picture Format from the options menu the guest can see. The guest will not have access to change the picture formats. • If YES is selected, Picture Format will appear in the options menu. If you select NO, Picture Format will not appear. • • CONTROL CHANNEL INSTALL ESP DIGIT TIMEOUT 3 DIGIT ENTRY SOURCE MENU ITEM 2 3.
Select and configure the settings and options for: FEATURES CHANNEL INSTALL • SMARTPOWER SMARTPOWER SMART SOUND KEY DEFAULT HDMI 1 AUDIO DEFAULT HDMI 2 AUDIO LOW POWER STANDBY LOUD SPEAKER MUTE USB BREAK-IN SW DOWNLOAD • SMART SOUND KEY • DEFAULT HDMI 1 AUDIO • DEFAULT HDMI 2 AUDIO LOW SMART SOUND AV AUDIO AV AUDIO YES NO NO > • LOW POWER STANDBY • LOUD SPEAKER MUTE • USB BREAK-IN • • SW DOWNLOAD CONFIGURATION CHANNEL INSTALL SWITCH ON / OSD PICTURE / SOUND SECURITY CONTROL VIDEO ADJUSTMENTS FEATURE
DVI Video can convert easily to HDMI with a simple adaptor, but the audio signal is not present and must then be connected to one of the other inputs on the TV. This feature allows you to match the DVI video to the Audio signal you have connected. The ports are distinguished from each other by 1 and 2.
• IBOARD FIRMWARE (only download) SW DOWNLOAD SOURCE DIRECTION SW TYPE START USB DOWNLOAD ALL > • If ALL is selected, all the TV software and settings available on the USB device are downloaded. SW DOWNLOAD SOURCE DIRECTION SW TYPE START USB DOWNLOAD ALL > • USB Source • Select USB to upload or download from a USB device. • In the DIRECTION option, select DOWNLOAD to download the software from the USB device. Select UPLOAD to upload the cloning information to the USB device.
• USB device. If SSB FIRMWARE is selected, the digital module software, including MPEG 2 and MPEG 4, is updated from the USB device. SW DOWNLOAD SOURCE DIRECTION SW TYPE START SW DOWNLOAD SOURCE DIRECTION SW TYPE START USB DOWNLOAD SSB FIRMWARE > • • If STANDBY FIRMWARE is selected, the startup data is updated from the USB device. SW DOWNLOAD USB DOWNLOAD STANDBY FIRMWARE > • • If IBOARD NVM is selected, the TV settings are updated from the USB device.
SW DOWNLOAD SOURCE DIRECTION CABLE TUNING RF CHANNEL NUMBER SW TYPE START Configuring the CC (Closed Caption) / V-CHIP options and settings RF DOWNLOAD YES 2 ALL > The CC / V-CHIP menu allows you to select and configure the settings and options for: • SAVE CC • CC • SAVED V-CHIP • V-CHIP MENU ITEM • In the CABLE TUNING option,. If YES is selected, Channels 1 to 135 are available for selection at the RF CHANNEL NUMBER option. If NO is selected, only Channels 2 to 69 are available for selection.
the V-CHIP settings. OFF and ON MUTE. CC / V -INSTALL CHIP CHANNEL SAVE CC CC DIGITAL CC MODE ANALOG CC MODE SAVED V - CHIP V - CHIP MENU ITEM V - CHIP SETUP CC / V - CHIP YES ON CS1 CC1 NO NO > D Note: CC MODE only appears when CC is ON • The DIGITAL CC MODE option allows you to set your digital CC options from CS1 to CS6. In the ANALOG CC MODE option, it allows you to set your analog CC options from CC 1 to CC 4 and TXT 1 to TXT 4.
10.10 Change Ambilight settings AMBILIGHT D Note: This feature is only available for certain models. AMBILIGHT BRIGHTNESS MODE SEPARATION COLOR BOOST BALANCE This section describes how to adjust your Ambilight settings. ON 50 MODERATE MED MED 0 Configure Ambilight The AMBILIGHT menu allows you to select and configure the settings and options for: • AMBILIGHT • • BRIGHTNESS The BRIGHTNESS option allows you to change the brightness of the ambilight. Press Í Æ to make these adjustments.
CUSTOM. LOW, MED and HIGH. AMBILIGHT AMBILIGHT AMBILIGHT BRIGHTNESS MODE COLOR SEPARATION COLOR BOOST BALANCE • AMBILIGHT BRIGHTNESS MODE COLOR CUSTOM COLOR ON 50 COLOR COOL WHITE MED MED 0 If CUSTOM is selected, a new menu item, CUSTOM COLOR, appears. Press Æ to enter the sub menu. ON 50 COLOR CUSTOM > MED MED 0 SEPARATION COLOR BOOST BALANCE • The COLOR BOOST option allows to configure the amount of color boosting to be present. Choose from LOW, MED and HIGH.
11. Appendix A 5. Press ï to select REMOTE CONTROL. Support for multiple remote controls COMMUNICATION COMMUNICATION STORE REMOTE CONTROL MULTI RC > YELLOW Programming the Multi Remote Controls function Multi RC function supports up to four TV sets operating in one room without any interference from each other remote controls. Each Guest Remote Control must be programmed individually to one of the four color (Blue, Yellow, Green and Red) buttons on the remote control. 1.
12. Definitions, acronyms and abbreviations A/V Audio / video. Bit Rate Sometimes written “bitrate”, the frequency at which bits are passing a given (physical or metaphorical) “point”, quantified in terms of bits per second (bit/s). CVI Component video input. Sometimes used interchangeably with “YPbPr”. CVBS Composite Video Broadcast Standard. Video signal containing combined color, luminance, and synchronization signals. Also often referred to as “AUX” video.
On A state of operation in which the unit (television) is connected to an AC power source, in active use, and capable of responding to queries or commands from a control device (IR remote control) and/or DCM. OSD On-Screen Display. The display of alphanumeric text that appears over the video image. Typically generated by a character generator usually integrated into the television chassis control processor. PCS Philips Commercial Solutions.
STB Set-top box. See SBB. Stand by Generally referred to as “off”. A state of operation, characterized by relatively low power consumption, in which the unit (television) is connected to an AC power source, but not in active use, and capable of responding to queries or commands from a control device and/or DCM. System 0 First data word of a Philips RC-5 / RC-6 remote control code for standard television commands. Synonymous with Philips Commercial Solutions ”guest” mode.
13. USA limited warranty Thank you for purchasing this PHILIPS branded Commercial Television. All Philips branded commercial televisions are designed and manufactured to high standards and deliver high-quality performance. Within the first year of purchase, this two-year Limited Warranty may entitle you to receive an “Advance Exchange*” model on-site within 72 hours of qualification.
WHAT WE WILL DO TO CORRECT PROBLEMS? *For the first year, the defective Product will be exchanged with a new Product (or one that has been renewed to original specifications) and delivered within seventy-two hours of qualification. During the second year, the defective product will be exchanged with one that has been renewed to original specifications and delivered via Ground Transportation.
HOW TO GET WARRANTY SERVICE IN U.S.A., PUERTO RICO OR U.S. VIRGIN ISLANDS? OR WHERE CAN I GET MORE INFORMATION? Before requesting service, please check your owner’s manual as adjustments of the controls discussed there may save you a service call. Also, please prepare the following details so we can solve your problem quickly.
Just a phone call away Philips’ customer help desks are located worldwide. Within the U.S. you can contact Philips Customer Care Monday-Friday from 8:00 AM-9:00 PM Eastern Time (ET) and on Saturdays from 10:00 AM-5:00 PM ET by using the USA contact phone number listed above. • To avoid possible shock hazard, please be sure that the television is unplugged from the electrical outlet before cleaning. • Do not touch the screen with anything hard as this scratch, mark or damage the screen permanently.
14. Cleaning and care 15. Environmental care • Do not touch the screen with anything hard as this may scratch, mark or damage the screen permanently. • • Do not rub with dust clothes containing chemical treatment. • Do not touch the surface with bare hands or a greasy cloth (some cosmetics are harmful to the screen). This Philips Institutional Television product and its packaging contain materials that can be recycled and re-used.
16.
Features 31 Optional Remote Controls 12 Overview of TV Connectors and Controls 10 G Guest Remote Control keys 13 P Physical Channel 21 I Picture Format 26 Iboard FIRMWARE 34 Iboard NVM 34 Important Safety Instructions 3 R Remote Control Lock 27 RF Channel Number 18 K RF Download 33 Keyboard Lock 27 S L Safety Information and Useful Tips 5 Loud Speaker Mute 32 Security 26 Low Power Standby 32 Selecting Input Source 17 Selecting Mute Source 20 Smartpower 31 M Smart RC 17 Mains connection 9 Sma
U U.S.A.
17. Dolby Digital Manufactured under license from Dolby Laboratories. ‘Dolby’ and the double-D symbol are trademarks of Dolby Laboratories. 18. Kensington Security Slot (if present) Your TV is equipped with a Kensington Security Slot, to prevent it from getting stolen. An anti-theft Kensington lock has to be purchased separately. The Kensington lock is a plastic-coated steel cable with a lock. One end has to be fixed to the opening of the TV and locked with a special key.