
Installation Guide

ENGLISH
EN - 24
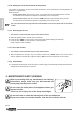
c. Makesurethelter(30)hasdriedcompletely.
d. Correctlyrepositionthelter(30)initsspecicseat(Fig.25).
e. Suckpossibleufromthegrille(Fig.25).
Donotusetheappliancewithoutthelter(30).
4.1.e - RECOMMENDATIONS FOR ENERGY SAVING
Belowndsimplerecommendationsforreducingconsumption:
• Alwaysandconstantlykeeptheltersclean(seemaintenanceandcleaningchapter).
• Keep the doors and windows of the rooms to be climate controlled closed.
• Do not let sun rays penetrate freely into the room (we recommend using curtains or lowering blinds or
closing the shutters).
•
Donotobstructtheairowpath(inputandoutput)oftheappliance;this,inadditiontoobtaininganon-op-
timalyield,alsoaectsthecorrectoperationoftheapplianceandthepossibilityofirreparabledamagesto
the appliance itself.
4.2 - MAINTENANCE
If you do not intend to use the appliance for a long period of time, work as follows:
a.
Activate the fan only mode for a few hours (approximately 8÷10 hours) to dry the interior of the appliance.
b. Stop the air conditioner and disconnect the power supply.
c. Cleantheairlters.
d. Completely discharge condensation.
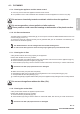
e. Wrapthepowersupplycable(34)aroundthecablewinder(33)andinsertthepluginthespecichousing
(31) (Fig.31).
f. Remove the batteries from the remote control.
Checks before resuming use of the air conditioner:
a. Cleantheltersafteralongperiodofinactivityoftheairconditioner.
b. Check that the air outlet or inlet are not obstructed (especially after a long period of inactivity of the air
conditioner).
4.2.a - Discharging condensation
When condensation in the lower tray reaches the predetermined level, the appliance emits 8 beeps; “P1”
appears on the control panel and the appliance stops working (the fan motor keeps running).
In this case:
a. Disconnect the plug from the power socket.
b. Carefully move the appliance in position suitable to unload water.
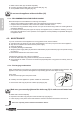
c. Remove the drain cap (32) and the rubber cap (32a) (Fig.26).
Makesureyoucorrectlytightenedthedraincap(32)inordertoavoidwaterleak.
d. Make water unload completely.
e. Reposition the rubber cap (32a) and screw the drain cap (32) (Fig.27).
f. Insert the plug in the power socket and restart the machine until when the indicator “P1”turnso.
If the error repeats, please contact an Assistance Centre.