
Operation Manual


6
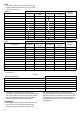
Battery/motor protection system
The battery cartridge and tool are provided with protection
devices that will automatically reduce or cut off power to
the tool when overload situations develop that may cause
damage to the tool or battery cartridge.
If the tool becomes overloaded but not locked up a
protector is provided to reduce the revolutions to protect
the motor. In this case the two indicator lamps described
in the table below do not light or blink.
All other protection functions can be identified by the
indicator lamps described in the table below. (Fig. 6)
010823
Battery remaining capacity indicator (only
for models with Battery AP-3622)
Battery AP-3622 is equipped with the battery remaining
capacity indicator. (Fig. 7)
Press the CHECK button to indicate the battery remaining
capacity. The indicator lamps will then light for approx.
three seconds.
011713
• When only the lowermost indicator lamp (next to the
“E”) blinks, or when none of the indicator lamps light,
the battery capacity has run out, so the tool does not
operate. In these cases, charge the battery or replace
the empty battery with a fully charged one.
• When two or more indicator lamps do not light even
after charging is complete, the battery has reached the
end of its service life.
• When the upper two and lower two indicator lamps light
alternately, the battery may have malfunctioned.
Contact your local Dolmar authorized service center.
NOTE:
• The indicated capacity may be lower than the actual
level during use or immediately after using the tool.
• Depending on the conditions of use and the ambient
temperature, the indication may differ slightly from the
actual capacity.
ASSEMBLY
WARNING:
• Always be sure that the tool is switched off and
battery cartridge is removed before carrying out
any work on the tool. Failure to switch off and remove
the battery cartridge may result in serious personal
injury from accidental start-up.
• Never start the tool unless it is completely
assembled. Operation of the tool in a partially
assembled state may result in serious personal injury
from accidental start-up.
Installing the grip (Fig. 8)
Securely fit the barrier and grip onto the shaft pipe with
two screws and clamps.
Make sure that the spacer on the shaft pipe is located
between the grip and the hanger. Do not remove or shrink
the spacer.
CAUTION:
• Never install the grip on the label or joint.
NOTE:
• In some countries, the barrier and spacer are not
provided with the tool. In that case, align the handle to
Status Action to be taken
– Blinking
Battery power has been nearly
used up.
Replace the battery with fully charged one.
– Lighting On
Battery protector is shutting off
the power - battery power has
been used up.
Replace the battery with fully charged one.
Blinking –
Overload protector is shutting off
the power - the motor was locked.
Release the switch trigger and remove the
cause of the motor lock or overload. If the
cutting tool is locked by entangling weeds or the
like, always remove the battery cartridge before
clearing it.
Lighting On –
Overheat protector is shutting
off the power - overheating.
Rest the equipment for a while.
Blinking Blinking
Electric or electronic malfunction Ask your local authorized service center for
repairs.
Indicator lamps
Remaining capacity
Lighted Off Blinking
E F
70% to 100%
45% to 70%
20% to 45%
0% to 20%
Charge the battery.
The battery may
have malfunctioned.