
Operation Manual


7
further side of the line which is indicated by the arrow
marks.
Mounting the attachment (Fig. 9)
To mount the attachment to a power unit:
1. Make sure that the lock lever is not tightened.
2. Align the pin with the arrow mark.
3. Insert the shaft into the drive shaft of the power unit
until the release button pops up.
4. Tighten the lock lever firmly as shown.
To remove the attachment, loosen the lock lever, press
the lock button and withdraw the shaft.
NOTICE:
• Do not tighten the lock lever without the shaft of the
attachment inserted. Otherwise the lock lever may
tighten the entrance of the drive shaft too much and
damage it.
Attaching shoulder harness (Fig. 10)
Put the shoulder harness on your left shoulder by putting
your head and right arm through it. Keep the tool on your
right side.
After putting the shoulder harness, attach it to the tool by
connecting the buckles provided on both the tool hook
and the harness. Be sure that the buckles click and lock
completely in place.
Adjust the strap to the suitable length for your operation.
(Fig. 11)
The buckle is provided with a means of quick release
which can be accomplished by simply squeezing the
sides and the buckle.
WARNING:
• Be extremely careful to maintain control of the tool
at all times. Do not allow the tool to be deflected
toward you or anyone in the work vicinity. Failure to
keep control of the tool could result in serious injury to
the bystander and the operator.
MAINTENANCE
WARNING:
• Always be sure that the tool is switched off and
battery cartridge is removed before attempting to
perform inspection or maintenance on the tool.
Failure to switch off and remove the battery cartridge
may result in serious personal injury from accidental
start-up.
NOTICE:
• Never use gasoline, benzine, thinner, alcohol or the
like. Discoloration, deformation or cracks may result.
To maintain product SAFETY and RELIABILITY, repairs,
any other maintenance or adjustment should be
performed by Dolmar Authorized Service Centers, always
using Dolmar replacement parts.
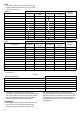
TROUBLESHOOTING
Before asking for repairs, conduct your own inspection
first. If you find a problem that is not explained in the
manual, do not attempt to dismantle the tool. Instead, ask
Dolmar Authorized Service Centers, always using Dolmar
replacement parts for repairs.
012662
OPTIONAL ACCESSORIES
CAUTION:
• These accessories or attachments are recommended
for use with your Dolmar tool specified in this manual.
The use of any other accessories or attachments might
present a risk of injury to persons. Only use accessory
or attachment for its stated purpose.
If you need any assistance for more details regarding
these accessories, ask your local Dolmar service center.
• Brushcutter attachment
• Hedge trimmer attachment
• Pole saw attachment
• Cultivator attachment
• Coffee harvester attachment
• Shaft extension attachment
• Dolmar genuine battery and charger
Malfunction status Cause Action
Motor does not run. Battery cartridge is not installed. Install the battery cartridge.
Battery problem (under voltage) Recharge the battery. If recharging is
not effective, replace battery.
The drive system does not work
correctly.
Ask your local authorized service center
for repair.
Motor stops running after a little use. Rotation is in reverse. Change the direction of rotation with the
reversing switch.
Battery’s charge level is low. Recharge the battery. If recharging is
not effective, replace battery.
Overheating. Stop using of tool to allow it to cool
down.
It does not reach maximum RPM. Battery is installed improperly. Install the battery cartridge as described
in this manual.
Battery power is dropping. Recharge the battery. If recharging is
not effective, replace battery.
The drive system does not work
correctly.
Ask your local authorized service center
for repair.