
Operation Manual


9
FUNCTIONAL DESCRIPTION
CAUTION:
• Always be sure that the tool is switched off and the
battery cartridge is removed before adjusting or
checking function on the tool.
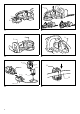
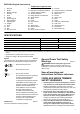
Installing or removing battery cartridge
CAUTION:
• Hold the tool and the battery cartridge firmly when
installing or removing battery cartridge. Failure to
hold the tool and the battery cartridge firmly may cause
them to slip off your hands and result in damage to the
tool and battery cartridge and a personal injury. (Fig. 1)
• Always switch off the tool before insertion or removal of
the battery cartridge.
• To remove the battery cartridge, withdraw it from the
tool while sliding the button on the front of the cartridge.
• To insert the battery cartridge, align the tongue on the
battery cartridge with the groove in the housing and slip
it into place. Always insert it all the way until it locks in
place with a little click. If you can see the red part on
the upper side of the button, it is not locked completely.
Insert it fully until the red part cannot be seen. If not, it
may accidentally fall out of the tool, causing injury to
you or someone around you.
• Do not use force when inserting the battery cartridge. If
the cartridge does not slide in easily, it is not being
inserted correctly.
Battery protection system
The battery cartridge is equipped with the protection
system, which automatically cuts off the output power for
its long service life.
The tool may stop during operation when the tool and/or
battery are placed under the following situation. This is
caused by the activation of protection system and does
not show the tool trouble.
• When the tool is overloaded:
At this time, release the switch trigger and remove
causes of overload and then pull the switch trigger
again to restart. When the tool does not work even
after pulling the switch trigger, the battery power auto-
stop is still at work. Charge the battery cartridge before
use.
• When the remaining battery capacity becomes low:
Recharge the battery cartridge.
Handle mounting positions (Fig. 2)
The handle can be rotated to either 90° left or right and
mounted either 45° or 90° position to fit your work needs.
First, pull the knob and rotate the handle clockwise or
counterclockwise in the direction of arrow as shown in the
figure. The handle will be locked in 45° position. The pull
the knob and rotate more. The handle will be locked in 90°
position.
CAUTION:
• Always make sure that the handle is locked in the
desired position before operation.
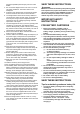
Switch action
CAUTION:
• Before inserting the battery cartridge into the tool,
always check to see that the switch trigger actuates
properly and returns to the “OFF” position when
released. (Fig. 3)
For your safety, this tool is equipped with a dual switching
system. To turn on the tool, press triggers A and B.
Release either one of the two pressed triggers to turn off.
The sequence of switching is unimportant as the tool only
starts when both switches are activated.
Speed change (Fig. 4)
The strokes per minute can be adjusted just by turning the
adjusting dial. This can be done even while the tool is
running. The dial is marked 1 (lowest speed) to 6 (full
speed).
Refer to the table below for the relationship between the
number settings on the adjusting dial and the strokes per
minute.
CAUTION:
• The speed adjusting dial can be turned only as far as 6
and back to 1. Do not force it past 6 or 1, or the speed
adjusting function may no longer work.
• The strokes per minute vary by the conditions of
battery cartridge and shear blades.
ASSEMBLY
CAUTION:
• Always be sure that the tool is switched off and the
battery cartridge is removed before carrying out any
work on the tool.
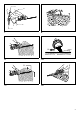
Battery adapter (Accessory) (Fig. 5 & 6)
CAUTION:
• Before using battery adapter, read all instructions on
tools using battery.
• When charging a battery cartridge, first remove it from
the battery adapter and then charge it. It is not allowed
to charge the battery cartridge while using battery
adapter.
Installing or removing battery adapter
• Always switch off the tool before insertion or removal of
the battery adapter.
• To remove the battery adapter, withdraw it from the tool
while sliding the button on the adapter.
• To insert the battery adapter, align the tongue on the
battery adapter with the groove in the housing and slip
it into place. Always insert it all the way until it locks in
place with a little click. If you can see the red part on
the upper side of the button, it is not locked completely.
Number on adjusting dial Strokes per minute (min
-1
)
6 1,800
5 1,750
4 1,650
3 1,500
2 1,300
1 1,000