Dolphin® 9500 Series Mobile Computers Windows Mobile ™ 2003 Software for Pocket PCs ™ Quick Start Guide
Disclaimer Hand Held Products, Inc. (“Hand Held Products”) reserves the right to make changes in specifications and other information contained in this document without prior notice, and the reader should in all cases consult Hand Held Products to determine whether any such changes have been made. The information in this publication does not represent a commitment on the part of Hand Held Products.
Table of Contents Congratulations! ................................................................... 1-1 Dolphin 9500 Series Terminals ............................................ 1-1 Dolphin 9500 Series Peripherals and Accessories............... 1-1 Hardware Overview .............................................................. 1-2 Setting Up Dolphin 9500 Series Terminals........................... 1-4 Unpack the Carton and Verify its Contents ..........................
iv Dolphin® 9500 Series Mobile Computers Quick Start Guide
Dolphin 9500 Series Quick Start Guide Congratulations! You have made a wise choice in selecting the Dolphin, a device known worldwide for the following features: • • • • • • Microsoft Windows Mobile 2003 Software for Pocket PCs Integrated, wireless, triple-radio design for real-time data collection Ergonomic form factor and lightweight design Rugged construction that withstands harsh treatment and real world use Adaptus Imaging Technology provides advanced point-and-shoot decoding and imaging 7.4V, 14.
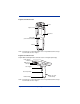
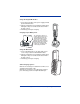
Hardware Overview The front, side, and bottom panels of all Dolphin 9500 Series terminals are the same. Front Panel Side Panel Image Engine window Decode LED Scan LED Magnesiumalloy top cover IrDA COM Port LCD with Touch Screen Access Door to the Secure Digital (SD) memory interface Audio Jack (2.
Dolphin 9500 Back Panel Speaker Stylus (in slot) Microphone Battery Well (underneath the battery) Battery Note: The back panel of the Dolphin 9501 has an expanded bottom housing to accommodate the laser engine. Dolphin 9550 Back Panel Dolphin 9550 and Dolphin 9551 terminals feature an integrated pistol-grip.
Setting Up Dolphin 9500 Series Terminals 1. Unpack the carton and verify its contents - page 4. 2. Install the battery in the terminal - page 5. 3. Charge the main battery in the terminal for a minimum of four hours - page 5. 4. Turn the power on and initialize the mobile computer - page 7. 5. Allow Autoinstall to run - page 8. Unpack the Carton and Verify its Contents Verify that the carton contains the following items: • Dolphin 9500 Series mobile computer (the terminal) • Main battery pack (7.
Install the Main Battery Pack ! Use only the Li-ion battery packs provided by Hand Held Products. The use of any battery pack not sold/manufactured by Hand Held Products in the Dolphin 9500 Series terminal will void your warranty and may result in damage to the Dolphin terminal or battery. 1. Remove the Li-ion battery pack from its package. Hold the terminal with the front panel (keyboard) facing down. 2. If necessary, detach the handstrap. 3.
Using the Dolphin HomeBase 1. Connect the HomeBase to the power supply provided by Hand Held Products. 2. Slide the terminal into the terminal well until the Dock LED lights solid green to indicate that the terminal is properly seated. 3. The battery pack begins charging. POWER SCA N SF T VOL + E SC PG A Charging a Spare Battery Pack F I J Q U The HomeBase features an auxiliary battery well. Insert a spare battery pack into this well and the battery charges in four hours.
Initialize the Mobile Computer 1. Power on the device. The decode LED lights and the scan LED blinks for approximately three seconds. Do NOT press any keys while the terminal is booting up. 2. The terminal initializes and the splash screen displays for a few seconds. The Build numbers indicate the software version number. 7.XX Bootloader 7.XX Kernel 7.XX Keyboard 3. The system performs a hard reset. When the display activates again, follow the instructions that appear. 4.
• • Press the stylus firmly into the center of the cross-hair target once and release. Do not “double-tap” the target. You can re-align the screen at any time by going to Start > Settings > System tab > Screen. 5. Complete the series of screens that teach you how to use the stylus and popup menus. 6. Setup is complete. Wait as your terminal begins auto-installing programs. 7. When Autoinstall is complete, the system performs a soft reset that ends on the Today screen.
Today Screen When you turn on your device for the first time, you’ll see the Today screen. It provides the tools you need to navigate the system. Navigation Bar The navigation bar at the top of the screen displays the date and time and provides access to the Start menu. Command Bar The command bar along the bottom of the screen contains menus, appropriate application icons, and perform tasks.
Verifying Operations with Demos Dolphin 9500 Series mobile computers contain Demos that you can use to verify imaging and decoding. Verify Imaging The Image Demo enables you to use the imager to capture an image. 1. Go to Start > Demos > Image Demo. The image demo opens. 2. Point the terminal at an object and press the SCAN key. A preview of the object appears on the terminal screen, and the decode and scan LEDs light. 3. Release the SCAN key. The image is captured.
Verifying Radio Status Dolphin 9500 Series terminals can be configured with 802.11b, Bluetooth™, GSM/GPRS (Dolphin 9500 only) radios or a combination of these radios. Radio Driver Installation Radio drivers install during the autoinstall whenever the mobile computer is initialized; when first turned on or after a hard reset. Only the appropriate drivers for your terminal’s radio configuration install. Radio Combinations Dolphin 9500 Series terminals can be configured with more than one radio.
Verify the Radio Status 1. Go to Start > Settings > Connections tab > Radio Manager. The Radio Manager appears identifying which radio modules are installed on the terminal. 2. The highlighted entry is the radio that is currently powered up; its Status is Ready. Powering up a Radio or Radio Combination To successfully power up a radio, both the hardware module and the software driver must be installed on the terminal. 1. In the Radio Modes list, select the radio or radio combination. 2. Tap Apply.
Adjusting the Backlight Both the keyboard and the display are backlit to enable better viewing in low-light conditions. All terminal configurations contain a Backlight key that toggles the keyboard backlight on and off; see Backlight, page 1-14. Backlight functionality differs for color and monochrome displays. On a Color Display The backlight for the color display is user-defined. There are two tabs: one for Battery and the other for External power. The options on each tab are the same.
Using the System Settings Tap Start > Settings > System tab > Contrast. The current settings display. Use the slider to adjust the contrast to the desired setting. The contrast instantly adjusts as you move the slider between Light and Dark. Tap OK to save adjustments. Entering Information To enter information, you can use • the keyboard (page 14), • the stylus on the touch screen (page 18), • the imager (page 19).
Using the Function Keys Name Key Function Power The Power key puts the terminal into and wakes the terminal from suspend mode. This is also known as suspend/resume. SCAN The SCAN key activates the image/scan engine and “wakes” the terminals from suspend mode. Its position allows convenient one-handed engine activation. Space The Space key moves the cursor one space. Tab The Tab key moves the cursor to the next tab stop or the next control (on a form, for instance).
35-key Numeric/Alpha Keyboard SCAN key Power key Shift key Alpha Lock key Escape key Tab key Enter key Navigation keys Alpha Lock Indicators Space key Delete key Function keys Backspace key Backlight key CTRL, Blue, Red, ALT Modifier keys Alpha Lock Key Because the 35-key keyboard defaults to numeric mode, the Alpha Lock key appears only on the 35-key keyboard. Numeric mode is when you type numbers with the number keys. Alpha mode is when you type letters with the number keys.
43-key Alpha/Numeric Keyboard SCAN key Power key Shift key Number Lock key Escape key Tab key Enter key Navigation keys Backlight key (use with SFT to delete) Space key (use with SFT to backspace) CTRL, Blue, Red, ALT Modifier keys Number Lock Key Because the 43-key keyboard defaults to alpha mode, the Number Lock key appears only on the 43-key keyboard. Alpha mode is when you type letters with the letter keys. Numeric mode is when you type numbers with the letter keys.
56-key Full Alpha/Numeric Keyboard SCAN key Power key Backlight key Shift key Escape key Tab key Enter key Navigation keys Insert key Space key Backspace key Delete key CTRL, Blue, Red, ALT Modifier keys Key Combinations In addition to the color-coded functions indicated on each overlay, there are keyboard combinations for specific functions and special characters on each keyboard.
Using the Imager The terminal contains a compact image engine that instantly reads all popular 1D and 2D bar codes. It also supports omni-directional aiming and decoding for greater flexibility in handling the device in real-world settings. The imager can also capture digital images, such as signatures and pictures of damaged inventory. Images are saved in industry-standard file formats.
4. Center the aiming beam over the bar code. A range of 4–10 inches (10–25 cm) from the bar code is recommended. 5. When a bar code is successfully decoded, the decode LED lights green and the terminal beeps. 6. The bar code information is entered into the application in use. Scanning Position Options Dolphin 9500 and Dolphin 9550 terminals equipped with an IT4100SF/SR/HD support omni-directional aiming using a green aiming beam.
Taking an Image The image-capture process is an intuitive, split-second operation. The terminal is capable of saving images in a number of industry-standard file formats such as *.bmp, *.jpg and *.png. The default file format for images is a grayscale *.jpg. Note: The Dolphin 9551 and Dolphin 9501 do not support image capture. 1. Point the Dolphin terminal directly at the object. The imager points straight out the top panel. 2. To preview the image: • • Press and hold the SCAN key.
2. The decode and scan LEDs flash for approximately three seconds. 3. The terminal re-initializes (see page 7 for details). Suspend Mode To put the Dolphin terminal into suspend mode manually, press and hold the Power key. To wake the Dolphin terminal from suspend mode, press the Power or SCAN keys. The terminal goes into suspend mode automatically when the terminal is inactive for a programmed period of time.
Troubleshooting Issue Receive message that the memory is full. Terminal not accepting scan data. The radio is not transmitting. Slow system performance. Cause Solution Too many files stored on the terminal. Delete unnecessary files. Upload files to a host PC or device with enough memory to store them. Storage memory is set too low for the applications in use. Adjust the storage memory allocation. Go to Start > Settings > System tab > Memory. Use the slider to increase the storage memory.
Product Service and Repair Hand Held Products provides service for all its products through service centers throughout the world. To obtain warranty or non-warranty service, return the unit to Hand Held Products (postage paid) with a copy of the dated purchase record attached. Contact the appropriate location below to obtain a Return Material Authorization number (RMA #) before returning the product.
Technical Assistance If you need assistance installing or troubleshooting your scanner, please call your Distributor or the nearest Hand Held Products technical support office: North America/Canada: Telephone: Fax number: E-mail: (800) 782-4263, option 4 (8 a.m. to 6 p.m. EST) (315) 685-4960 natechsupport@handheld.com Europe, Middle East, and Africa: TelephoneEuropean Ofc: Int+31 (0) 40 29 01 600 U.K. Ofc: Int+44 1925 240055 E-mail: eutechsupport@handheld.
Limited Warranty Hand Held Products, Inc. (“Hand Held Products“) warrants its products to be free from defects in materials and workmanship and to conform to Hand Held Products’ published specifications applicable to the products purchased at the time of shipment.
• Use of any peripheral not manufactured/sold by Hand Held Products will void the warranty. This includes but is not limited to: cables, power supplies, cradles, and docking stations. • Use only power adapters approved for use by Hand Held Products. Failure to do so may result in improper operation or damage to the unit and will void the warranty. Hand Held Products, Inc. extends these warranties only to the first end-users of the products. These warranties are non-transferable.
1. This device may not cause harmful interference. 2. This device must accept any interference received, including interference that may cause undesired operation. This equipment has been tested and found to comply with the limits for a Class B digital device pursuant to Part 15 of the FCC Rules. These limits are designed to provide reasonable protection against harmful interference in a residential installation.
RF, Regulatory, and Safety Agency Approvals for 802.11b and Bluetooth Parameter Specification RF Approvals U.S.A Canada FCC Part 15.247 RSS 210 RF, Regulatory, and Safety Agency Approvals for GSM Parameter Specification RF Approvals U.S.A Canada FCC Part 24 RSS 133 Dolphin 9500 Series 802.11b and/or Bluetooth R&TTE Compliance Statement The Dolphin RF are in conformity with all essential requirements of the R&TTE Directive (1999/5/EC).
This equipment has been assessed to the following standards: Parameter Specification R&TTE EN 301 511: 2000 EN 301 489-1 (2002-08) EN 301 489-7 (2002-08) EN 60950:2000 EN 50361:2001 Pacemakers, Hearing Aids, and Other Electrically Powered Devices Most manufacturers of medical devices adhere to the IEC 601-1-2 standard. This standard requires devices to operate properly in an EM Field with a strength of 3V/m over a frequency range of 26 to 1000MHz.
Hand Held Products, Inc. 700 Visions Drive P.O.