
Manual

Sparrow Mk4 Installation Guide V5 28
TH
May 2015 Page 10 of 16
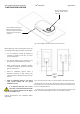
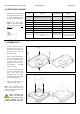
8. ATTACH DUCT TO UNIT
Raise the brace assembly and
slip the black plastic duct over
the outside of the fan outlet
underneath the rooftop unit.
Ensure that the notch cut in the
plastic ductwork aligns with the
fans power cable (Fig 12).
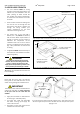
When attaching the duct to
the unit take care to ensure
it forms a tight, unbroken
seal that doesn’t allow cold air to
escape.
Engage and tighten the four M8
bolts with the threaded inserts
in the rooftop unit.
Recommended tightening
torque of the bolts is 7 N.m (5.2
lbf-ft).
As the bolts are tightened
ensure that the hold down bars
slot into their recesses in the
brace (Fig 11).
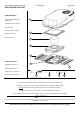
Fig 11: Raise the duct assembly up to the roof hole, ensuring the black plastic duct work forms a
tight fit around the evaporator fan underneath the unit. Then engage the four M8 bolts, taking
care to ensure the hold down bars slot into their recesses
Fig 12: Highlights how the notch on the plastic duct slots over the wire from the inside fan
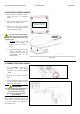
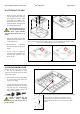
9. ATTACH PLENUM COVER
Connect the main cover of the plenum
to the duct by attaching the blue
suspension cord to the lug on the inside
of the cover (Fig 13).
This will allow you to use two hands
to connect the control cable (see
Fig 14 on next page).
Connect the key pad control cables
together (see below). Be sure that
the plug joins the corresponding
wire colours together (yellow to
yellow, red to red etc.)
Failure to properly plug the
control cables together
correctly will result in loss of
power to display
Fig 13: Shows the positioning of the lug inside the plenum cover
Pull the suspension cord down from inside the unit and
hook it through the lug shown inside the plenum housing.
This will allow two free hands to connect the control cables
together.