
Manual


Sparrow Mk4 Installation Guide V5 28
TH
May 2015 Page 12 of 16
COMMISSIONING OF THE UNIT
1. Turn the power on at the circuit breaker
2. Press the ON/OFF button and press the MODE button to
select FAN
3. Cycle through the LOW, MED and HIGH fan speeds checking
that all speeds run.
4. Set mode to COOL, adjust temperature via up/down buttons
to 4˚C below the display temp (i.e. room temp) compressor
will start within three minutes.
5. Set mode to HEAT, similarly set temperature to 4˚C above
the display temperature. Compressor will start within three
minutes. After a few minutes the fan will start and warm air
will be apparent.
Note: Regardless of the mode selected there will always be at
least a 3 minute delay before the compressor starts. If the unit
is turned off it is important that the compressor be given at
least 3 minutes before being re-activated
MAINTENANCE
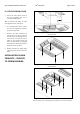
I. Plenum Filters
The plenum filters are the only parts that require routine
maintenance. They must be cleaned periodically to ensure
that they do not become clogged with dust and other
particles.
Blocked filters must be cleaned frequently to maintain cooling
& heating performance
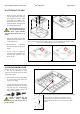
To clean the two plenum filters, first remove them both from
the plenum by pulling them out of the assembly.
Fig 17 plenum filter when removed
The state of the filters can be ascertained from its appearance,
if they appear clogged then they should be cleaned. Generally
the filters can be cleaned sufficiently by tapping them together
to shake loose the dust and particles trapped inside.
WARNING
Airborne particles can pose a health risk, particulalry to
young children and the elderly. Ensure that filters are cleaned
in a safe and well ventilated area
If a more thorough clean is required then the filters can be
washed out using warm soapy water. Care must be taken to
avoid ripping the fabric.
The filters should be cleaned every two weeks or more when
in use. Prolonged use, higher concentrations of airborne
particles and various other factors may result in the filters
needing to be cleaned more often.
Replacement filters can be ordered directly from Aircommand.
II. Mounting bolts
Aircommand suggests that the hold down bolts are initially
checked for tightness within the first 3 months of installation,
and thereafter every 12 months if the van is in constant use.
III. Compressor mounts
Ensure that the rubber mounts on the compressor are checked
every 12 months and more often with frequent travelling. If
the top mount looks very worn or there is no rubber left
between the top washer and the compressor foot (metal on
metal contact possible) then the rubbers need replacing.
IV. Storage
The air conditioner should be run on a routine basis to ensure
the components remain in working order.
If the van is in storage or is to remain unoccupied for an
extended length of time it is recommended that the air
conditioner is allowed to run uninterrupted for 20-30min once
every six months.
V. Warranty claims
The unit comes with a one year manufacturer’s warranty from
date of purchase. It is IMPORTANT that you read and
understand the conditions of the warranty agreement which
are included with the unit.
If you have a claim please contact Aircommand directly on
(08) 8345 8444, alternatively you can fax (08) 8243 0628 or
email service@aircommand.com.au
Please have your unit serial number ready.