
Manual

Sparrow Mk4 Installation Guide V5 28
TH
May 2015 Page 6 of 16
1. INSTALLATION POSITION
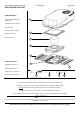
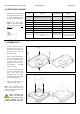
Fig 1: Sparrow Mk4 clearances required around roof top unit
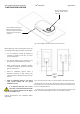
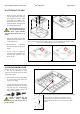
Before beginning, mark out the position of the unit
considering the following important requirements:
The air conditioner should be situated as
centrally as possible on the van, to ensure
even air distribution.
The Sparrow Mk4 may be oriented in any
direction to the normal direction of travel.
When considering the installation position
remember to check for clearance around the
plenum inside the van.
Avoid an installation position where a
bulkhead, cupboard or light fitting could
interfere with the discharge air flow from the
plenum.
Avoid an installation where a roof joining
seam crosses through the 14” square
installation cut out.
It is important that the unit is never
more than 5° from the horizontal and the
rear of the unit should never be higher
than the front when in use.
Contact Aircommand if your installation differs
significantly.
Fig 2: The footprint of the rooftop unit, and the plenum, measured from the hole.
- The above outline on the left shows the minimum clearance required around the
Sparrow Mk4 unit on the roof of the vehicle, distances shown are calculated from a
14” square hole (360 x 360mm).
- The above outline on the right shows the minimum clearance required around
the 14” square hole (360 x 360mm) in order to accommodate the plenum.
There should be a minimum of
100mm clearance around the
perimeter of the unit to allow for
service access and air flow to
condenser.
Hot air is ejected from this
exhaust; consider nearby
roof hatch
14” x 14”
(360mm)
SQUARE
HOLE