
Manual
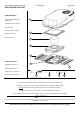

Sparrow Mk4 Installation Guide V5 28
TH
May 2015 Page 9 of 16
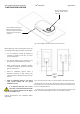
6. ASSESS ROOF THICKNESS
Measure the roof thickness
and consult the table across
to check if adjustments to
the duct length are required.
NOTE: If the duct length
needs to be adjusted then
cut the excess from the un-
notched end.
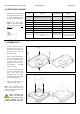
Roof thickness
(mm)
Comment
Duct length (mm)
Bolt length
25
Absolute minimum – ring must be
removed from top of plenum ducting.
60
Standard
30
Use plenum duct as provided
65
Standard
40
“
75
Standard
50
“
85
Standard
60
“
95
Standard
85
“
120
Limit of std bolt
115
Absolute maximum
150
Installer to provide
General rule
Roof less than 30mm – remove duct
ring. 30mm or thicker leave duct as
supplied
Duct length = Roof
thickness + 35mm
Roof greater than 85mm
thick will require installer
to provide longer bolts
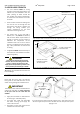
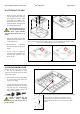
7. ASSEMBLE DUCT
Thread a hold down bar onto
the M8 bolt and push the
bolt almost all the way into
the hole in each corner of
the brace (Fig 9).
Leave a 10mm gap between
the hold down bar and the
recess in the plastic brace.
This will allow for easier
engagement with the four
corresponding threaded
holes in the unit.
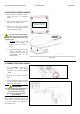
Turn the assembly over and
add the black plastic duct
work to the top of the
assembly with the notch
upwards (Fig 10). The notch
is shown circled below.
Align the notch with the
inside fans power cable.
Note: Some installers find it
easier to attach the duct to the
roof top unit first and then insert
the brace assembly.
When attaching the
duct to the unit take
care to ensure it forms
a tight, unbroken seal that
doesn’t allow cold air to escape.
Fig 9: Insert the four M8 bolts and hold down bars into the corners of the brace
Fig 10: Fit the black plastic duct onto the brace assembly ensuring a tight, sealed fit