
User Manual


33
2. Fitting and Changing the Gas Supply
Connecting the gas supply
• Before connecting the appliance to a gas supply, ensure that the rubber seal on the regulator is in
position and in good condition.
• Before connecting the hose and regulator to the appliance, check that the appliance control knob is
in the “OFF” position.
• Carry out this check each time you fit the appliance to a gas cylinder.
• Blow out any dust from the gas supply opening to prevent possible blockage of the jet.
• Fit an approved hose and regulator to the appliance.
• Only use the hose assembly as supplied for connection to the gas supply.
• Ensure that the gas supply (gas cylinder/gas cartridge) is fitted in a well-ventilated location away
from any source of ignition, such as naked flames and away from other people.
• Do not twist or pinch the hose. Ensure that it is routed away from the stove body so as to prevent
deterioration / damage to the hose caused by heat.
• Make sure that the gas cylinder is kept upright at all times, connect to the cylinder by screwing on
hand tight until fully engaged.
• Ensure that a complete gas seal has been made (check for the smell of gas around the connection
joint). Do not check for leaks with a naked flame. Use warm soapy water only, applied to the joints
and connections of the appliance. Any leakage will show up as bubbles around the leakage area.
• If you cannot rectify the gas leak do not use the appliance. If you are in doubt, contact your nearest
stockist.
Disconnecting and changing the gas supply
• Aer use, turn the appliance control knob to the “OFF” position and close the gas supply.
• When you need to replace your empty cylinder, make sure that the gas is closed at the cylinder
valve.
• Do not smoke while changing the cylinder.
• Remove the regulator from the empty cylinder.
• Attach the regulator to the full cylinder, refer to the instructions above on how to connect the gas
supply.
• Apply the same care and checking procedures as if fitting a new gas cylinder.
How to check if your gas cylinder is empty
• The easiest way to check if you are low on gas is by picking up your gas cylinder.
• If you think your gas cylinder is feeling a little lighter than you’d like, weighing the bottle is a great way to see how much gas is le. Most
cylinders will have the empty weight stamped on either the neck or foot ring, and if the weight indicated on the stamp and the weight of your
cylinder are the same, you’re out of gas. You can then approximate the amount of gas you have le by the difference in weight.
3. Operating the Appliance
• When operating this appliance, please take care to ensure that all parts are in good working order
and that you have checked for any gas leaks before lighting the appliance with every use.
• Cooking surfaces can simply be placed and are ready to use. No assembly required.
• PLEASE NOTE: Please ensure all protective packaging and plastic are removed from the appliance
before use.
• The appliance is designed for use with cooking vessels of not less than 180mm in diameter and not
greater than 250mm in diameter.
Precautions to observe before lighting.
• Use this appliance only on a firm level surface.
• Aer prolonged storage, inspect the appliance for any insects and webs, which may affect gas flow.
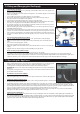
Lighting the appliance using the piezo
• It is recommended to remove any cooking surfaces when trying to light the appliance. This way it will
be easy to see the burner when it is lit.
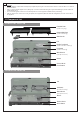
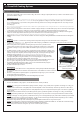
• To light up the appliance using the piezo igniter, push and turn the control knob 90° in an anti-clockwise direction, then press the piezo
button to ignite the gas (see Fig. 3). If the gas does not ignite on the first spark, turn the control knob back to its “OFF” position. Try again,
by pushing and turning the control knob anti-clockwise and push the piezo button to ignite the gas. If the gas has not ignited in the first two
to three seconds you should close the control valve by turing the control knob back to its “OFF” position.
• Wait approximately thirty seconds to let any accumulated gas within the burner escape. Repeat the above process if necessary until the
flame ignites. The flame should normally light up within the first one to two seconds.
Lighting up using a BBQ lighter
• When starting cold, the appliance may be lit from the top prior to fitting the desired cooking surface. When lighting up a hot appliance, it
is recommended that this be done by sticking a barbecue lighter through one of the vent holes underneath the burner, until it is in line with
the burner (DO NOT place the BBQ lighter through the large hole directly underneath the burner). Ignite the BBQ lighter. Whilst the BBQ
lighter is lit, push and turn the control knob anti-clockwise to light the burner.
Fig. 3
EN
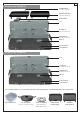
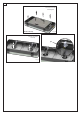
Fig. 2b
Fig. 2a
Piezo
button