EN Gravity-discharge Toilet Installation manual DE Mazerier-WC Bedienungsanleitung . . . . . . . . . . . . . 13 FR WC dilacérateur Mode d’emploi . . . . . . . . . . . . . . . . . 22 ES Inodoro triturador Manual de instrucciones . . . . . . . . . . 32 NL Toilet met versnijdingspomp Instructihandleiding . . . . . . . . . . . . . . 42 IT WC di macerazione Manuale di istruzioni . . . . . . . . . . . . . 51 FI Silppuripumppu-wc Ohjekirja . . .
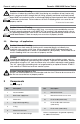
Notes on using the manual 1 Dometic 4300/4400 Series Toilets 2 9 1 10 11 2 B 8 C 12 G 3 7 A D 4 5 F 6 2 E
Dometic 4300/4400 Series Toilets General safety instructions Table of contents 1 2 3 4 5 6 1 EN Notes on using the manual . . . . . . . . . . . . . . . . . . . . . . . . . . . . . . . . . . . . . . . . . . . . . . . . . 3 General safety instructions . . . . . . . . . . . . . . . . . . . . . . . . . . . . . . . . . . . . . . . . . . . . . . . 3 - 4 Components . . . . . . . . . . . . . . . . . .
General safety instructions Dometic 4300/4400 Series Toilets Caution! Hazard of Flooding If toilet rim is below the waterline at ANY time (during any conditions of heel, load or trim) and is connected to ANY through-the-hull fittings, properly positioned ventilated (vented) loops MUST be installed in intake* or discharge piping to prevent potential back siphonage of seawater into the boat. Failure to do so can result in flooding which can cause loss of property and life.
Dometic 4300/4400 Series Toilets 4 Specifications 4.1 Materials Specifications Toilet: vitreous ceramic Dometic switch panel (4300 series): polycarbonate resin Flush handle (4400 series): plated brass 4.2 Minimum System Requirements Electrical Water Supply Discharge Circuit breaker 2 amps/12 V DC Wiring 14 gauge stranded copper Fitting 0.5 in. NPT Flow rate 4 gpm/15 lpm minimum at toilet Maximum flow pressure 40 PSI / 276 kPa Fitting 4-bolt floor (closet) flange. 3-in.
Installation 5 Installation 5.1 Toilet installation Dometic 4300/4400 Series Toilets Note If replacing an existing gravity-discharge toilet, make sure the center of the existing discharge flange is at least 10 inches (254 mm) from the back wall, then proceed to Step 5 for proper positioning of water line and electrical wiring. 1. Carefully unpack the toilet bowl and floor flange adapter. 2. Position the ceramic bowl in the space intended.
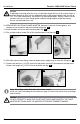
Dometic 4300/4400 Series Toilets Installation Above-Floor Installation Below-Floor Installation 7. Insert floor flange into larger hole and secure to the floor with #12x3/4-inch long flat head wood or sheet metal screws (fig. 9 ). 8. Route 1/2-inch (13 mm) PEX tubing through the smaller hole and install a PEX 1/2-inch NPT fitting (fig. 10 ). Note A water shut-off valve should be installed in the water line to the toilet for maintenance requirements. 9.
Installation Dometic 4300/4400 Series Toilets Caution If replacing an existing toilet that uses a 2-bolt floor flange, drill two 5/16-inch dia. holes in old floor flange that align with two additional holes in floor flange adapter. Use two #10 or 12 x 1-1/2-inch wood screws and washers for these drilled holes, and two T-bolts with flat washers and nuts to fasten flange gasket and floor flange adapter to old floor flange. Do not use old hardware or seal. 13.
Dometic 4300/4400 Series Toilets Installation 18. Set the toilet in place on the floor flange (fig. 19 ) and secure to floor with #14x2-1/2 inch long lag bolts (fig. 20 ). Install decorative bolt caps by pushing them onto bolt heads (fig. 21 ). 19. Turn on electrical power and water to toilet. Lift flush handle and fill toilet bowl with water. Wait one hour, then inspect the floor around and under the rear of the toilet for leaks or dampness. If no leaks are present, toilet is ready for operation.
Installation 5.2 Dometic 4300/4400 Series Toilets Wall switch installation – 4400 series toilet 1. Select a location for the switch. 8 feet of cable (2.4 m) is provided. More wire may be required, depending on how far the 23 switch is located from the toilet. 2. Cut an opening 1-1/4 in. wide x 1-5/8 in. high (fig. 25 , page 11). 3. If installing the switch in a shallow wall, you may need to use the spacer between the wall and the switch assembly cover to allow space for the wire connectors.
Dometic 4300/4400 Series Toilets Installation Wall switch template 25 A B C D Ref. Dimension/Description A Spacer outline B Cover outline C 1.625 in. / 41 mm D 1.25 in.
Customer service 6 Dometic 4300/4400 Series Toilets Customer service There is a strong, worldwide network to assist in servicing and maintaining your sanitation system. For the Authorized Service Center near you, please call from 8:00 a.m. to 5:00 p.m. (ET) Monday through Friday. You may also contact or have your local dealer contact the Parts Distributor nearest you for quick response to your replacement parts needs. They carry a complete inventory for the Dometic product line.