
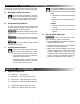
Installation Guide


11
INSTALL AWNING
7. ALWAYS use sealant on (clean)
parts and surfaces where fasteners enter RV’s
roof and / or walls. Otherwise, water leakage
could occur.
Apply sealant to #14-10 X 1 3/4” hex head screw
threads. Then place and tighten screws through
bottom mounting bracket and into solid structure
of RV.
8. Repeat steps (1) through (7) for opposite side.
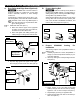
D. Install Stop Bolts
Install shoulder bolt (stop bolt) to help pre-
vent over-travel of arm assembly.
Before proceeding with stop bolt installation:
● Bottom mounting bracket MUST be installed.
● Patio food MUST be latched into bottom
mounting bracket.
● Lift handle MUST be locked in position.
1. Pull lift handle out and slide main arm up by one
hole only. Then release lift handle to lock in posi-
tion. See (FIG. 16).
2. Place shoulder (stop) bolt through highest, fully
exposed hole in adjustable arm (nearest bottom
edge of main arm). Then secure with lock nut.
See (FIG. 23).
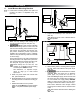
FIG. 23
Lock Nut
Shoulder
(Stop) Bolt
Main Arm
Adjustable
Arm
Patio Foot
Bottom Mounting
Bracket
3. Pull lift handle out and slide main arm down until
it rests on stop bolt. Then release lift handle to
lock in position. See (FIG. 20) & (FIG. 23).
Top casting should now clear top pivot
by 12.7mm when awning closes. See
(FIG. 19).
4. Repeat steps (1) through (3) for opposite side.
E. Release 8500/9000 Awning Preset
Tension
1. IMPACT OR PINCH HAZARD.
Do NOT remove cotter pin from torsion rod (at
end cap) until BOTH top castings are secured
to corresponding main arms, and awning safety
lock lever is in roll down position. Otherwise,
rapid casting spin off will occur. Spring tension
will attempt to spin the hardware and/or fabric
roller tube quickly and unexpectedly. Failure to
obey this warning could result in death or seri-
ous injury.
With awning safety lock lever in roll down posi-
tion, straighten, remove, and discard cotter pin
from right end of torsion rod (RH end cap). See
(FIG. 24).
Removing cotter pins will release the fac-
tory preset tension. To facilitate removal,
you may need to twist the fabric roller tube
(as if unrolling awning) by pulling the bot-
tom of tube toward you while pulling on
cotter pin.
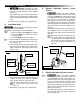
FIG. 24
RH End Cap
Cotter Pin
Awning
Safety Lock
F. Release 8300 Awning Preset Tension
1. IMPACT OR PINCH HAZARD.
Do NOT remove nail from torsion rod (at end
cap) until BOTH arm caps are secured to cor-
responding main arms, and awning safety lock
lever is in roll down position. Otherwise, rapid
casting spin off will occur. Spring tension will at-
tempt to close the awning quickly and unexpect-
edly. Failure to obey this warning could result in
death or serious injury.
With awning safety lock in roll down position, re-
move nail from right end of torsion rod (RH end
cap). See (FIG. 25).