
Installation Guide


12
a. If there is misalignment, make adjustments
accordingly.
b. Cycle awning again to check alignment.
3. Ensure arm assemblies are still positioned cor-
rectly (directly in front of top brackets), then
mark location of awning edges on awning rail.
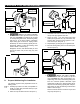
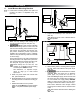
4. Pull one edge of awning fabric approximately
6.35mm beyond marked position. Then secure
with #6 X 7/16″ TEK screw through awning rail
(approximately 50.8mm from fabric edge). See
(FIG. 26).
FIG. 26
50.8mm
Awning Rail
Fabric Edge
#6 X 7/16″
TEK Screw
5. Pull to stretch opposite edge of awning fabric
approximately 19.05mm. Then secure with #6 X
7/16″ TEK screw through awning rail (approxi-
mately 50.8mm from fabric edge).
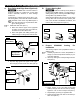
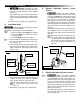
Removing nails will release the factory
preset tension. To facilitate removal, you
may need to twist the fabric roller tube (as
if unrolling awning) by pulling the bottom
of tube toward you while pulling on nail.
a. Hold strap securely.
b. Rotate awning safety lock to roll up position,
allowing awning to roll up against RV sur-
face.
FIG. 25
RH End Cap
Awning
Safety
Lock
Nail
G. Secure Awning Fabric to Awning Rail
1. PINCH HAZARD. Maintain a
horizontal distance of at least 406.4mm between
fully open awning and any permanent object.
Failure to obey this caution could result in injury.
Open an close awning four or ve times to allow
for natural self adjustment of awning fabric. See
Operating Instructions.
2. Verify alignment of awning fabric, and awning
hardware.
INSTALL AWNING
VERIFY INSTALLATION
A. Test Operation
Operate awning according to Operating Instruc-
tions to verify all parts are functioning correctly.
B. Secure Awning for Travel
1. Fully close awning. See "Close Awning" in Oper-
ating Instructions.
2. Verify awning is secure for travel. See "Prepare
Awning For Travel" in Operating Instructions.
C. Keep Literature
Instructions contain valuable information for prod-
uct use and consumer safety.
Keep BOTH the Installation and Operat-
ing Instructions with product.