
Installation Guide


7
PREPARE FOR INSTALLATION
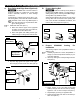
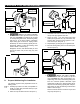
a. With both hardware arms secured to FRTA
and front of arms down, rotate left arm clock-
wise slightly to release pressure from nail.
b. Remove nail and lower arm.
FIG. 9
Nail
LH End Cap
E. Determine Awning Location
1. IMPACT OR CRUSH HAZARD.
Make sure mounting surface on RV is at, has
solid structural backing where fasteners pene-
trate surface, and will safely and securely sup-
port product. Otherwise, product may become
unstable and could detach, bend, or collapse.
Failure to obey this warning could result in death
or serious injury.
Find a solid structure in RV wall for support of
top mounting brackets.
Install back channels on a at
surface, level, and keep parallel with each other
to ensure correct function and appearance.
The relationship between solid structure and
awning rail will determine location of top mount-
ing brackets. Possible positions for top mounting
brackets include:
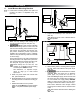
● Mounting OVER awning rail. See (FIG. 10).
Do NOT use this position if top mount-
ing brackets will contact rubber cap
molding on RV (roof with rounded cor-
ners).
● Mounting BELOW awning rail. See (FIG. 11).
● Mounting ON awning rail. See (FIG. 12).
Install top bracket spacers if awning
rail is too wide (has drip channel) and
interferes with top mounting brackets.
See (FIG. 13)
See subsection, "A. Optional Com-
ponents" on page (3) to order top
bracket spacers.
FIG. 10
Top
Mounting
Bracket
Mounting Over Rail
Awning
Rail
FRTA
FIG. 11
Top
Mounting
Bracket
Mounting Below Rail
Awning
Rail
FRTA
FIG. 12
Mounting On Rail
Top
Mounting
Bracket
Awning
Rail
FRTA