
Installation Guide


8
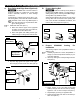
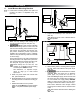
FIG. 14
Arm Assemblies
FIG. 13
Top Mounting
Bracket
Awning Rail
With Drip
Channel
Top Bracket
Spacer
2. Make sure arm assemblies do not restrict use of
doors, windows, etc. See (FIG. 14).
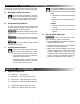
PREPARE FOR INSTALLATION
INSTALL AWNING
A. Insert Awning Fabric Into Awning Rail
1. With awning safety lock in roll down position, un-
furl awning fabric 1 revolution.
Unfurling 1 revolution will allow enough
space between RV wall and awning hard-
ware to guide fabric as it is inserted into
awning rail.
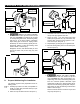
2. LIFTING HAZARD. Use proper
lifting technique and control when lifting product.
Failure to obey this caution could result in injury.
With one person grasping each arm assembly,
carefully lift entire awning assembly upright.
Then carry awning to prepared (ared) awning
rail end. See (FIG. 15).
FIG. 15
Awning
Rail
Arm
Assembly
FRTA
3. While one person guides awning fabric into aw-
ning rail, carefully move (carry) awning assem-
bly to predetermined location. See (FIG. 15).
To determine correct awning location, see
subsection, "E. Determine Awning Loca-
tion" on page (7).
A stepladder may be necessary to reach
awning rail.
At least two other people are required to
hold and control awning hardware until:
● both top mounting brackets are cor-
rectly installed;
● both bottom mounting brackets are
correctly installed;
● both patio feet are securely latched
into bottom mounting brackets.
B. Install Top Mounting Brackets
1. When awning is in predetermined location, ex-
tend both adjustable arms down to help support
awning assembly.
To determine correct awning location, see
subsection, "E. Determine Awning Loca-
tion" on page (7).
a. Pull lift handle out and CAREFULLY extend
adjustable arm until patio foot contacts oor /
ground. See (FIG. 16).
b. With FRTA at same height (approximately)
as awning rail, release lift handle to lock in
position. See (FIG. 11) & (FIG. 16).
c. Repeat steps (a) through (b) for opposite
side.