
Service manual

14
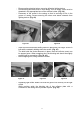
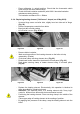
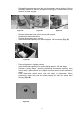
- Turn metal casing of boiler-insulation so that the joint rim becomes visible.
- While slightly pressing the metal casing of the boiler-insulation, detach the
rims. (Fig. 55)
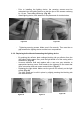
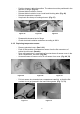
- Turn out insulation – metal casing and rock wool together – from under the
boiler. (Fig. 56)
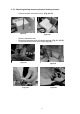
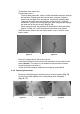
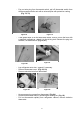
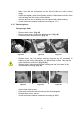
- Loosen screw securing the element, pull out heating element upwards. If
the heating element is jammed in the heating tube, then push it out from
below with a screwdriver. (Fig. 57, 58)
- Installing the new heating element is done in reverse order. The
heating element must be securely fixed. (It must not slide out at 100 N
axially tractive effort.)
- Attention ! The electrical power of a heating element with ”fuzzy logic”
control is different from those with electromechanical control!
- The boiler-insulation can be reinserted by turning it in. The rims must be
snapped together by slightly pressing the metal casing.
- Turn in boiler-insulation so that the securing bore is in the correct position.
- Attach boiler-insulation to back panel with securing screw.
- Adjust wires.
- Connect electrical connections at the appropriate points.
- In appliances with ”fuzzy logic” control, snap back the printed circuit board
into the base board. When replacing, make sure that the driving shaft
jointing fits in the potentiometer’s bore.
- Secure wire clamp.
- Reinsert electrical cover, secure with screws.
Figure 55 Figure 56
Figure 57 Figure 58