MOBILE COOLING CFX3 PROTECTIVE COVERS CFX3-PC35, CFX3-PC45, CFX3-PC55, CFX3-PC75, CFX3-PC95, CFX3-PC100 EN CFX3 Protective Covers Installation Manual. . . . . . . . . . . . . . . . . . . . . 2 WARNING Cancer and Reproductive Harm www.P65Warnings.ca.gov Form No. 3317446.
Contents CFX3 Protective Covers Service Center & Dealer Locations Visit: www.dometic.com Read these instructions carefully. These instructions MUST stay with this product. Contents 1 Explanation of Symbols and Safety Instructions . . . . . . . . . . . . . . . . . . . . . . . . . . . . . 2 1.1 Recognize Safety Information. . . . . . . . . . . . . 2 1.2 Understand Signal Words. . . . . . . . . . . . . . . . 2 1.3 Supplemental Directives. . . . . . . . . . . . . . . . .
CFX3 Protective Covers Installation • Damage to the product resulting from mechanical influences and excess voltage • Alterations to the product without express permission from the manufacturer • Use for purposes other than those described in the operating manual q q Dometic Corporation reserves the right to modify appearances and specifications without notice.
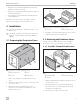
Installation CFX3 Protective Covers 3.2.2 For CFX3 55, CFX3 75, CFX3 95, and CFX3 100 Coolers e w w e r r q 4 Attaching the Soft Cover to the Molded Panel q Soft Cover w Handle Tab e Zipper r Molded Panel q 6 Aligning the Molded Panel (CFX3 75 shown) q Molded Panel w Cooler 4. Position one end of the soft cover. 5. Release the handle tab. 6. Attach the zipper between the soft cover and the molded panel on one side. e Display r Handle Tab 1.
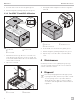
CFX3 Protective Covers Installation 4. Begin fitting the next molded panel onto the opposite end of the cooler by starting the zipper: attach the zipper between the soft cover and the molded panel, then pull the zipper down a short distance. 5. Finish fitting the molded panel to the cooler. 6. Fully close the zipper. 7. Fully close the zipper on the display end. 2. Position the lid cover in alignment with the latch clearance slot. 3. Insert the lid cover hooks into the gasket groove. 4.
Maintenance CFX3 Protective Covers 3. Insert the lid cover hooks into the gasket groove. 4. Refit the lid gasket, pushing it fully into the groove. 3. Gently pull out the lid gasket on the two long sides of the lid. 3.3.3 For CFX3 75 and CFX3 95 Coolers q w e q e w 14 Attaching the Lid Cover q Lid Cover w Lid Cover Hook 12 Aligning the Lid Covers (CFX3 75 shown) q Lid Cover w Cooler Lid e Location Tab 1.
CFX3 Protective Covers Warranty Information 6 Warranty Information 6.3 All Other Regions Refer to the sections below for information about warranty and warranty support in the US, Canada, Australia, New Zealand, and all other regions. The statutory warranty period applies. If the product is defective, please contact the manufacturer’s branch in your region or your retailer (see the back of this instruction manual for the web addresses to locate your region or retailer). 6.
Mobile living made easy. dometic.com YOUR LOCAL DEALER YOUR LOCAL SUPPORT YOUR LOCAL SALES OFFICE dometic.com/dealer dometic.com/contact dometic.