FREEZER/REFRIGERATOR F400 0402 GB Operating Instructions 207.5082.
Please read these operating instructions carefully before putting the refrigeration unit into operation. If you later sell or dispose of it, please ensure that the new owner receives these operating instructions. Thank you for choosing our appliance. We are sure it will provide you with trouble-free use.
CONTENT S 1. 2. 3. 4. 5. 6. 7. 8. 9. 10. 11. Unpacking View of the appliance Cleaning Positioning the appliance Using the appliance 5.1. From electrical mains 5.2. From vehicle battery 5.3. From bottled gas Useful suggestions Defrosting, cleaning and maintenance Customer service Putting into operation, technical data 9.1. Connecting to electrical mains 9.2. Connecting to vehicle battery 9.3. Connecting to as cylinder 9.4.
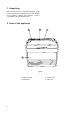
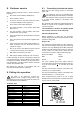
1. Unpacking After removal from the cardboard packaging, make sure the appliance is not damaged. If you find damage to the appliance resulting from transport, report it immediately to the transportation firm. 2. View of the appliance Figure 1. 4 1. insulated casing 3. control panel 2. insulated lid 4.
3. Cleaning Clean both the inside and outside of the appliance before putting it into use. To do so, use a soft towel, lukewarm water and a non-abrasive detergent. Ensure water does not enter the rear cover grille or the control elements. Afterwards, wipe the appliance with a clean towel and cleanwater, and then wipe it dry. To avoid damage, do not use soap, soda or abrasive cleaners. 4.
5.2. Operating from 12 Volt vehicle battery Make sure the voltage shown on the data plate of the appliance matches the voltage of the vehicle battery (12V). In 12V operation, the appliance runs continuously without temperature control. The appliance is supplied with a matching pair of 12 Volt MALE + FEMALE plugs (see 9,2 connection to vehicle power source). For 12V operation, make sure, if the engine is not running, that the plug must be disconnected (see fig. 7).
6. Useful suggestions When setting out on a trip, run the appliance on 230 V (in thermostat setting between min and max for cooling and "max" for freezing) for 24 hours prior to departure. Place food in a precooled condition into the appliance. Frost forms on the evaporator panel when in operation. When opening the lid or putting in food, some of this frost melts and collects in the form of water on the bottom of the appliance. Wipe the water off occasionally using a sponge.
. Customer service 9.
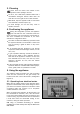
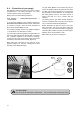
.2 CONNECTING TO VEHICLE BATTERY Make sure no other energy source is connected (gas, 230V). The 12V female socket is on the backwall of the appliance, while the suitable male plug with a 2,5m long wire is an accessory supplied with your new appliance. Make the connection to 12 volt vehicle battery by a professional vehicle service the following way: Figure 6. The free end of the cable must be connected to positive and negative pole of the battery.
9.4 Connection of gas supply (The following instructions refer in the main to coolers manufactured in the United Kingdom. For other countries please refer to your supplier.) Always connect in the following sequence: GAS BOTTLE → PRESSURE-REGULATOR → → APPLIANCE. To connect the appliance to the pressure-regulator an APPROVED GAS TUBING should be used. This should be minimum in length - have an inside dimension of 8mm and be marked BS3212/2/8.
10. Environmental protection information The appliance does not contain any CFCs/HCFCs. Ammonia (natural hydrogen and nitrogen compound) is used as a refrigerating agent in the refrigeration unit. The ozone-friendly cyclopentane is activated as a motive agent for the PU foam insulation. Sodium chromate is used for corrosion protection (less than 2 weight % of the coolant). 11. Recycling After unpacking the appliance, the packing materials should be delivered to a local collection site.
Printed by Xerox Hungary Ltd. Rev.:2003. 12. 17.