INSTRUCTIONS for USE INSTALLATION INSTRUCTIONS miniBar HiPro 3000 HiPro 4000 HiPro 6000 ENGLISH Type H20 / 60 821 2660-01 T.B.
TABLE OF CONTENTS 1.0 INTRODUCTION 3 2.0 FOR YOUR SAFETY 3 2.1 2.2 Warnings and Safety Advice Coolant 3 3 3.0 WARRANTY AND CUSTOMER SERVICE 3 4.0 INSTALLATION 4 5.0 4.1 4.2 4.3 4.4 4.5 4.6 4.7 The Purpose of this Manual Tools/Materials Required Unpacking Cleaning Installation Securing Connecting the Device to the Electricity Supply 4.8 Changing the Sliding Hinge 4.9 Changing the Doorhang 4.10 Decor Panel 8 9 10 INSTRUCTION FOR USE 11 5.1 5.2 5.3 5.4 5.5 5.6 5.7 5.8 5.9 5.10 5.11 5.
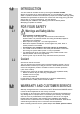
1.0 INTRODUCTION You have made an excellent choice by choosing the Dometic miniBar. We are convinced that you will be satisfied with your new appliance in every way. Silent in operation because of the Absorption principle, the miniBar fulfils high quality standards and guarantees an efficient use of resources and energy during its entire working life, i.e. during manufacturing, use and disposal. Please study the installation and operating instructions carefully before attempting to operate the miniBar. 2.
MLC-Code and serial number ! You can find this information on the model label inside the device. e.g. 4.0 4.1 HiPro 3000 INSTALLATION The Purpose of this Manual The manual shows you how to: install the miniBar correctly. operate the miniBar correctly. guarantee the miniBar´s correct maintenance and functioning. deal with faults by yourself. 4.2 Tools / Materials Required You will need the following tools for initial operation: mild detergent 4.
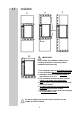
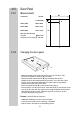
4.5 Installation 200 cm² 20 mm IMPORTANT: Please follow the installation details below carefully. Guarantee is valid for products installed as described only. 1. The refrigerator must be level both directions. 2. There should be 20mm clearance to the wall. 3. Ventilation must be provided as shown in alternatives A, B, C or D. 4. The ventilation duct must at least measure 105mm x the width of the refrigerator. 5. Only the entire cooling unit must project into the duct as shown.
4.6 Securing The miniBar can be screwed to the furniture using the fittings at the bottom. Drive in the screws and place the caps on. 4.7 Connecting the Device to the Electricity Supply The device must be connected to a properly earthed socket in line with the relevant valid country regulations. The mains plug/socket must be freely accessible. Check prior to initial operation that the voltage noted on the model label corresponds to the mains voltage.
4.7.1 Attention: For GB only ! Plug connection for United Kingdom only If a 3-pin plug is used, it should be fitted with a 3 amp fuse, with other plug types, the circuit should contain a 5 amp fuse. Warning - This appliance must be earthed.
4.8 Changing the Sliding Hinge 1. 2. 1. 2. 3. 4. Distance to cupboard door (A) 1. mm A 2. mm 1. When closed, the cupboard door (A) must not lie against the rest of the surrounding cupboard area (distance 1-2mm). 2. There must be a distance of 6-8mm between the cupboard door and the miniBar.
4.9 Changing the Doorhang (optional) LED door-opening control always opposite the hanging side device with feet LED If the miniBar is equipped with the LED first carry out steps a. - e. : a. Pull out LED, lay the cable into the cable routing and insert the LED at the opposite side. d. d. + e. device with feet e. b. c. Pull the lower hinges forwards, pull out the door with the hinge. 1. 3. 2. Remove the upper hinge pin and insert on the other side, change the lower pin in the door.
4.10 Decor Panel 4.10.1 Measurements Thickness W 0,4 mm H x W (mm) HiPro 3000 492 x 294,5 HiPro 4000 524 x 311,5 HiPro 6000 533 x 376,5 h a H Hole for door lock (a) diameter O 23,5 mm distance from the edge (h) 62 mm 4.10.2 Changing the decor panel A C B - Detach the lower door hinge and pull the door out (see also "4.9"). Remove the holder for the lock (A) (mounted). Detach the lower frame section (B) (not screwed) and remove.
5.0 5.1 INSTRUCTION for USE Initial Operation The device must be plugged into a properly earthed socket. The miniBar starts automatically with a selftest. If the electronics do not detect any fault, the LED for the interior lighting illuminates for 2 seconds after approximately 10 seconds. If a fault is detected, the illumination changes to a continuous flashing light. If this occurs, please consult your authorised Customer Service.
5.5 Positioning of the Storage Rack 1. - Pull out the storage rack until it is blocked. - Press in the lock of both running rails. - Remove storage rack and running rails and place it at the desired position. - After clicking in the the storage rack it is secured against pulling out completely again. 2. 5.6 3. 4. Interior Light Two LEDs (A) light the cooling compartment whilst the door is opened. B Two sensors (B) control the LEDs and the (optional) door control as well. 5.
5.8 Check List Failure : No cooling (the aggregate at the back of the device is cold). Possible Cause Self Help a.) The device plug is not plugged in. a.) Plug in device plug. b.) No voltage in socket. b.) Check main fuse. Authorised Service c.) The electronics or the sensor is faulty. Does the LED flash ? c.) Install new electronics or sensor. d.) Defective heating element. d.) Install new heating element. e.) The device is in its defrosting phase. e.) See operating instruction 5.
5.
5.11 Environmental Advice miniBars manufactured by Dometic GmbH are free from CFCs / HCFCs and fluorinated hydrocarbons. The cooling unit uses ammonia as the coolant (a natural compound of hydrogen and nitrogen). Cyclopentane, which does not damage the ozone layer, is used as propellant for the insulation made from PU-foam. 5.12 Disposal In order to ensure the re-use of recyclable packaging materials, these must be disposed of using local collection systems.
Dometic GmbH In der Steinwiese 16 D-57074 Siegen www.dometic.de/minibar www.dometic.