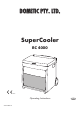
DOMETIC PTY. LTD. SuperCooler RC 4000 0402 Operating Instructions 207.5359.
Please read these operating instructions carefully before putting the refrigeration unit into operation. If you later sell or dispose of it, please ensure that the new owner receives these operating instructions. Thank you for choosing our appliance. We are sure it will provide you with trouble-free service.
CONTENT S 1. 2. 3. 4. 5. 6. 7. 8. 9. 10. 11. 12. 13. Unpacking View of the appliance Cleaning Positioning the appliance Using the appliance 5.1. From 240 Volt electrical mains 5.2. From 12 Volt vehicle battery 5.3. From LP bottled gas Mounting the wheels Making ice Useful suggestions Defrosting, cleaning and maintenance Trouble shooting Putting into operation, technical data 11.1. Connecting to 240 Volt electrical mains 11.2. Connecting to 12 Volt vehicle battery 11.3.
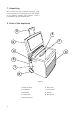
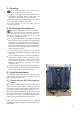
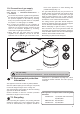
1. Unpacking After removal from the cardboard packaging, make sure the appliance is not damaged. If you find damage to the appliance resulting from transport, report it immediately to the transportation firm. 2. View of the appliance 3 5 7 2 4 9 6 1 8 Figure 1. 1. Insulated casing 6. Rear cover 2. Insulated lid 7. Ice-tray shelf 3. Pull handle 8. Wheels 4. Control panel 9. Storage net 5.
3. Cleaning Clean both the inside and outside of the appliance before putting it into use. To do so, use a soft towel, lukewarm water and a non-abrasive detergent. Ensure water does not enter the rear cover grille or the control panel. Afterwards, wipe the appliance with a clean towel and clean water, and then wipe it dry. To avoid damage, do not use soap, soda or abrasive cleaners. 4.
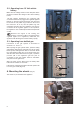
5.2. Operating from 12 Volt vehicle battery Make sure the voltage shown on the data plate of the appliance matches the voltage of the vehicle battery (12 V). 12V DC voltage appliances are equipped with connectors that can be plugged into cigarette lighters (Figure 3.). For some types of vehicles, you may need to remove the red plastic ring located on the end of the connector. To do so, turn the plastic ring anticlockwise and pull it off. The appliance can then be connected to the cigarette lighter.
. Making ice The ice-tray holder and ice-tray accessories delivered with the appliance allow ice cubes to be made. To do so, first insert the ice-tray holder panel into the groove of the plastic holder. Make sure the perforated part of the panel enters the groove (Figure 6). Next, fill the ice tray with water (up to about 4 mm below the edge) and put on the cover. Figure 6. Place the ice tray on the ice-tray holder, so that its outer edge is below the edge of the plastic cover (Figure 7).
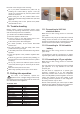
Removal of the storage net the cleaning: Te 5 pcs plastic rivetsshould be pulled out by pressing the central shift by approx. 5mm (by means of a pen) (figure 8), then the plastic rivets should be removed. Before fixing the net the pressed shifts of the plastic rivets should be fully pressed back. (till click) (figure 9). The protruding ends of the placed back plastic rivets should be hit in. Figure 8. Figure 9. 10.
11.4 Connection of gas supply Always connect in the following sequence: GAS BOTTLE → PRESSURE-REGULATOR → → APPLIANCE. To connect the pressure regulator to the gas bottle, the valve of the gas bottle must be closed. Connect the pressure regulator to the bottle by screwing firmly. The pressure regulator must be compatible for propane 11" water gauge. (2.75KPA) To connect the appliance to the regulator an approved flexible gas hose must be used, this hose should be of a minimum length.
Printed by Xerox Hungary Ltd. 2004. 02. 18.