R Portable Refrigerator RC 4000 Operating Instructions Mode d'emploi 207.5331.
Please read these operating instructions carefully before putting the refrigeration unit into operation. If you later sell or dispose of it, please ensure that the new owner receives these operating instructions. Thank you for choosing our appliance. We are sure it will provide you with trouble-free use.
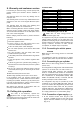
CONTENT S 1. 2. 3. 4. 5. 6. 7. 8. 9. 10. Unpacking View of the appliance Cleaning Installation Using the appliance 5.1. Operating from 120 V AC 5.2. Operating from vehicle battery 5.3. Liquid gas operation Mounting the wheels Useful suggestions Defrosting, cleaning and maintenance Warranty and customer service Putting into operation, technical data 10.1. Connecting to 120 V AC 10.2. Connecting to vehicle power source 10.3. Connecting to gas cylinder 10.4.
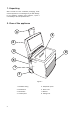
1. Unpacking After removal from the cardboard packaging, make sure the appliance is not damaged. If you find damage to the appliance resulting from transport, report it immediately to the transportation firm. 2. View of the appliance 3 5 2 4 8 6 1 7 Figure 1. 4 1. Insulated casing 5. Evaporator panel 2. Insulated lid 6. Rear cover 3. Pull handle 7. Wheels 4. Control panel 8.
3. Cleaning Clean both the inside and outside of the appliance before putting it into use. To do so, use a soft towel, lukewarm water and a non-abrasive detergent. Ensure water does not enter the rear cover grille or the control elements. Afterwards, wipe the appliance with a clean towel and clear water, and then wipe it dry. To avoid damage, do not use soap, soda or abrasive cleaners. 4.
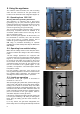
5. Using the appliance The cable for mains connection, the 12V connecting cable and the connector for the gas hook-up are located on the back side of the refrigerator (Figure 3). 5.1. Operating from 120 V AC Warning: Electrical grounding instructions: This appliance is equipped with a three-prong (grounding) plug for your protection against shock hazards and should be plugged directly into a properly grounded three-prong receptable. Do not cut or remove the grounding prong from this plug.
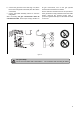
off gas supply. While the button is pushed, this device is temporary inoperative. After finishing the gas operation the gas supply is to be turned off at the gas bottle (Fig. 9.1.). 6. Mounting the wheels (Fig. 6.) The wheel set, found inside the appliance. Just slide the wheels on to the axel and snap in the center hub cap. 7. Useful suggestions When planning a trip, run the appliance on 120 V for 24 hours prior to departure. Place only precooled food in the appliance.
9. Warranty and customer service For warranty or other servicing, such as spare-parts, please contact your Dometic Service Network or Dealer. This warranty does not cover any damage due to improper use. The warranty does not cover any modifications to the appliance or the use of non-original Dometic spareparts. The warranty does not apply if the installing and operating instructions are not adhered to. When contacting Dometic Service Network, please state the model, product number and serial number.
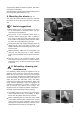
b. connect the gas hose to the inlet (Fig. 9.4) at the back of the refrigerator with tools (see label at the connection) c. put the gas bottle assembly about 10 from the refrigerator. After connecting all gas connections must be checked for leaks. For this put a soapy solution on all gas connections, turn on the gas cylinder manual valve and watch for bubbles. For the detection of leaks never use an open flame.
Wiring Diagram 1. BLACK 2. WHITE 3. GREEN 4. BROWN 1. NOIR 2. BLANK 3. VERT 4. BRUN For Service Center Assistance Call: 800-544-4881 10 USA CANADA Service Office Dometic Distribution Inc.
Printed by Xerox Hungary Ltd. 2004. 06. 14.