MANUAL miniBar RH 136D RH 137D RH 330LD RH 340LD RH 341LD RH 355LD RH 356LD RH 360LD RH 361LD English Type H20 / 60 821 2675 -11 T.D.
TABLE OF CONTENTS 1.0 INTRODUCTION 3 2.0 FOR YOUR SAFETY 3 2.1 2.2 Warnings and Safety Advice 3 Coolants 3 3.0 WARRANTY AND CUSTOMER SERVICE 3 4.0 INSTALLATION 4 4.1 4.2 4.3 4.4 4.5 4.6 4.7 4.8 4.9 5.0 The Purpose of this Manual Tools/Materials Required Unpacking Cleaning Installation Securing Connecting the Device to the Electricity Supply Changing the Sliding Hinge Changing the Doorhang INSTRUCTION FOR USE 5.1 5.2 5.3 5.4 5.5 5.6 5.7 5.8 5.9 5.10 5.11 5.
1.0 INTRODUCTION You have made an excellent choice by choosing the Electrolux miniBar. We are convinced that you will be satisfied with your new appliance in every way. Silent in operation, the miniBar fulfils high quality standards and guarantees an efficient use of resources and energy during its entire working life, i.e. during manufacturing, use and disposal. Please study the installation and operating instructions carefully before attempting to operate the miniBar. 2.0 2.
.0 4.1 4.2 4.3 INSTALLATION The Purpose of this Manual The manual shows you how to: install the miniBar correctly. operate the miniBar correctly. guarantee the miniBar´s correct maintenance and functioning. deal with faults by yourself. Tools / Materials Required You will need the following tools for initial operation: mild detergent Unpacking Check during unpacking that the device is defect-free. Report transport damage to the transport company within 48 hours.
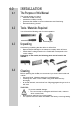
4.5 Installation The following illustrations (A,B,C,D) show four different ways for installing the miniBar. 1 = ventilation grid 2 = air going in 3 = air coming out Note: The ventilation grids (1) must have a clear cross section of at least 200cm2. A.) B.) C.) D.
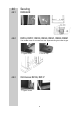
4.6 4.6.1 Securing RH356LDE 1. Tighten screw. 4.6.2 RH136, RH137, RH330, RH340, RH341, RH360, RH361 The miniBar must be screwed onto the cupboard using the lower hinges. 1. Tighten screw. 4.6.3 2. Put on cap. 2. Put on cap. Old Version RH136, RH137 1. Tighten screw.
4.7 Connecting the Device to the Electricity Supply The device must be connected to a properly earthed socket in line with the relevant valid country regulations. Check prior to initial operation that the voltage noted on the model label corresponds to the mains voltage. If this is not the case, do not connect the device and contact your dealer! 4.7.
If the plug supplied on the mains lead is not suitable for the socket in your home, it should be cut off and disposed of safely, or destroyed, to avoid any possible shock hazard resulting from the plug being inserted into a 13 amp socket elswhere in the use. A suitable replacement plug should then be fitted as given above. 4.8 Changing the Sliding Hinge (possible with RH330, RH340, RH341, RH360, RH136, RH137) 2. 1. 1. 2. 3. 4. Distance to cupboard door (A) 1. mm A 2. mm 1.
4.9 Changing the Doorhang ( RH136D, RH137D, RH330, RH340, RH341, RH 360, RH 361) L 1. R 2. 3. 2. 1. 4. 5. 6. 7. R L 1. 2. 8. 12. 9. 10. 13. 9 11.
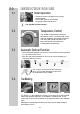
5.0 5.1 INSTRUCTION FOR USE Initial Operation The device must be plugged into a properly earthed socket. The miniBar achieves its operating temperature after several hours. The miniBar operates silently ! 5.2 Temperature Control min. 5.3 max. The miniBar is fitted with an electronic temperature control. The thermostat control button is situated in the internal containers rear area. (RH 355LD, RH 356LD: the thermostat button is situated in the unrefrigerated compartment).
5.5 Automatic Door Control (ADC) The following descriptions only apply to devices with ADC. Using a red dot in the display window (A, point 3), the ADC shows that the miniBar´s door has been opened. 1. Open the miniBar, check its contents and - if applicable- stock it up again. 2. Close the miniBar. RH356 All other models 2. 2. A A 1. 3. Insert ADC key and turn to the right. 1. 3. Insert ADC key and turn to the left. The red dot has disappeared now. 4. Remove ADC key. 5.5.
5.6 5.6.1 Interior Light RH356LD / LDE Model RH356LD is fitted with low voltage lighting. When the door is opened, the light in the cooling shelf is switched on via a sensor. The light in the uncooled storage shelf is switched on manually by means of a switch integrated into the lamp. Changing bulbs: 1. 2. 1. Pull out the mains plug. 2. Remove the reflector disk. 90° 3. Remove the defective bulb. 4. Insert new bulb. 5.Clip reflector disk back in. 5.6.
5.7 5.8 Enviromental Advice miniBars manufactured by Electrolux Siegen are free from CFCs and fluorinated hydrocarbons. The cooling unit uses ammonia as the coolant (a natural compound of hydrogen and nitrogen). Cyclopentane, which does not damage the ozone layer, is used as propellant for the insulation made from PU-foam. Disposal In order to ensure the re-use of recyclable packaging materials, these must be disposed of using local collection systems.
5.11 Check List 1. Problem: No cooling (the aggregate at the back of the device is cold). Possible Cause Self Help a.) The thermostat is set to 0. a.) Set temperature control to middle position. b.) The device plug is not plugged in. b.) Plug in device plug. c.) No voltage in socket. c.) Check building fuse. Authorised Service d.) Defective electronics or sensor feelers. d.) Install new electronics or sensor. e.) Defective heating cartridge. e.) Install new heating cartridge. f.
5.
Electrolux GmbH In der Steinwiese 16 D-57074 Siegen Phone: +49-(0) 271 / 692 0 Fax: +49-(0) 271 / 692 300 www.electrolux.